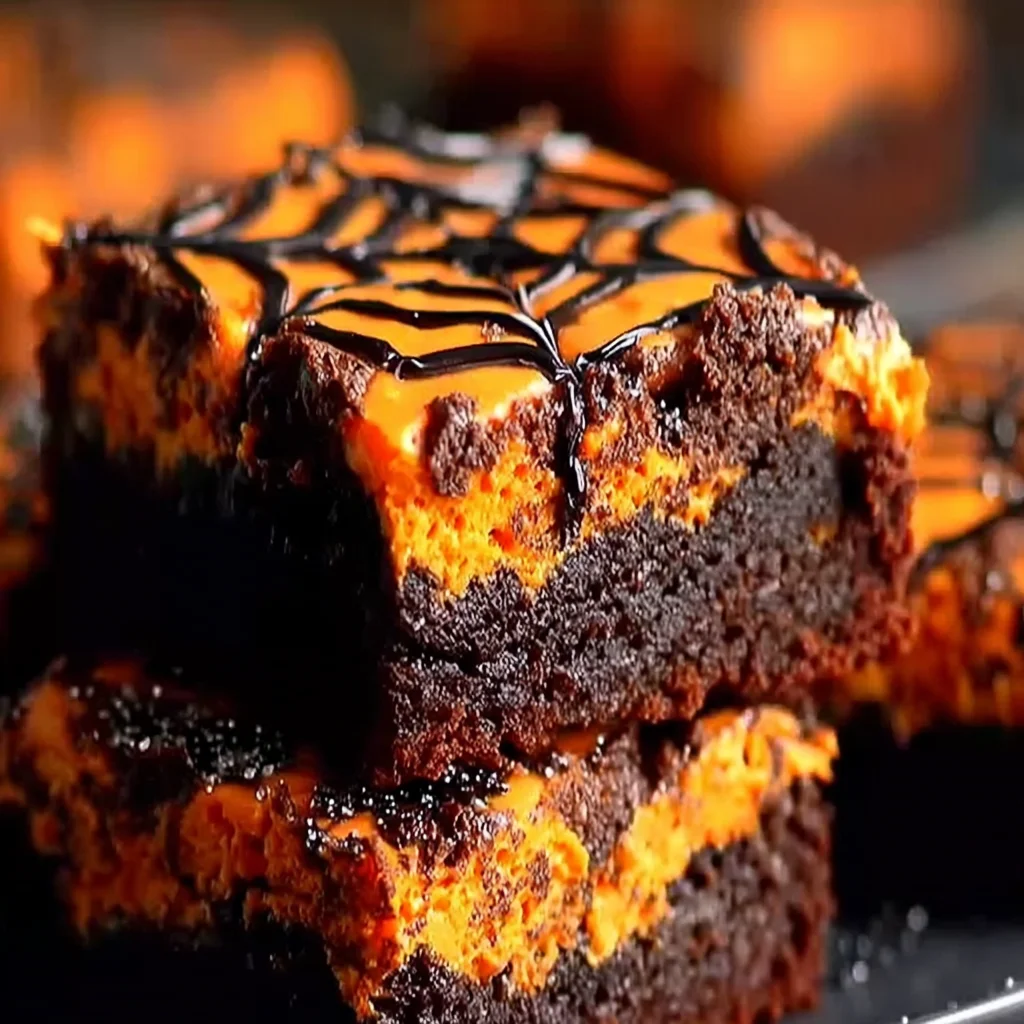
Halloween is just around the corner, and what better way to celebrate than with some deliciously spooky Halloween brownies? These aren’t your average brownies; we’re taking things to the next level with a creepy-crawly spiderweb design made from luscious white chocolate. Imagine the delighted screams (of joy, of course!) as your guests uncover this delightfully decadent treat. These Halloween brownies are perfect for Halloween parties, spooky movie nights, or simply indulging in a little autumnal sweetness. They’re rich, fudgy, and intensely chocolatey, offering the perfect balance of spooky fun and delicious flavor. Prepare to be amazed by how easy it is to create this show-stopping dessert. Get ready to impress your family and friends with your baking skills – these Halloween brownies are guaranteed to be a hit!
Why You’ll Love This Recipe
This Spooky Spiderweb Halloween Brownies recipe isn’t just about the delicious taste; it’s about the experience. These Halloween brownies are more than just a dessert; they’re a work of art, a conversation starter, and a guaranteed crowd-pleaser. Here’s why you’ll absolutely adore this recipe:
- Unbelievably Easy: Despite the impressive presentation, these Halloween brownies are surprisingly simple to make. Even beginner bakers can achieve professional-looking results with minimal effort.
- Rich Chocolate Flavor: The fudgy brownie base is intensely chocolatey, satisfying even the most discerning chocolate lover. We use high-quality cocoa powder for a deep, complex flavor.
- Stunning Visual Appeal: The intricate spiderweb design is undeniably captivating. It adds an element of fun and festivity, making these brownies perfect for any Halloween gathering.
- Customizable: Want to add some extra flair? Feel free to experiment! Add chopped nuts, different types of chocolate chips, or even spooky sprinkles to personalize your Halloween brownies. Check out our other recipes like our Chewy Maple Brown Sugar Cookies for extra autumnal inspiration.
- Perfect for Sharing: These Halloween brownies are ideal for sharing with friends, family, or colleagues. They’re a guaranteed hit at any Halloween party or gathering.
- Make-Ahead Friendly: You can bake the brownies ahead of time and decorate them just before serving, saving you time and stress on the day of your event.
Why You Should Try This Recipe
In a world of countless Halloween treats, these Spooky Spiderweb Halloween Brownies stand out for their unique combination of ease, elegance, and deliciousness. Here’s why you should definitely give this recipe a try:
- Impress Your Guests: These Halloween brownies are sure to wow your guests. The intricate spiderweb design adds a touch of sophistication and whimsy, making them a memorable treat.
- Perfect for All Skill Levels: Whether you’re a seasoned baker or a kitchen novice, this recipe is straightforward and easy to follow. The detailed instructions and helpful tips ensure success for everyone.
- Versatile Dessert: These Halloween brownies are adaptable to various dietary needs. See our tips section for gluten-free and vegan adaptations. Pair them with a scoop of vanilla ice cream, or enjoy them on their own for a perfect Halloween indulgence.
- Unique and Memorable: These aren’t your average store-bought brownies. They’re a unique and memorable treat that will leave a lasting impression on your guests and elevate your Halloween celebrations.
- Halloween Fun for Everyone: The spooky spiderweb design makes these brownies a fun and festive addition to any Halloween gathering, perfect for both kids and adults. For more delicious Halloween recipes, you can explore our collection on Recipesamaya.com
- Cost-Effective: The ingredients are readily available and affordable, making these Halloween brownies a budget-friendly option for your Halloween festivities.
Ingredients and Necessary Utensils
Creating these hauntingly delicious Halloween brownies requires both the right ingredients and the right tools. Let’s delve into the specifics:
Ingredients for the Halloween Brownies:
- 1 cup (2 sticks) unsalted butter, softened – *Use high-quality butter for the best flavor. Room temperature butter is crucial for proper creaming.*
- 1 ¾ cups granulated sugar – *Granulated sugar provides the sweetness and helps create the fudgy texture.*
- 4 large eggs – *Eggs bind the ingredients and add richness to the brownies.*
- 1 teaspoon vanilla extract – *Vanilla extract enhances the overall flavor of the brownies.*
- 1 cup all-purpose flour – *All-purpose flour provides the structure for the brownies.* Consider using gluten-free all-purpose flour blend for a gluten-free alternative.
- ½ cup unsweetened cocoa powder – *Use a high-quality unsweetened cocoa powder for a rich chocolate flavor.* Dutch-processed cocoa powder will give a darker, less acidic brownie.
- ½ teaspoon baking powder – *Baking powder helps the brownies rise slightly.*
- ¼ teaspoon salt – *Salt balances the sweetness and enhances the chocolate flavor.*
- 1 cup semi-sweet chocolate chips (optional) – *These add extra chocolatey goodness and texture.* You can use dark chocolate chips, milk chocolate chips, or a combination for variety.
Ingredients for the Spiderweb:
- White chocolate candy melts – *These are specifically designed for melting and piping, making them ideal for creating the spiderweb design.*
Necessary Utensils:
- 9×13 inch baking pan – *This size pan is perfect for making these brownies.*
- Electric mixer (handheld or stand mixer) – *An electric mixer makes creaming the butter and sugar much easier and faster.*
- Large mixing bowls (at least two) – *One for the wet ingredients and one for the dry ingredients.*
- Whisk – *For whisking together the dry ingredients.*
- Rubber spatula or wooden spoon – *For folding in the dry ingredients and chocolate chips.*
- Wooden skewer or toothpick – *For checking if the brownies are done.*
- Piping bag or zip-top bag with a small corner snipped off – *For piping the melted white chocolate.*
- Toothpick or thin knife – *For creating the spiderweb design.*
- Measuring cups and spoons – *For accurate measurements.*
- Parchment paper (optional) – *To line the baking pan for easy removal.*
Detailed Recipe Steps
Now, let’s embark on the journey of crafting these spooky Halloween brownies:
- Preheat & Prepare: Preheat your oven to 350°F (175°C). Grease and flour a 9×13 inch baking pan. Lining the pan with parchment paper, leaving an overhang on the sides, makes removing the brownies easier.
- Cream Butter & Sugar: In a large bowl, cream together the softened butter and sugar until light and fluffy. **This is crucial for a tender brownie.** Use an electric mixer for best results. This step incorporates air into the batter, resulting in a lighter and fluffier texture.
- Add Eggs & Vanilla: Beat in the eggs one at a time, ensuring each egg is fully incorporated before adding the next. Then, stir in the vanilla extract. **Scrape down the sides of the bowl to ensure everything is well combined.**
- Combine Dry Ingredients: In a separate bowl, whisk together the flour, cocoa powder, baking powder, and salt. **Whisk thoroughly to prevent lumps.** This ensures even distribution of the dry ingredients in the batter.
- Combine Wet & Dry: Gradually add the dry ingredients to the wet ingredients, mixing on low speed until just combined. **Be careful not to overmix.** Overmixing develops gluten and can lead to tough brownies.
- Add Chocolate Chips (Optional): If using, gently fold in the chocolate chips. **Use a spatula to fold, rather than stir, to prevent breaking the chocolate chips.**
- Pour & Bake: Pour the batter into the prepared pan and spread evenly. Bake for 25-30 minutes, or until a wooden skewer inserted into the center comes out with moist crumbs attached (it shouldn’t be completely clean). **Start checking for doneness around 25 minutes.** Oven temperatures vary, so keep an eye on your brownies.
- Cool Completely: Let the brownies cool completely in the pan before frosting. **Cooling completely is important for the spiderweb design to hold its shape.** You can speed up the cooling process by placing the pan on a wire rack.
- Melt White Chocolate: Once the brownies are completely cool, melt the white chocolate candy melts according to package directions. You can do this in a double boiler, microwave, or using a candy melting pot. **Be careful not to overheat the chocolate, as this can cause it to seize.**
- Create the Spiderweb: Transfer the melted chocolate to a piping bag or a zip-top bag with a small corner snipped off. Pipe concentric circles of melted chocolate onto the brownies, starting from the center and working your way outwards. Then, using a toothpick or thin knife, drag lines from the center outwards through the chocolate circles to create the spiderweb effect. **Work quickly, as the chocolate will start to set.**
- Set & Serve: Allow the spiderweb to set completely before cutting and serving the Halloween brownies. For extra spookiness, consider adding plastic spiders to your creation. For a variation, try adding some edible Halloween sprinkles before the white chocolate sets.
Tips and Variations
Elevate your spooky baking experience with these helpful tips and creative variations:
- For extra fudgy brownies: Underbake the brownies slightly. The brownies will continue to set as they cool.
- For chewier brownies: Use less flour.
- For a richer chocolate flavor: Use dark chocolate cocoa powder or add a tablespoon of instant espresso powder to the batter.
- Gluten-free adaptation: Substitute all-purpose flour with a gluten-free blend designed for baking. You may need to adjust the amount slightly, as gluten-free blends can absorb liquid differently. Test a small batch first.
- Vegan adaptation: Replace butter with vegan butter and eggs with flax eggs (1 tbsp flaxseed meal mixed with 3 tbsp water per egg). Ensure your chocolate chips are also vegan.
- Add-ins: Get creative with add-ins! Try chopped nuts, pretzels, different types of chocolate chips, or even spooky Halloween sprinkles.
- Storage: Store leftover Halloween brownies in an airtight container at room temperature for up to 3 days or in the refrigerator for up to a week.
- Frosting Options: While the spiderweb is beautiful on its own, a simple chocolate ganache or cream cheese frosting can add an extra layer of flavor and decadence.
Nutritional Values and Benefits
While indulging in these Halloween brownies, it’s good to be mindful of their nutritional content. A single serving (approximately 1/12th of the 9×13 inch pan) contains approximately:
- Calories: Around 300-350 calories (depending on the specific ingredients used)
- Protein: Around 3-4 grams
- Fat: Around 15-20 grams (mostly from butter and chocolate)
- Carbohydrates: Around 35-40 grams (mostly from sugar and flour)
Note: These are estimates, and the actual nutritional values may vary slightly depending on the specific ingredients used.
Benefits of Ingredients:
- Cocoa powder: Rich in antioxidants, which can help protect cells from damage.
- Dark Chocolate (if used): Contains flavanols, which have potential heart-health benefits.
- Butter: Provides fat-soluble vitamins and contributes to the rich texture of the brownies.
Remember that moderation is key when enjoying any treats, especially those that are high in sugar and fat. Enjoy these Halloween brownies as part of a balanced diet.
FAQs
How long do Halloween brownies last?
Can I make these Halloween brownies ahead of time?
What are some creative ways to decorate Halloween brownies besides the spiderweb?
Are these Halloween brownies suitable for kids?
Can I freeze these Halloween brownies?
Conclusion
These Spooky Spiderweb Halloween Brownies are more than just a recipe; they’re an experience. From the rich, decadent chocolate flavor to the captivating spiderweb design, these brownies are guaranteed to be a hit at your next Halloween gathering. The detailed instructions and helpful tips make it easy for bakers of all levels to create this impressive dessert. So, gather your ingredients, put on your Halloween apron, and get ready to create some spooky deliciousness!
We’d love to see your creations! Share your photos on social media using #SpookySpiderwebBrownies and tag us! Don’t forget to leave a comment below and let us know how your Halloween brownies turned out. Happy baking, and happy Halloween! For more delicious recipes and baking inspiration, visit our blog at Recipesamaya.com and check out our other Halloween treats!
For more amazing Halloween dessert ideas, check out our Pinterest board: Recipesamaya’s Halloween Treats on Pinterest.
Spooky Spiderweb Halloween Brownies
Ingredients
Equipment
Method
- Preheat oven to 350°F (175°C). Grease and flour a 9x13 inch baking pan.
- Cream together the softened butter and sugar until light and fluffy using an electric mixer.
- Beat in the eggs one at a time, then stir in the vanilla extract.
- In a separate bowl, whisk together the flour, cocoa powder, baking powder, and salt.
- Gradually add the dry ingredients to the wet ingredients, mixing until just combined. Do not overmix.
- Gently fold in the chocolate chips (if using). Pour batter into the prepared pan and spread evenly.
- Bake for 25-30 minutes, or until a wooden skewer inserted into the center comes out with moist crumbs.
- Let cool completely. Melt white chocolate melts. Transfer to a piping bag and pipe concentric circles onto the cooled brownies. Drag a toothpick outwards to create a spiderweb.
- Let the spiderweb set completely before cutting and serving.