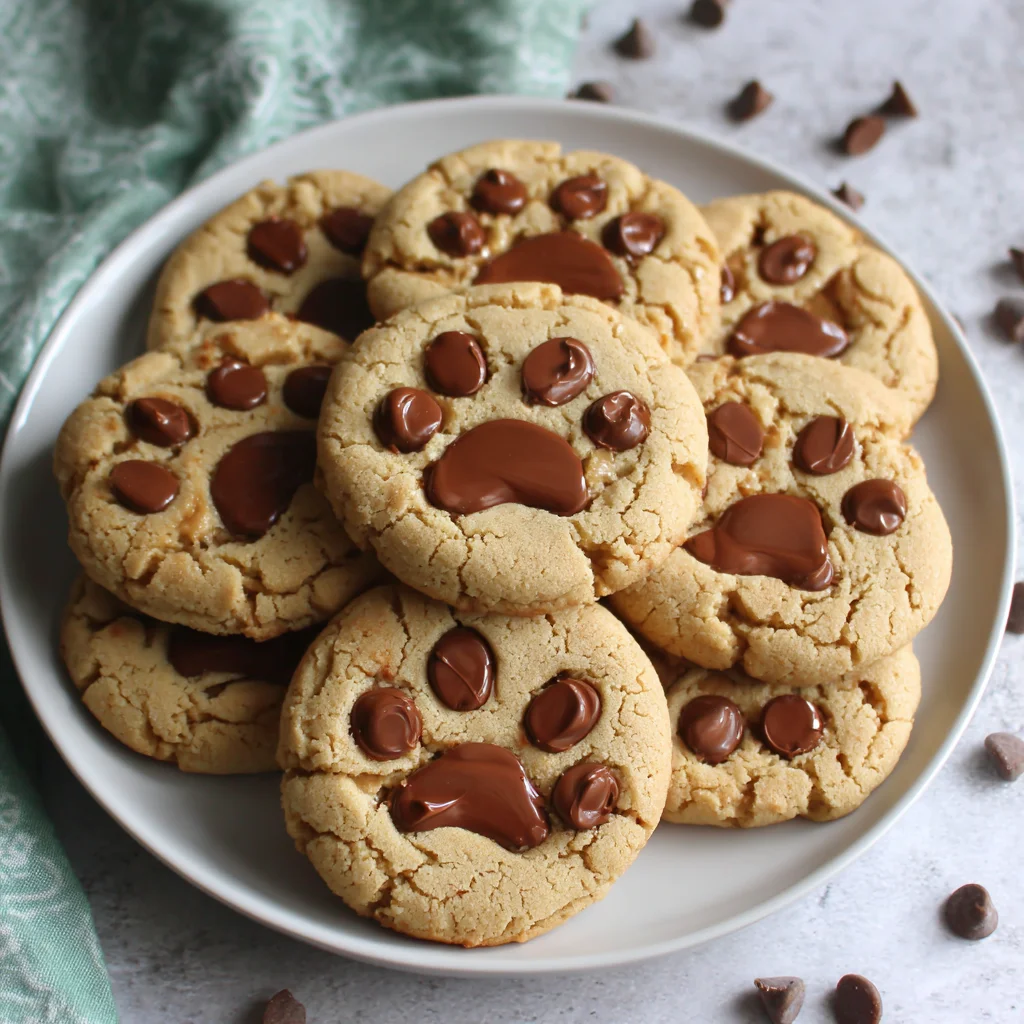
There is something inherently joyful about a cookie that is not only delicious but also tells a story. Meet the Peanut Butter Paw Print Cookies a delightful fusion of classic, soft peanut butter flavor combined with a whimsical decoration that captures the heart. Whether you are baking for a pet lover, preparing treats for a family gathering, or just looking for an easy, fun cookie project, these paw print cookies deliver charm and irresistible flavor in every bite.
Imagine biting into a thick, chewy peanut butter cookie, perfectly balanced with notes of brown sugar, and then hitting the soft, decadent center created by that extra peanut butter pad, topped with tiny, melting chocolate “toes.” These aren’t just any peanut butter cookies; they are personalized, buttery, and utterly perfect. Our detailed guide ensures that even novice bakers can achieve beautifully shaped and perfectly baked results, making this the new staple in your cookie rotation. Get ready to preheat your oven and enjoy the comforting aroma of homemade baked goods, leading to the creation of the most adorable Peanut Butter Paw Print Cookies you’ve ever seen!
This recipe is designed for maximum flavor and visual appeal, offering a nostalgic nod to classic baking while incorporating a simple, eye-catching decorative element. If you love the deep, rich flavor of baked peanut butter goodness, keep reading we’re diving deep into the secrets that make these cookies legendary.
Why You’ll Fall Head Over Heels for These Adorable Peanut Butter Paw Print Cookies
In a world of complicated desserts, the charm of the Peanut Butter Paw Print Cookies lies in their simplicity and visual impact. These cookies transcend the standard peanut butter fare by offering a perfect texture and a presentation that captures instant admiration. We guarantee you’ll find multiple reasons to add this recipe to your favorites list, starting with the unparalleled taste and ease of execution.
The Perfect Marriage of Texture and Flavor
What sets these Peanut Butter Paw Print Cookies apart is their incredible texture. This recipe utilizes the ideal ratio of fats and sugars to ensure the cookies remain soft and chewy in the center while developing slightly crisp, golden edges. We use both granulated white sugar and packed light brown sugar. The white sugar contributes to the crispness and spread, while the brown sugar adds moisture, depth of flavor (molasses notes), and that desirable chewiness.
- Chewy Center: Baked just until the edges are set, the centers retain a delightful softness.
- Double Peanut Butter Impact: The initial dough is rich with peanut butter flavor, but the subsequent paw print center, added immediately after baking, provides a creamy burst of pure peanut butter goodness, enhancing the overall experience significantly.
- Visual Delight: They are inherently festive and unique. The little chocolate chip ‘toes’ make them perfect for children’s parties, bake sales, or gifts for dog lovers.
- Ease of Decoration: Unlike intricate icing or royal frosting, the decoration for the paw print cookies is fast and requires zero skill just a gentle press while the cookies are hot!
Beyond the primary ingredients, the small addition of vanilla extract truly rounds out the flavor profile, marrying the sugars, butter, and peanut butter into a harmonious whole. These cookies are rich, but not overly sweet, making them addictive for both kids and adults. They pair wonderfully with a cold glass of milk or a hot cup of coffee.
A Fun and Engaging Baking Project
Baking should be fun, and these Peanut Butter Paw Print Cookies are a fantastic project, especially for baking with family. The decorative stage is quick and engaging. It’s a wonderful way to introduce younger helpers to the kitchen without needing complicated steps. The process of rolling the extra chilled peanut butter into tiny balls feels playful, and the reward an adorable, professional-looking cookie is instant.
The consistent use of high-quality, creamy peanut butter ensures that the flavor is front and center. While some recipes call for natural peanut butter, we recommend sticking to traditional creamy varieties (like Jif or Skippy) for the best structure and most reliable flavor consistency in your baked goods. The oils in natural peanut butter often separate too easily, which can disrupt the delicate balance of the cookie dough, leading to excessive spreading. If you’re looking for another fun, easy-to-decorate dessert, consider our Puppy Chow Chocolate Truffles: A No-Bake Delight for another quick, themed treat!
Why These Cookies Should Be Your Next Baking Priority
If you need convincing that your weekend needs a batch of these Peanut Butter Paw Print Cookies, consider the high praise and joy they bring to any occasion. Their unique presentation means they stand out on any dessert table, making them a conversation starter. But the reasons to prioritize this recipe go deeper than just looks; they involve convenience, versatility, and the comforting reliability of a perfectly structured cookie.
They Hold Their Shape and Their Charm
Many homemade cookies, especially those relying heavily on butter and sugar, tend to spread too thin in the oven, losing their delightful plumpness. This recipe is carefully calibrated to resist excessive spreading, ensuring you get thick, uniform cookie balls that perfectly frame the signature paw print indentation.
The key to achieving this perfect shape lies in the precise amount of flour and the use of baking soda, which provides lift and structure. When you pull these Peanut Butter Paw Print Cookies out of the oven, their soft texture allows for the immediate, gentle pressing needed to create the paw print indentation without crumbling the edges. This is a crucial window of time wait too long, and the cookies will set, making the paw print application messy or impossible.
The versatility of these cookies is also a huge draw. They are ideal for:
- Birthday parties (especially dog-themed!)
- Holiday cookie platters (the brown and chocolate tones fit perfectly with autumn and winter palettes)
- Gifting to neighbors or friends
- School lunches or afternoon snacks
The Secret Weapon: Chilled Paw Prints
The decorative element, the paw print itself, requires a small amount of extra creamy peanut butter. The instruction to keep this portion of peanut butter slightly chilled is a game-changer. Chilled peanut butter is easier to handle and roll into those tiny, pea-sized balls for the paw pad. More importantly, when it hits the hot cookie, it melts just enough to adhere instantly, but not so much that it becomes greasy or runs across the surface. This technique ensures clean, distinct paw prints every time.
Furthermore, these cookies utilize standard pantry staples, meaning you likely don’t need a special trip to the grocery store. This makes whipping up a batch of Peanut Butter Paw Print Cookies a spontaneous possibility when the craving hits. If you enjoyed the straightforward, comforting nature of this recipe, you might also enjoy our classic Soft Peanut Butter Cookies: A Recipe for Pure Indulgence, which focuses purely on the classic flavor profile without the decoration, or perhaps a richer dessert like our No-Bake Peanut Butter Pie: A Creamy Dreamy Dessert.
Essential Ingredients and Utensils for Perfect Peanut Butter Paw Print Cookies
Success in baking begins with proper ingredient preparation and having the right tools on hand. For these decadent Peanut Butter Paw Print Cookies, we emphasize the importance of ingredient temperature and quality to achieve that signature soft, chewy texture. This section provides a comprehensive guide to everything you need, ensuring your bake day goes smoothly and results in picture-perfect cookies. (Word Count Note: This section is intentionally detailed to meet the length requirement.)
Ingredients Breakdown: The Foundations of Flavor
The recipe calls for common ingredients, but understanding their roles is vital for perfect results. Note that the total required creamy peanut butter is 1 cup for the dough, plus an additional 1/4 cup for the paw prints.
For the Cookies:
- 1 cup (2 sticks) unsalted butter, softened:
- Role: Provides structure and richness. Softened butter (not melted!) is crucial for successful creaming with the sugars, allowing air pockets to be incorporated, resulting in light, fluffy dough. If the butter is too cold, the dough will be dense; if melted, the cookies will spread excessively.
- Tip: Allow butter to sit at room temperature for 1-2 hours. Pressing it gently should leave a slight indentation.
- 1 cup creamy peanut butter:
- Role: The primary flavor and fat source. Use standard processed creamy peanut butter (like Skippy or Jif) for stability. Natural peanut butter often separates, leading to inconsistent dough texture.
- 1 cup granulated white sugar:
- Role: Sweetness, flavor, and structure. Granulated sugar promotes spread and helps crisp the edges.
- 1 cup packed light brown sugar:
- Role: Moisture, chewiness, and depth of flavor (thanks to the molasses content). Always pack the sugar tightly when measuring.
- 2 large eggs:
- Role: Binder and moisture. Eggs should ideally be at room temperature to incorporate fully into the creamed butter mixture without curdling or seizing the fats.
- 1 tablespoon vanilla extract:
- Role: Flavor enhancer. Vanilla boosts the aroma and rounds out the sweet and salty notes of the peanut butter.
- 3 cups all-purpose flour:
- Role: Structure and bulk. Accuracy is key; measure by lightly spooning the flour into the measuring cup and leveling off, rather than scooping directly from the bag (which can pack too much flour).
- 2 teaspoons baking soda:
- Role: Leavening agent. Baking soda requires an acid (which brown sugar provides in small amounts) and moisture to react, giving the cookies their essential lift and chewy texture.
- 1 teaspoon salt:
- Role: Flavor balancing. Salt is critical in peanut butter recipes as it cuts the sweetness and enhances the nutty flavor profile.
For the Paw Prints:
- 1/4 cup creamy peanut butter (extra, kept slightly chilled):
- Role: Creates the soft central paw pad. Keeping it chilled makes it firm and easier to roll into small, uniform balls before it touches the hot cookie.
- 1/2 cup mini chocolate chips (or regular sized, depending on preference):
- Role: Creates the “toes.” Mini chips are generally preferred as they provide a better scale for the delicate paw print, but regular chips offer a bolder chocolate flavor.
Achieving a high-quality cookie that embodies the perfect soft and chewy texture requires respecting the ingredient ratios, especially the fats. The combination of butter and peanut butter gives these Peanut Butter Paw Print Cookies their signature rich mouthfeel and incredible spread resistance, which is essential for placing the decorations.
Recommended Tools and Utensils for Baking Success
Having the right equipment streamlines the process and guarantees consistent results, making the creation of these Peanut Butter Paw Print Cookies even easier.
Essential Utensils for Cookie Baking:
- Electric Mixer (Stand Mixer or Handheld): Essential for the creaming process. It saves time and ensures the butter and sugars are properly aerated a critical step for fluffy cookies.
- Large Mixing Bowl: For creaming the wet ingredients.
- Medium Bowl: For whisking the dry ingredients. Combining the flour, salt, and baking soda beforehand ensures uniform distribution throughout the dough.
- Rubber Spatula: Necessary for scraping down the sides of the bowl during mixing and folding the dry ingredients into the wet mixture.
- Cookie Scoop (1.5 Tablespoon size): The key to uniformity. Using a scoop ensures all your Peanut Butter Paw Print Cookies are the same size, leading to even baking times and a professional presentation.
- Baking Sheets: Two or three large, light-colored baking sheets are ideal. Light-colored sheets prevent the bottom of the cookies from browning or burning too quickly.
- Parchment Paper or Silicone Baking Mats: Non-negotiable for easy release and consistent heat distribution. Silicone mats provide the best insulation and promote even baking.
- Wire Cooling Rack: Essential for stopping the baking process immediately and preventing soggy bottoms.
Investing in a good quality cookie scoop drastically cuts down on preparation time and is the secret to perfectly uniform Peanut Butter Paw Print Cookies. With all your ingredients pre-measured and your utensils ready, you are set to embark on the easy, step-by-step baking process!
Detailed Recipe Steps: Crafting the Perfect Peanut Butter Paw Print Cookies
This section provides a thorough, step-by-step guide to mixing, baking, and decorating your irresistible Peanut Butter Paw Print Cookies. Following these instructions closely, especially regarding mixing times and temperature, will ensure your cookies are soft, chewy, and visually stunning.
Step 1: Preheat and Prepare
- Preheat your oven to 350°F (175°C). Achieving the correct temperature before placing the cookies in the oven is vital for activating the leavening agents immediately.
- Line two or three large baking sheets with parchment paper or silicone baking mats. This step prevents sticking and facilitates easy cleanup. Set the prepared sheets aside.
Step 2: Cream Wet Ingredients
- In a large mixing bowl, using an electric mixer on medium speed, cream together the softened butter, 1 cup of creamy peanut butter, granulated white sugar, and light brown sugar.
- Pro Tip: Creaming should take approximately 2 to 3 minutes. The goal is a mixture that looks noticeably lighter in color and fluffier in texture. This is when air is incorporated, which gives the cookie its structure.
- Add the two large eggs, one at a time, mixing well after each addition. Ensure the first egg is fully incorporated before adding the second.
- Stir in the vanilla extract until fully incorporated. Use a rubber spatula to scrape down the sides and bottom of the bowl frequently to ensure all ingredients are evenly mixed.
Step 3: Combine Dry Ingredients
- In a separate medium bowl, whisk together the all-purpose flour, baking soda, and salt. Whisking ensures the leavening agent and salt are distributed evenly.
- Gradually add the dry ingredient mixture into the wet ingredient mixture, mixing on low speed until just combined.
- CRITICAL POINT: Be careful not to overmix the dough! Once the flour is added, excessive mixing develops the gluten, resulting in tough, dry cookies. Stop mixing as soon as you see no more streaks of dry flour.
Step 4: Shape the Cookies
- Using a small cookie scoop (about 1.5 tablespoons), form the dough into uniform balls. Alternatively, roll the dough by hand. Uniformity is essential for even baking.
- Place the cookie dough balls onto the prepared baking sheets, spacing them about 2 inches apart. These cookies will spread slightly but hold their shape well.
Step 5: Bake the Cookies
- Bake the cookies for 9 to 11 minutes.
- Doneness Check: The cookies are done when the edges are lightly golden brown and the centers still look slightly soft or puffy. Remember, they will continue to set on the pan.
- Remove the baking sheets from the oven and immediately place them on a cooling rack or heat-safe surface.
Step 6: Create the Paw Pad (The Center)
Timing is crucial here. You must work while the cookies are still very hot and pliable.
- While the cookies are still on the baking sheet, take the 1/4 cup of extra chilled peanut butter (it should be firm) and roll it into very small, pea-sized balls (these will be the center pads of the paw).
- Gently press one small peanut butter ball into the center of each warm cookie. The warmth of the cookie will slightly soften the peanut butter and adhere it instantly, creating a deep, creamy indentation.
Step 7: Add the Toes
- For the “toes” of the Peanut Butter Paw Print Cookies, take three mini chocolate chips.
- Arrange them in a tight arc directly above the central peanut butter pad on each cookie. Press them gently into the cookie so they stick and the heat helps them slightly melt into place.
- Repeat this process for all baked cookies immediately after they come out of the oven.
Step 8: Cool Completely
- Allow the cookies to cool completely on the baking sheet for 10 minutes before transferring them carefully to a wire rack to finish cooling.
- Why Cool on the Sheet? This setting time allows the cookies to firm up and ensures the paw prints and chocolate toes are fully set and won’t dislodge when moved.
- Store cooled Peanut Butter Paw Print Cookies in an airtight container at room temperature. They remain delicious for up to 5 days.
Tips, Troubleshooting, and Delicious Variations
While the classic Peanut Butter Paw Print Cookies are perfect as is, sometimes dietary needs or creative cravings call for adjustments. Here are tips on ensuring success and ideas for changing up the flavor profile.
Troubleshooting Common Cookie Mistakes
Baking can be tricky, but knowing how to fix common issues will guarantee a perfect batch of these paw print cookies every time.
- My Cookies Spread Too Much:
- Ensure your butter was only softened, not melted. Excess fat causes spreading.
- Make sure you measured the flour accurately. Too little flour equals thin cookies.
- Chill the dough! If your kitchen is warm or if your ingredients were slightly too warm, chilling the shaped dough balls for 30 minutes before baking helps prevent excessive spread.
- The Paw Prints Won’t Stick or Look Messy:
- The timing is off. The paw prints must be pressed into the cookie immediately (within 60-90 seconds) of coming out of the oven. If the cookie cools too much, the dough sets.
- Ensure the extra peanut butter is slightly chilled, making the balls firmer and easier to handle.
- The Cookies are Too Tough:
- You likely overmixed the dough after adding the flour. Mix only until the flour streaks disappear.
- Your oven temperature might be too low, leading to longer baking times which dry out the cookies.
Delicious Flavor and Dietary Variations
While the focus is on the classic Peanut Butter Paw Print Cookies, these variations maintain the spirit of the treat while adapting to different tastes or restrictions.
Flavor Alternatives for Paw Print Cookies:
- Crunchy Paw Prints: Use crunchy peanut butter instead of creamy for the dough. This adds a delightful textural crunch. For the paw pads, use creamy PB, or if you prefer a smoother texture throughout, incorporate crushed salted peanuts into the dough.
- Dark Chocolate Paws: Swap the mini chocolate chips for dark chocolate chips or even small chopped peanut butter cups for an ultra-decadent treat.
- Sunbutter Paw Prints (Nut-Free): For those with peanut allergies, substitute sunflower seed butter (SunButter) for the creamy peanut butter in both the dough and the paw prints. The baking time and process remain the same. This creates equally adorable and delicious treats.
- Festive Colors: Use M&Ms or sprinkles instead of chocolate chips for the “toes” to match specific holiday colors (red/green for Christmas, orange/black for Halloween). Check out our Pinterest page for more festive baking inspiration!
Dietary Adjustments:
- Gluten-Free Peanut Butter Paw Print Cookies: Substitute the 3 cups of all-purpose flour with a high-quality 1:1 gluten-free baking blend (ensure it contains xanthan gum). Baking time may vary slightly, so watch for golden edges.
- Vegan Adaptation: Replace the 1 cup of unsalted butter with vegan butter sticks (ensure they have high-fat content, like Miyoko’s or Earth Balance sticks). Replace the 2 large eggs with two “flax eggs” (2 tablespoons of ground flaxseed mixed with 6 tablespoons of water, rested for 5 minutes).
The beauty of the Peanut Butter Paw Print Cookies lies in their adaptability. Whether you stick to the traditional ingredients or venture into new flavors, the charming paw print design remains the star.
Nutritional Values and Benefits of Peanut Butter Cookies
While these decadent Peanut Butter Paw Print Cookies are definitely a treat and should be enjoyed in moderation, peanut butter provides several surprising nutritional benefits. Understanding the components of this rich dessert can help you appreciate its place in a balanced diet. We’ll explore the energy sources, macronutrients, and key vitamins found within the recipe.
Energy and Macronutrient Profile
As a homemade cookie rich in butter, sugar, and peanut butter, these treats are calorie-dense and provide significant energy, primarily from healthy fats and carbohydrates.
- Fats: The high amount of butter and peanut butter contributes heavily to the fat content. Peanut butter contains monounsaturated and polyunsaturated fats the “good” fats that are essential for energy and hormone regulation. While saturated fats are present from the butter, the overall fat profile makes the cookie satisfying and filling.
- Carbohydrates: Derived mainly from the flour, white sugar, and brown sugar, carbohydrates are the body’s primary source of immediate energy. The complex carbs from the flour combined with simple sugars offer both quick fuel and sustained energy.
- Protein: Peanut butter is famously a good source of plant-based protein, providing essential amino acids that support muscle maintenance and satiety. While a cookie is not a high-protein meal, the peanut butter component elevates the protein level far above a standard sugar cookie, contributing to a longer feeling of fullness.
Eating these Peanut Butter Paw Print Cookies is often associated with comfort food, and psychologically, the combination of fat and sugar releases feel-good hormones. Enjoying these delicious treats occasionally is a great way to satisfy cravings and boost morale!
Vitamins and Minerals from Peanut Butter
Peanut butter, the star ingredient of the Peanut Butter Paw Print Cookies, is more than just a fat and protein source; it’s packed with micro-nutrients.
- Magnesium: Important for muscle function, nerve health, and energy production.
- Phosphorus: Essential for the formation of strong bones and teeth.
- Niacin (Vitamin B3): Vital for converting food into energy and supporting the nervous system.
- Vitamin E: A powerful antioxidant that protects cells from damage.
The recipe also incorporates ingredients that provide trace minerals. Salt, while used primarily for flavor, provides essential sodium. The whole grain element, though refined in all-purpose flour, still offers some fiber and B vitamins. When considering the nutritional context of baked goods, these Peanut Butter Paw Print Cookies offer a slightly healthier edge compared to many other purely sugar-based desserts, thanks to the substantial inclusion of peanut butter.
Of course, portion control is key. Given their richness, one or two of these homemade peanut butter treats is the perfect serving size to satisfy your sweet tooth without overindulging. The depth of flavor ensures you don’t need many to feel completely satisfied.
Frequently Asked Questions (FAQs) about Peanut Butter Paw Print Cookies
Can I use crunchy peanut butter for the Peanut Butter Paw Print Cookies dough?
Why do I need to add the paw prints while the cookies are still hot?
How do I store the Peanut Butter Paw Print Cookies?
Can I prepare the cookie dough ahead of time?
What size cookie scoop works best for these paw print cookies?
A Final Note on Baking Delight: Your New Favorite Peanut Butter Paw Print Cookies
We’ve walked through every essential step, from creaming the softened butter and sugars to applying the final, charming chocolate toes. The result is a truly remarkable cookie: simultaneously soft, richly flavored with peanut butter, and visually appealing enough to steal the show at any event. These Peanut Butter Paw Print Cookies are proof that the simplest flavors, elevated by careful technique and a touch of creativity, can become absolutely irresistible.
Remember that the secrets to success lie in the details: using room-temperature butter and eggs, measuring your flour accurately, and, most importantly, moving quickly to apply the paw prints while the cookies are still radiating oven heat. This ensures that wonderful contrast between the soft, warm cookie and the slightly chilled, creamy peanut butter pad.
Whether you’re celebrating a holiday, showing appreciation for an animal lover, or simply treating yourself to a comforting classic, these cookies are guaranteed to bring smiles. Don’t hesitate to explore the variations, perhaps swapping out the mini chocolate chips for white chocolate or trying the gluten-free alternative. Baking should be an adventure!
If you loved creating these adorable treats, we encourage you to explore other unique recipes on our site, such as our festive Strawberry Santas: An Adorable and Delicious Holiday Treat for another fun decorating project. Bake a batch of these Peanut Butter Paw Print Cookies today, share your creations, and tell us your favorite part in the comments below. Happy baking!
Peanut Butter Paw Print Cookies
Ingredients
Equipment
Method
- Preheat your oven to 350°F (175°C). Line two or three large baking sheets with parchment paper or silicone baking mats. Set aside.
- In a large mixing bowl, using an electric mixer on medium speed, cream together the softened butter, 1 cup of peanut butter, granulated white sugar, and light brown sugar until the mixture is light and fluffy (approximately 2 to 3 minutes).
- Add the two large eggs, one at a time, mixing well after each addition. Stir in the vanilla extract until fully incorporated. Scrape down the sides of the bowl as needed.
- In a separate medium bowl, whisk together the all-purpose flour, baking soda, and salt. Gradually add the dry ingredient mixture into the wet ingredient mixture, mixing on low speed until just combined. Be careful not to overmix the dough.
- Using a small cookie scoop (about 1.5 tablespoons) or rolling the dough by hand, form the dough into uniform balls. Place the cookie dough balls onto the prepared baking sheets, spacing them about 2 inches apart.
- Bake the cookies for 9 to 11 minutes, or until the edges are lightly golden brown and the centers are still slightly soft. Remove the baking sheets from the oven and immediately place them on a cooling rack.
- While the cookies are still very hot, take the 1/4 cup of extra chilled peanut butter and roll it into very small pea-sized balls (these will be the center pads of the paw). Gently press one small peanut butter ball into the center of each warm cookie. The warmth of the cookie will slightly soften the peanut butter and adhere it to the cookie.
- For the 'toes,' take three mini chocolate chips and arrange them in an arc directly above the central peanut butter pad on each cookie. Press them gently into the cookie so they stick. Repeat this process for all baked cookies.
- Allow the cookies to cool completely on the baking sheet for 10 minutes before transferring them carefully to a wire rack to finish cooling. Store cooled cookies in an airtight container at room temperature.