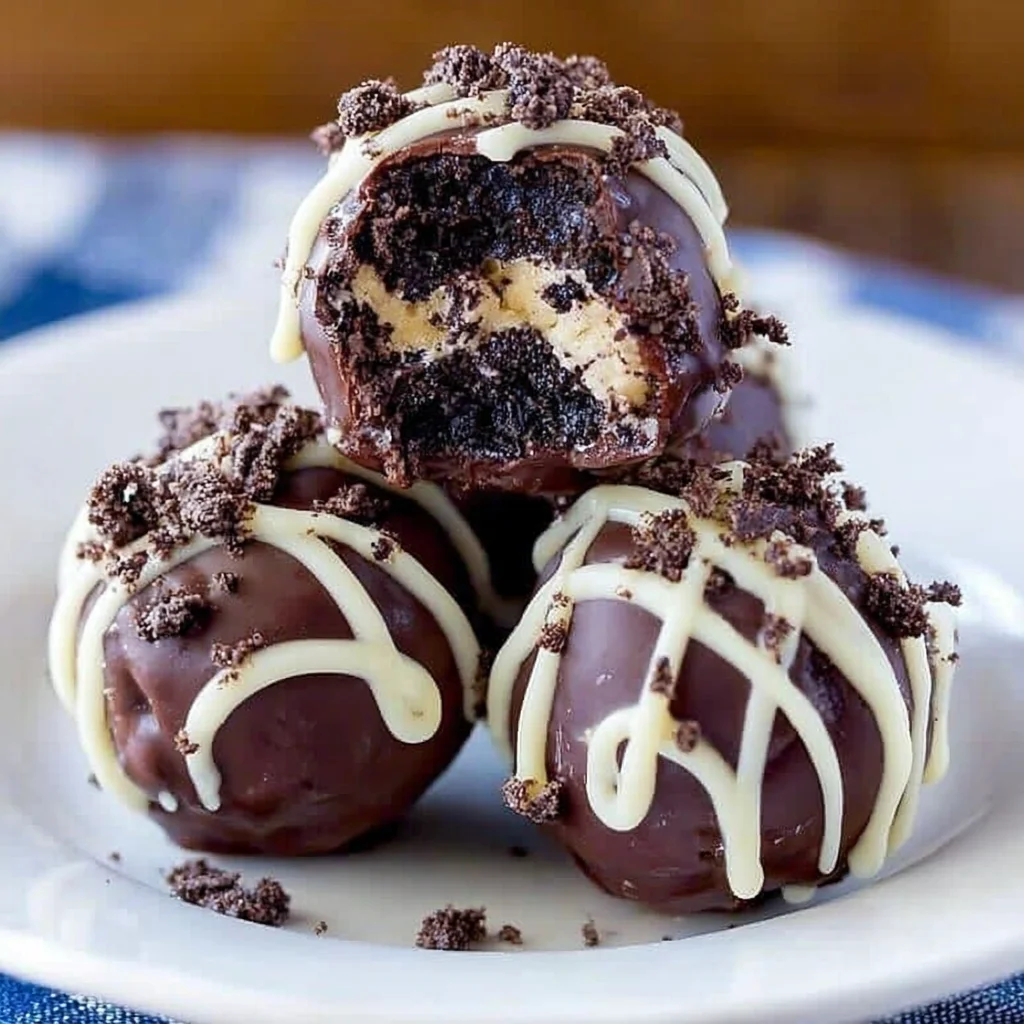
Welcome to the world of easy desserts! If you’re searching for a treat that delivers maximum flavor with minimal effort, you’ve found your holy grail. These 3-Ingredient No-Bake Oreo Balls are famous for a reason: they require no baking, use only three common ingredients, and produce a rich, creamy, chocolate-coated truffle that disappears instantly at any gathering. Whether you call them Oreo Truffles, Cream Cheese Balls, or simply cookie dough bliss, this recipe guarantees success, even for the most novice kitchen adventurer.
In a mere fifteen minutes of prep time, you can transform a classic cookie into a sophisticated, bite-sized confection. The secret lies in the perfect ratio of finely crushed Oreo crumbs, soft cream cheese, and a generous layer of tempered dipping chocolate. We are going beyond the basic instructions to provide you with every tip, trick, and variation necessary to master this unbelievably simple sweet treat. Get ready to impress everyone with these decadent, foolproof, and utterly addictive 3-Ingredient No-Bake Oreo Balls.
We understand that navigating the kitchen can sometimes feel overwhelming, but this particular recipe strips away the complexity while retaining all the joy of homemade desserts. Forget complicated steps, expensive ingredients, or turning on your oven. This process is all about mixing, rolling, chilling, and dipping a pure, unadulterated pleasure. By the time you finish reading, you will be fully equipped to create dozens of these luscious treats that are perfect for holidays, parties, or simply satisfying that late-night chocolate craving.
Why You’ll Fall Head Over Heels for These Easy Oreo Truffles
In the vast universe of simple dessert recipes, the 3-Ingredient No-Bake Oreo Balls stand out as a supernova of convenience and flavor. But why exactly do home cooks and professional bakers alike gravitate toward this uncomplicated confection? The reasons are numerous, blending practicality with irresistible deliciousness, making them the ideal choice for virtually any occasion.
The Magic of Three Ingredients
The foremost reason to adore this recipe is right there in the title: the minimal ingredient list. You only need Oreos, cream cheese, and melting chocolate. This simplicity means grocery shopping is quick, and stocking your pantry for an impromptu batch is effortless. This efficiency makes them one of the best easy dessert recipes you can memorize. When time is tight, knowing you can whip up 40+ treats with only three items is a true lifesaver. Furthermore, this focus on core components means the quality of each ingredient truly shines through, delivering that iconic Oreo flavor, intensified by the creamy tang of the cheese.
No Oven Required: The Ultimate No-Bake Dessert
For those living in warmer climates, or simply trying to save energy, the “no-bake” label is a huge selling point. You never have to worry about preheating, precise baking times, or dry results. The 3-Ingredient No-Bake Oreo Balls rely solely on refrigeration, making them ideal for summer holidays, large party prep, or whenever your oven is busy handling savory dishes. This zero-oven requirement dramatically reduces complexity and stress, putting this simple sweet treat well within the reach of children and novice cooks. If you love delicious, creamy results without the hassle of heat, this recipe is a must-try.
The Perfect Crowd-Pleaser and Giftable Treat
Few desserts have the universal appeal of these chocolate-coated cookie balls. Oreos are beloved worldwide, and transforming them into a truffle format elevates them from simple snack status to sophisticated confectionery. These truffles are easy to transport, look beautiful when decorated, and are the perfect size for serving at large gatherings or including in holiday cookie boxes. Need a last-minute hostess gift? A beautifully boxed batch of 3-Ingredient No-Bake Oreo Balls is always appreciated. Their rich, dense texture and sweet coating ensure they are instant favorites at school events, office parties, and family dinners.
Customization and Versatility
While the classic preparation yields spectacular results, this recipe is a fantastic canvas for creativity. The chocolate coating and the final decoration can be tailored to any season or theme. From using white chocolate and red sprinkles for Christmas Oreo Balls, to drizzling dark chocolate for an elegant look, the possibilities are endless. This adaptability ensures that your easy dessert recipe never feels tired or repetitive. This highly customizable nature is another major reason why these cream cheese balls maintain their popularity year-round.
Why You Should Make These 3-Ingredient No-Bake Oreo Balls Today
If the sheer simplicity and undeniable deliciousness haven’t already convinced you, let’s delve deeper into the practical advantages of adding this recipe for 3-Ingredient No-Bake Oreo Balls to your permanent rotation. These benefits extend beyond just flavor, touching upon kitchen efficiency, financial prudence, and skill building.
Efficiency and Speed for Busy Schedules
In our fast-paced lives, time is a precious commodity. Traditional baking often requires multiple stages of cooling, kneading, rising, or complex layering, consuming hours of your weekend. The entire process of making these 3-Ingredient No-Bake Oreo Balls from crushing the cookies to rolling the dough takes less than 30 minutes of active work. The majority of the required time is chilling, during which you are free to tackle other tasks. This incredible speed and efficiency make these Oreo truffles the ultimate solution for last-minute party needs or quick weeknight dessert fixes. This recipe proves that exceptional quality doesn’t have to come with a high time investment.
A Budget-Friendly Dessert Option
Many dessert recipes call for expensive nuts, rare extracts, or specialty flours. Not so with the 3-Ingredient No-Bake Oreo Balls. The ingredients are affordable, readily available in bulk, and rarely subject to seasonal price fluctuations. Oreos, cream cheese, and melting chocolate are staples that often go on sale. When you consider the generous yield approximately 40 to 45 individual truffles the cost per serving is incredibly low, making this a highly economical way to feed a crowd or fill a large dessert platter without breaking the bank. It’s truly a win-win: gourmet results at a grocery store price.
Mastering a Core Kitchen Technique: Chocolate Dipping
While the recipe itself is simple, it provides a perfect, low-stakes opportunity to practice the essential confectionery skill of dipping and coating in chocolate. Achieving a smooth, thin, glossy chocolate shell can be intimidating, but these dense, chilled Oreo balls are the perfect subjects. Because the balls are very cold, the chocolate sets quickly, reducing smudging and dripping. Mastering this technique here will give you confidence for future, more complex projects, such as making elegant Chocolate Chip Cheesecake Balls or fruit dipping. The process of learning how to properly melt and manage dipping chocolate is a valuable culinary skill gained from this simple recipe.
The Ultimate Comfort Food Factor
There is an inherent joy and nostalgia associated with Oreos. Combining that familiar crunch and cream filling with the luxurious, melt-in-your-mouth texture of cream cheese creates a truly indulgent experience. These Oreo cookie balls tap into a deep sense of comfort, offering a rich, satisfying bite that feels simultaneously homemade and professional. They are dense, decadent, and the perfect textural counterpoint to the smooth, snappy chocolate shell. When you need a treat that feels truly special without the effort, look no further than these 3-Ingredient No-Bake Oreo Balls.
For more inspiration on using cream cheese and simple desserts, make sure to check out our festive recipes like Christmas Oreo Balls, which offer seasonal flair to this classic method.
Ingredients and Essential Utensils for the Perfect 3-Ingredient No-Bake Oreo Balls
The beauty of the 3-Ingredient No-Bake Oreo Balls lies in their minimalist composition. However, ensuring success depends entirely on the quality and preparation of these three crucial components, as well as using the right tools for the job. Here is a detailed breakdown to guarantee you achieve the best possible texture and flavor.
Detailed Ingredient List (The Holy Trinity)
As the name promises, you only need three core ingredients. Precision in measurement, though, is key to achieving that ideal dense, yet creamy, truffle consistency.
Core Ingredients:
- 1 (14.3 oz) package Oreo Sandwich Cookies (Original Flavor Recommended): This is the foundation of the truffle. We highly recommend the standard original flavor for the best results, as the specific fat content in the filling helps bind the dough perfectly.
- 1 (8 oz) block Cream Cheese, fully softened to room temperature: This is arguably the most critical ingredient preparation step. The cream cheese must be genuinely soft almost spreadable to blend seamlessly with the fine Oreo crumbs. Cold cream cheese will result in lumps and a crumbly, unworkable dough.
- 16 ounces Dipping Chocolate (Melting Wafers, Almond Bark, or Candy Melts): While you could theoretically use chocolate chips, high-quality dipping chocolate (like melting wafers or almond bark) contains stabilizers that help it melt smoothly, set quickly, and maintain a crisp, glossy finish without requiring complicated tempering. Choose milk, dark, or white chocolate based on your preference.
Optional Decorative Topping (Highly Recommended):
- 1/4 cup Reserved Oreo Crumbs: Saved from the initial crush, these are excellent for a simple, professional-looking garnish.
- Sprinkles, Sea Salt, or Chopped Nuts: Use these for seasonal variations or to add extra flavor contrast.
Ingredient Deep Dive and Essential Tips
1. The Power of the Oreo Crumbs
Achieving a uniform, flour-like crumb consistency is paramount to a smooth truffle dough. Large chunks of cookie will prevent the dough from rolling smoothly and can lead to a lumpy texture. Using a food processor is the easiest way to achieve this fine grind. When crushing, be sure to include the cream filling, as the fat and sugar from the filling contribute significantly to the binding process when mixed with the cream cheese. Remember to reserve some crumbs before mixing if you plan to use them for decoration on your finished 3-Ingredient No-Bake Oreo Balls.
2. The Cream Cheese Factor
We cannot overstate the importance of using fully softened cream cheese. If the block is even slightly cool, it will resist mixing, leading to tiny, hard pieces of cream cheese dispersed throughout your dough. This not only affects texture but also the dough’s ability to roll and hold its shape. Plan ahead and leave the cream cheese out on the counter for at least an hour, or even two, especially if your kitchen is cool. This softening ensures that when you combine the ingredients, you get a beautiful, uniform, dark chocolate dough.
3. Selecting the Right Dipping Chocolate
While standard chocolate bars or chips can be melted, they often require adding oil or shortening and can sometimes seize (turn grainy) or produce a dull finish. Dipping chocolates are formulated specifically for coating. Their composition allows them to melt smoothly and harden quickly with a satisfying “snap.”
- Almond Bark/Candy Melts: Excellent choice for beginners. They melt easily and hold their structure without complicated temperature control.
- High-Quality Wafers (e.g., Ghirardelli, Callebaut): Offer superior flavor and glossiness but require slightly more attention during melting to prevent scorching.
If you find your melted chocolate is too thick for easy dipping, adding just a teaspoon of neutral oil (like coconut oil) or vegetable shortening can help thin it out without compromising the setting capability of the coating for your 3-Ingredient No-Bake Oreo Balls.
Necessary Utensils for Success
While this recipe is simple, a few specialized tools can make the process faster, cleaner, and more professional.
Essential Tools:
- Food Processor: (Highly Recommended) For pulverizing the Oreos quickly and efficiently into fine crumbs. A high-powered blender can also work in a pinch.
- Large Mixing Bowl and Spatula/Hand Mixer: Needed for combining the dough. A sturdy spatula or a low-speed electric hand mixer works best for handling the thick, stiff dough.
- Small Cookie Scoop (1 Tablespoon): Crucial for ensuring all your Oreo truffles are uniform in size, which aids in presentation and even coating.
- Parchment Paper or Wax Paper: Absolutely necessary for lining the baking sheet. This prevents the chilled balls and the freshly dipped chocolate from sticking.
- Baking Sheet: Used for chilling the balls and allowing the dipped chocolate to set.
- Microwave-Safe Bowl: For melting the dipping chocolate in short bursts.
- Dipping Tools:
- Chocolate Dipping Fork: The best option, as it allows excess chocolate to drain quickly.
- Toothpicks: A functional alternative, though you will have a small hole in the finished truffle where the toothpick was inserted.
- Two Standard Forks: A simple, effective solution use one to lift the ball and the other to tap off the excess chocolate.
Having these tools ready before you begin the process of making your 3-Ingredient No-Bake Oreo Balls will ensure a seamless and enjoyable experience from start to finish.
Detailed Recipe Steps: Crafting Your Perfect 3-Ingredient No-Bake Oreo Balls
Follow these six straightforward steps precisely, and you will achieve flawless, professional-quality 3-Ingredient No-Bake Oreo Balls every single time. Pay special attention to the chilling and dipping phases these are the keys to success.
STEP 1: CRUSH THE OREOS – Achieving the Perfect Crumb
The base of your truffle needs to be ultra-fine to bond effectively with the cream cheese.
- Open the package of Oreos. If you plan to decorate with extra crumbs, measure out 1/4 cup of whole Oreos and set them aside to crush separately later, or just reserve 1/4 cup of the finished crumbs.
- Place the remaining Oreo cookies, including the cream filling, into a large food processor. Pulse repeatedly until the cookies are finely ground into uniform, flour-like crumbs. Avoid processing for too long in a continuous cycle, as this can turn the mixture oily.
- If you do not have a food processor, place the cookies in a large, sealable plastic bag and use a rolling pin to crush them completely. Focus on the edges and corners to ensure there are absolutely no large chunks remaining.
- Pour the finely crushed Oreo crumbs into a large mixing bowl, ready for the next step.
Tip: The finer the crumb, the smoother the final texture of the Oreo truffles will be.
STEP 2: MIX AND COMBINE – Creating the Dough
This is where the magic happens, turning crumbs and cream cheese into a dense, workable dough.
- Add the fully softened (room temperature) cream cheese directly to the bowl containing the Oreo crumbs. It is crucial that the cream cheese is at room temperature; otherwise, the dough will be lumpy and difficult to roll.
- Using a rubber spatula, a sturdy wooden spoon, or an electric hand mixer on low speed, begin mixing the crumbs and cream cheese together. This takes a minute or two.
- Continue mixing until they are completely combined and a thick, uniform dark dough forms. You may need to use your hands briefly to ensure all the dry crumbs at the bottom are incorporated.
- The finished mixture should be stiff, uniform in color, look like rich dark brown putty, and be easy to roll without sticking excessively to your fingers.
Troubleshooting: If your dough feels too sticky, you can add 1-2 extra tablespoons of finely crushed Oreos (if you have them) to firm it up slightly.
STEP 3: SCOOP AND CHILL – Preparation is Key
Chilling is the most vital non-active step in making perfect 3-Ingredient No-Bake Oreo Balls.
- Line a large baking sheet with parchment paper or wax paper.
- Use a small cookie scoop (about 1 tablespoon or 0.5 oz) to portion the Oreo mixture. Consistent sizing ensures even dipping and presentation.
- Roll each portion firmly between the palms of your hands to form smooth, uniform balls. Be firm to compress the dough and remove air pockets.
- Place the finished Oreo cookie balls onto the lined baking sheet.
- Place the baking sheet into the refrigerator and chill the Oreo balls for at least 60 minutes (1 hour). Chilling is essential because cold balls hold their shape perfectly and prevent them from melting or crumbling when submerged in the warm chocolate.
Expert Tip: If you are in a rush, you can place the balls in the freezer for 20-30 minutes instead of the refrigerator, but ensure they don’t freeze solid.
STEP 4: PREPARE THE CHOCOLATE COATING – Melt Smoothly
Melting chocolate requires patience and low heat to prevent scorching.
- Place your dipping chocolate (wafers, almond bark, or candy melts) in a deep, microwave-safe bowl. A deeper bowl is better for dipping.
- Heat the chocolate in the microwave in 30-second intervals, stirring thoroughly with a rubber spatula between each interval.
- Continue heating and stirring until the chocolate is completely smooth, melted, and lump-free. It should look fluid and glossy. Do not overheat the chocolate; overheating causes it to seize (become grainy and thick).
- If the chocolate appears too thick, add a small teaspoon of coconut oil or shortening and stir until thin enough for easy dipping.
Alternative Method: Use a double boiler (a heatproof bowl set over a simmering pot of water) for gentler, more controlled melting.
STEP 5: DIP THE OREO BALLS – Coating Perfection
Working quickly with cold balls is the key to a thin, even coat.
- Remove only a small batch (about 10–12) of the chilled 3-Ingredient No-Bake Oreo Balls from the refrigerator, leaving the rest to stay cold.
- Using a chocolate dipping fork, toothpick, or two standard forks, carefully drop one Oreo ball into the melted chocolate, turning it gently to ensure it is fully coated.
- Lift the ball out and tap the dipping tool lightly on the edge of the bowl. Allow any excess chocolate to drip off entirely. This step creates a thin, even, and professional-looking shell.
- Return the dipped Oreo ball to the parchment-lined baking sheet.
Tip: If the chocolate starts to thicken during dipping, return it to the microwave for 15 seconds, stir, and continue.
STEP 6: DECORATE AND SET – The Final Flourish
The topping must be applied while the chocolate is still wet!
- Immediately sprinkle the top of the wet chocolate coating with your reserved Oreo crumbs, sprinkles, sea salt, or any other desired topping.
- Repeat the dipping process with all remaining Oreo balls, working in small batches to keep the dough cold.
- Allow the dipped balls to set completely. This can be done at cool room temperature (about 1–2 hours) or sped up significantly by placing the baking sheet back into the refrigerator for about 15–20 minutes, until the chocolate shell is firm to the touch.
- Store the finished 3-Ingredient No-Bake Oreo Balls in an airtight container in the refrigerator for up to 1 week.
For those who love simple, no-bake treats, you might also enjoy our recipe for No-Bake Peanut Butter Pie it uses similar principles of simplicity and chilling to achieve decadent results.
Tips, Troubleshooting, and Delicious Variations for Your Oreo Cookie Balls
While the recipe for 3-Ingredient No-Bake Oreo Balls is exceptionally simple, knowing how to troubleshoot common issues and explore creative variations can elevate your treats even further. Here are some pro tips and ideas to keep things exciting.
Troubleshooting Common Challenges
My Dough Is Too Sticky to Roll!
If your dough feels excessively sticky and soft, it usually means the cream cheese was either too soft or you used slightly less cookie bulk than needed. The fix: Add 1–2 tablespoons of finely crushed Oreos (or, in a pinch, graham cracker crumbs or powdered sugar) and mix well. Then, ensure you refrigerate the dough for a full hour, or freeze it for 20 minutes, to firm it up significantly before rolling.
My Chocolate Is Too Thick/Seized!
Thick chocolate makes dipping messy and results in a thick, uneven coat. If your chocolate is too thick, stir in 1 teaspoon of coconut oil (or vegetable shortening) at a time until it reaches a desirable fluid consistency. If the chocolate has seized (become thick, grainy, and pasty), it means it was scorched or a drop of water got into it. Unfortunately, seized chocolate cannot usually be fully recovered for dipping, and you may need to start over with a fresh batch.
My Balls Are Cracking After Dipping!
This happens when the Oreo ball is too cold relative to the warm chocolate coating. The cold interior causes the outer chocolate shell to set too quickly and crack. The fix: Let the chilled balls sit at room temperature for about 5–10 minutes before dipping. They should still be very cold, but not ice-cold, allowing the chocolate a fraction more time to solidify smoothly.
Exciting Variations on the Classic 3-Ingredient No-Bake Oreo Balls
The beauty of this recipe is its adaptability. Feel free to swap out the classic Oreos for any flavor your heart desires:
- Mint Chocolate Oreo Truffles: Use Mint-flavored Oreos and dip them in dark chocolate. Drizzle with melted white chocolate colored green for a festive look.
- Peanut Butter Perfection: Use Peanut Butter Oreos, or mix 1/4 cup of creamy peanut butter directly into the standard Oreo/cream cheese mixture. Dip in milk chocolate. (If using extra PB, you may need to add a few extra crumbs to maintain firmness.)
- Seasonal Cheesecake Balls: For a fall-themed treat, substitute Oreos with pumpkin-flavored cookies and sprinkle with cinnamon sugar.
- Red Velvet Flair: Use Red Velvet Oreos and dip them in white chocolate for a beautiful contrast, perfect for Valentine’s Day or Christmas.
Elevated Topping Ideas
Dressing up your Oreo truffles is the easiest way to make them look gourmet.
- Nuts and Crunch: Dip in dark chocolate and immediately roll in finely chopped pecans, pistachios, or walnuts.
- Elegant Drizzles: Dip the balls in milk chocolate, let them set halfway, then drizzle with contrasting white chocolate using a fork or piping bag.
- Salted Caramel: Sprinkle with flaky sea salt immediately after dipping. Once set, drizzle with high-quality caramel sauce.
- For the Holidays: Use colorful sanding sugars or festive sprinkles while the chocolate is wet. For more inspiration on holiday treats and simple desserts, be sure to visit my Pinterest board: Recipes Amaya Blog Festive Desserts.
By experimenting with these variations, you ensure that the simple base of the 3-Ingredient No-Bake Oreo Balls remains a household favorite, adapting to different tastes and seasons with ease.
Nutritional Snapshot and Ingredient Spotlight
When indulging in a delightful treat like 3-Ingredient No-Bake Oreo Balls, it is important to remember that these are fundamentally a dense, dessert item. While we focus on maximizing flavor and minimizing effort, it’s useful to understand the nutritional contribution of the key ingredients.
Estimated Nutritional Values (Per Ball)
Please note that the exact nutritional content can vary based on the size of the ball, the type of dipping chocolate used, and the thickness of the coating. These figures are approximations based on a standard 1-tablespoon portion, yielding approximately 40 balls per batch.
| Nutrient | Approximate Value |
|---|---|
| Calories | 85 – 100 kcal |
| Total Fat | 5 – 7 g |
| Saturated Fat | 3 – 4 g |
| Total Carbohydrates | 8 – 10 g |
| Sugar | 6 – 8 g |
| Protein | 1 – 2 g |
Spotlight on Ingredients and Potential Benefits
While this recipe is categorized as an indulgent treat, the components themselves offer some minor nutritional elements:
Cream Cheese (The Binder)
Cream cheese provides the rich, creamy texture and acts as the crucial binding agent for these Oreo truffles. Nutritionally, it offers a small amount of high-quality protein and essential fat. When consumed in moderation, the fats contribute to the overall satiety and luxurious mouthfeel of the dessert.
Chocolate (The Coating)
The dipping chocolate, especially if you opt for dark chocolate, offers more than just flavor. Dark chocolate contains antioxidants, including polyphenols and flavanols, which are associated with improving blood flow and reducing inflammation. While the quantity in one truffle is small, incorporating dark chocolate ensures you get some nutritional benefit alongside the sweetness. Moreover, chocolate is well-known for boosting mood, thanks to compounds like phenylethylamine (PEA), which trigger the release of endorphins.
Oreos (The Base)
The cookie base provides the primary source of carbohydrates and recognizable flavor. These simple carbs provide a quick source of energy, making these easy dessert recipes a good option for a fast energy lift during a busy day or after a workout (though certainly not a primary health food!).
Making It Healthier (Relatively Speaking)
If you wish to slightly reduce the decadence of your 3-Ingredient No-Bake Oreo Balls, consider these minor adjustments:
- Reduced-Fat Cream Cheese: While it may slightly change the texture (making the dough potentially firmer), using neufchâtel or reduced-fat cream cheese can cut down on the saturated fat content.
- Choose Dark Chocolate: Use 70% cacao or higher dark melting chocolate for the coating to reduce sugar content and maximize antioxidant benefits.
- Minimize the Coating: Use the dipping technique outlined in Step 5 (tapping off the excess) to ensure a very thin chocolate shell, reducing overall fat and sugar per truffle.
Regardless of minor adjustments, remember that these 3-Ingredient No-Bake Oreo Balls are intended as a delightful indulgence, best enjoyed in reasonable portions! Their primary benefit is the joy they bring to the table.
FAQs About 3-Ingredient No-Bake Oreo Balls
How long do 3-Ingredient No-Bake Oreo Balls last and how should I store them?
These Oreo truffles should always be stored in an airtight container in the refrigerator due to the cream cheese content. When stored properly, they will last for up to 1 week. For longer storage, you can freeze them for up to 2 months; just thaw them in the refrigerator before serving.
Can I use low-fat or whipped cream cheese for this recipe?
It is strongly recommended to use full-fat block cream cheese (8 oz brick). Whipped cream cheese has too much air incorporated, which changes the density, while low-fat versions contain more water and less fat, which can result in a stickier, less workable dough. The full-fat block ensures the perfect rich, firm consistency for rolling the 3-Ingredient No-Bake Oreo Balls.
What is the best way to melt the chocolate for dipping the Oreo truffles?
The safest and best method is using a deep, microwave-safe bowl and heating the chocolate in 30-second bursts, stirring vigorously between each. Be sure to use quality melting wafers or almond bark, as these are formulated to melt smoothly without seizing or requiring complicated tempering. Avoid overheating, as this will scorch the chocolate.
Why do I need to chill the Oreo cookie balls for so long before dipping?
Chilling the 3-Ingredient No-Bake Oreo Balls for at least one hour is non-negotiable for success. The cold temperature ensures the balls are firm enough to withstand the warmth of the melted chocolate without melting, crumbling, or falling off the dipping tool. It also prevents the chocolate shell from cracking after it sets.
Can I make these easy dessert recipes gluten-free or vegan?
Yes! Oreo offers certified gluten-free cookies, which work perfectly as a substitute. To make them vegan, use the accidently vegan Oreos (check ingredients, as flavors vary) and substitute the cream cheese with a vegan cream cheese block (Miyoko’s or Kite Hill are great) and use a vegan chocolate melting wafer for the coating. The consistency should remain largely the same.
Can I skip the chocolate dipping step entirely?
While the chocolate coating adds texture, crunch, and visual appeal, you can certainly skip the dipping step. If you omit the chocolate, the 3-Ingredient No-Bake Oreo Balls will essentially be simple Oreo cookie dough balls. In this case, roll them in powdered sugar or cocoa powder immediately after rolling for a polished, finished look, similar to traditional powdered sugar-coated truffles.
Conclusion: The Sweetest Simplicity
The appeal of the 3-Ingredient No-Bake Oreo Balls is clear: they are the epitome of simple sweet treats that taste anything but simple. This recipe demystifies the art of confectionery, proving that you don’t need a pantry full of specialty items or hours of dedicated kitchen time to produce a truly spectacular dessert. From the satisfying crunch of finely ground Oreo crumbs to the creamy texture provided by the softened cream cheese, sealed in by a snappy, glossy chocolate shell, these truffles are a textural and flavor masterpiece.
We’ve covered everything you need for success: from the necessity of using room-temperature cream cheese and choosing the right dipping chocolate, to essential chilling times and creative variation ideas. Whether you are prepping for a large holiday gathering, hosting a casual dinner party, or simply craving an effortless indulgence, these Oreo truffles are a guaranteed hit. They travel well, they hold up beautifully in the fridge, and they offer endless possibilities for customization.
Now that you are equipped with the detailed instructions and expert tips, there is no reason to delay. Grab those three core ingredients and get started. If you enjoyed the straightforward nature of this recipe, be sure to explore more of our easy dessert recipes, like our incredibly simple 3-Ingredient Peanut Butter Balls, which uses a similar no-bake method.
If you try this recipe for 3-Ingredient No-Bake Oreo Balls, we would absolutely love to hear about your experience! Did you stick to the classic flavor, or did you try one of our variations? Share your photos and comments below happy rolling!
3-Ingredient No-Bake Oreo Balls (Oreo Truffles)
Ingredients
Equipment
Method
- Crush the Oreos: Place all the Oreo cookies (including the cream filling) into a food processor. Pulse until they form fine, uniform crumbs, similar to flour. Pour crumbs into a large mixing bowl. Reserve approximately 1/4 cup of the crumbs for decorating the tops later.
- Combine Ingredients: Add the fully softened cream cheese to the bowl with the crushed Oreos. Use a rubber spatula or electric mixer on low speed to mix thoroughly until a stiff, uniform, dark dough forms. Ensure there are no streaks of white cream cheese remaining.
- Roll and Chill: Scoop the mixture using a 1-tablespoon cookie scoop. Roll each portion firmly between your palms into a smooth ball. Place the finished balls onto a baking sheet lined with parchment paper. Transfer the sheet to the refrigerator and chill for a minimum of 60 minutes. (Chilling is mandatory to prevent the balls from dissolving in the warm chocolate.)
- Melt the Chocolate: Place the dipping chocolate in a deep, microwave-safe bowl. Heat in the microwave in 30-second bursts, stirring vigorously after each interval, until the chocolate is completely melted and smooth. If the chocolate is too thick, stir in 1 teaspoon of coconut oil or shortening to thin it slightly.
- Dip the Truffles: Remove the chilled Oreo balls from the fridge. Using a dipping fork or two standard forks, submerge one ball completely in the melted chocolate. Lift the ball out and gently tap the fork against the edge of the bowl to allow excess chocolate to drip off, creating a thin, smooth coating.
- Decorate and Set: Immediately place the dipped ball back onto the parchment-lined baking sheet. While the chocolate is still wet, sprinkle the top with the reserved Oreo crumbs or other desired garnishes. Repeat this process quickly with the remaining balls.
- Finish Chilling: Once all balls are dipped and decorated, place the baking sheet back into the refrigerator for 15-20 minutes until the chocolate shell has hardened completely.