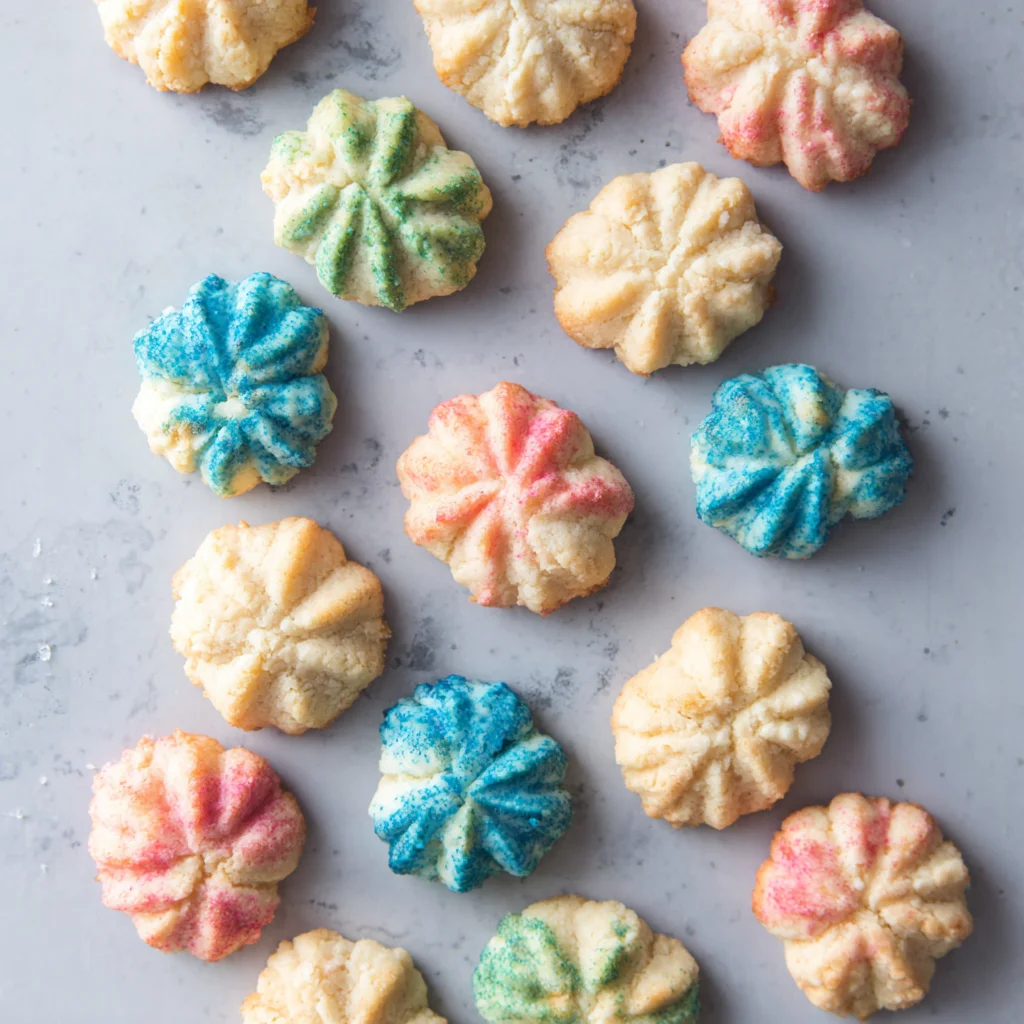
There are few cookies that evoke the sense of cozy holiday nostalgia quite like the delicate, buttery Spritz Cookie. Originating in Germany and Scandinavia, the word “Spritz” comes from the German verb spritzen, meaning “to squirt,” which perfectly describes the method used to form these cookies through a specialized press.
Unlike rugged drop cookies or rigid cutout shapes, the Spritz Cookie offers a unique combination of tender texture and precise, beautiful design. They are fragile yet rich, holding their intricate shapes perfectly during baking, resulting in a sweet, light cookie that literally melts in your mouth. This specific recipe is formulated to achieve the exact consistency required for reliable performance in a cookie press, eliminating the frustration of dough that won’t adhere or spreads too much.
Whether you are preparing for a festive Christmas platter, looking for a simple, elegant treat for afternoon tea, or simply craving the satisfying crunch of a classic butter cookie, this guide provides the precise ratios, essential tips, and detailed instructions to make your next batch of pressed cookies a resounding success. Forget the complicated piping bags; mastering the cookie press with this foolproof dough is your ticket to effortlessly beautiful baking.
Why You’ll Fall in Love with this Timeless Spritz Cookie Recipe (The Joy of Pressed Cookies)
The decision to embrace the classic Spritz Cookie tradition isn’t just about making another dessert; it’s about investing in a simple, satisfying, and beautiful baking experience. Many home bakers shy away from pressed cookies, fearing the notorious difficulty of getting the dough to stick or the shapes to hold, but this precise butter-rich formulation guarantees success, turning fear into confidence.
Unmatched Buttery Flavor and Tender Texture
The foundation of a great Spritz Cookie is its high butter content. Unlike standard sugar cookies that rely heavily on flour for structure, the Spirtz dough is deeply enriched with butter. This results in an incredibly short texture meaning the cookie is tender, flaky, and crumbly, dissolving almost instantly upon hitting your tongue. The flavor profile is pure, sweet, and comforting, making it a perfect canvas for subtle enhancements like vanilla or almond extract. This recipe focuses on maximizing that pure, creamy butter flavor, which is truly the defining characteristic of this Scandinavian classic.
Effortless Elegance Through the Cookie Press
If you’re tired of cutting out dozens of intricate holiday shapes, the cookie press is your new best friend. Using a press automates the most time-consuming part of decorative baking. In a matter of minutes, you can transform a single batch of dough into dozens of uniformly sized cookies from festive wreaths and trees to stars and simple flowers. The resulting visual impact, especially when finished with sparkling colored sugar or simple sprinkles, far outweighs the minimal effort involved. This rapid production capability makes the Spritz Cookie recipe an absolute must-have for large holiday gatherings or cookie exchanges, saving you precious time without sacrificing aesthetic appeal.
Moreover, the versatility of the cookie press allows for continuous creative exploration. Even if you use the same dough base every time, changing the disc delivers an entirely new presentation. You can easily categorize your cookies by shape and color, providing a professional, varied look to your dessert platter. The repetitive motion of pressing the dough onto the sheet is surprisingly therapeutic, making the baking process itself enjoyable and meditative. The secret is always starting with a dough formulated exactly like this one not too wet, not too dry, and perfectly pliable for the press mechanism.
Why This Specific Spritz Cookie Formulation Guarantees Success
Baking with a cookie press demands a specific dough structure that differs significantly from standard drop or roll-out cookies. If the dough is too rich in sugar or too liquid, it will spread and lose its shape. If it’s too dry, it won’t pass through the fine disc holes or adhere properly to the baking sheet. This recipe is meticulously balanced to address these challenges, ensuring high-quality results every time you pull out your cookie press.
The Critical Role of Ingredients Temperature
The success of pressed cookies hinges almost entirely on the temperature of the fat. This recipe explicitly calls for butter that is “truly soft, but not melted.” When the butter is creamed with sugar (Step 2), it incorporates tiny air pockets that create the light, fluffy texture necessary for the final cookie. If the butter is too cold, the dough will be dense and difficult to press; if it’s too warm or melted, the dough will be greasy, won’t hold its shape, and, crucially, will refuse to stick to the ungreased metal baking sheet. The precise temperature balance of the ingredients is non-negotiable for a perfect Spritz Cookie.
The Ungreased Sheet Requirement
One of the most unique and often confusing aspects of making Spritz Cookies is the absolute prohibition on greasing the pan or using parchment/silicone mats. Pressed cookies must have something to grip onto when released from the press. The cool, clean, ungreased metal surface provides the friction needed for the delicate dough shape to detach from the press mechanism. If the sheet is slick, the cookie will stay stuck to the press and lift off the pan when you pull the press away. Understanding and adhering to this critical instruction as highlighted in Step 1 is foundational to successfully pressing your holiday butter cookies.
If you find yourself needing other simple, comforting holiday recipes that complement these delicate treats, you might enjoy our article on Cherry Snowball Cookies: A Festive Delight, which offers a contrasting texture perfect for a mixed platter. Furthermore, the light, slightly crunchy texture of the Spritz Cookie provides a wonderful contrast to richer desserts, like our recipe for Decadent Chocolate Peanut Butter Swirl Pie, making your entire dessert spread cohesive and interesting.
Ingredients and Necessary Utensils for Perfect Spritz Cookie Baking
Achieving the ideal texture for these pressed butter cookies requires strict adherence to measurements and temperatures. Please ensure all ingredients are gathered and prepared before starting the mixing process.
Detailed Ingredient Breakdown (The Core of the Classic Recipe)
The ratio of fat to flour in this dough is key to ensuring it passes smoothly through the press while maintaining structural integrity during baking.
Essential Ingredients
- Unsalted Butter, softened: 1 cup (2 sticks)
- Quantity Rationale: Butter provides the rich flavor and tenderness. Using unsalted butter allows you to fully control the salt content.
- Temperature Note: This is arguably the most crucial step. The butter should yield easily when gently pressed but should not look shiny or greasy. Cold butter makes the dough too stiff; melted butter creates a greasy dough that spreads. Room temperature (around 68-70°F or 20°C) is perfect.
- Granulated Sugar: 2/3 cup
- Function: Provides sweetness and aids in creaming by creating necessary air pockets.
- Tip: Do not substitute with powdered sugar, as the cornstarch can change the dough’s behavior in the press.
- Large Egg: 1
- Temperature Note: A room temperature egg incorporates more smoothly into the creamed butter and sugar, ensuring the emulsion doesn’t break. Place the egg in a bowl of warm water for 5 minutes if you forget to take it out ahead of time.
- Vanilla Extract: 1 teaspoon
- Flavor Options: Vanilla is the traditional flavor, but for a true Scandinavian twist, substitute or combine it with 1 teaspoon of high-quality almond extract. Almond extract provides that distinctive holiday flavor often associated with the classic Spritz Cookie.
- Salt: 1/4 teaspoon
- Role: Essential for balancing the intense sweetness and enhancing the deep, buttery flavor.
- All-Purpose Flour: 2 1/4 cups
- Measurement Precision: Use the “spoon-and-level” method. Fluff the flour in its container, gently spoon it into the measuring cup, and level the excess off with a straight edge. Do not scoop the flour directly with the measuring cup, as this compresses it, adding too much flour and resulting in a dry, crumbling dough that will break your cookie press.
Recommended Tools and Utensils for Spritz Success
While basic baking tools suffice for mixing, the cookie press itself is indispensable for achieving the signature shapes of the Spritz Cookie.
Essential Equipment Checklist
- Stand Mixer or Handheld Electric Mixer: A stand mixer fitted with the paddle attachment is highly recommended, as the dough becomes quite stiff at the end of the mixing process. Ensure you have a sturdy mixer that can handle thick dough.
- The Cookie Press (A Specialty Tool):
- Types: Whether you use an electric press or a manual crank/lever model, familiarity with your specific device is key. Electric models offer consistency and speed, while manual models give you better control over the dough release.
- Discs: Have a variety of discs ready the simple flower, Christmas tree, or wreath shapes are excellent starting points for practicing your technique.
- Unaltered Metal Baking Sheets:
- Crucial Requirement: You must use standard, ungreased, bare metal baking sheets. Non-stick sheets, sheets lined with parchment paper, or silicone mats will prevent the dough from adhering during the press action, leading to frustration. The cool, clean surface is critical for the dough release.
- Rubber Spatula: Necessary for scraping down the bowl during creaming and, perhaps more importantly, for packing the dough tightly into the cookie press barrel to eliminate air pockets.
- Measuring Cups and Spoons: Accurate measurements are critical, especially for the flour.
- Wire Cooling Rack: Used to cool the delicate cookies completely after they have slightly set on the baking sheets.
Detailed Recipe Steps: Mastering the Perfect Spritz Cookie Dough
Follow these steps precisely. Success with a Spritz Cookie recipe lies in temperature control and proper dough handling.
Step 1: Preparation is Non-Negotiable
- Preheat the Oven: Position an oven rack in the center position. Preheat your oven to 375°F (190°C).
- Prepare Baking Sheets: This step is paramount. Gather your metal baking sheets. DO NOT grease them. DO NOT use parchment paper. DO NOT use silicone mats. The dough must be pressed directly onto the clean, bare metal. If your sheets have residual grease, wipe them thoroughly with a paper towel and a little vinegar, then dry completely.
Step 2: Creaming the Butter and Sugar for Fluffiness
- In the bowl of your stand mixer, combine the softened butter (1 cup) and granulated sugar (2/3 cup).
- Begin beating on low speed, gradually increasing to medium speed. Beat for a full 2 to 3 minutes. The goal here is aeration. The mixture must lighten in color, almost becoming pale yellow, and take on a truly fluffy, whipped texture. This stage creates the structure that keeps the cookies tender.
- Stop the mixer often to scrape down the sides and the bottom of the bowl. Ensure every bit of butter and sugar is incorporated evenly.
Step 3: Incorporate Wet Ingredients Smoothly
- Once the butter and sugar are fluffy, stop the mixer. Add the room temperature egg and the vanilla extract (or almond extract).
- Mix on medium speed for about 1 minute. The mixture might look slightly curdled or separated right when the egg is added, but continue mixing until it comes back together into a smooth, thick emulsion. If your ingredients were at the correct temperature, this mixing should happen quickly and result in a homogenous mixture.
Step 4: The Delicate Addition of Dry Ingredients
The key to tender cookies is minimum mixing once the flour is added. Overmixing develops gluten, which makes the cookies tough and resistant to pressing.
- In a separate medium bowl, whisk together the measured all-purpose flour (2 1/4 cups) and the salt (1/4 teaspoon). Whisking ensures the salt is distributed and prevents pockets of uneven flavor or leavening (though this dough uses no chemical leaveners).
- Reduce the mixer speed to the absolute lowest setting. Begin gradually adding the flour mixture about one third at a time.
- Mix only until the flour is just incorporated. Stop immediately once you see no more streaks of dry flour. The finished dough should be soft, uniform, and easily moldable, resembling a stiff play-dough.
- Practical Tip: If your dough feels too sticky or wet (which can happen if your butter was too warm), chill it briefly (10-15 minutes). If it feels too dry and crumbly, add 1 teaspoon of milk or cream at a time, mixing briefly, until the dough holds together.
Step 5: Preparing the Cookie Press
- Select your chosen disc remember that thinner, more intricate shapes often require slightly firmer dough.
- Load the dough into the cookie press barrel. Use a spatula or spoon to press the dough down firmly, working out any air pockets. Air pockets are the enemy of consistent pressing! If there’s air trapped, the press will often produce a half-formed shape or fail to release the dough entirely.
Step 6: Flawless Pressing Technique
Successful pressing is all about pressure and surface adhesion.
- Place the base of the cookie press firmly against the cool, ungreased metal baking sheet. The press should be flush against the surface.
- Press and Release: Activate the press (one lever squeeze or one full crank rotation, depending on your model). Hold the press firmly until you see the desired shape fully formed and stuck to the metal.
- Lift Straight Up: Lift the press directly upward, pulling it away from the cookie shape. The dough should instantly detach from the press and remain firmly adhered to the sheet.
- Troubleshooting: If the cookie pulls up with the press, the sheet is likely too warm or greasy, or the dough is too soft. Wipe the sheet down with a cool, clean cloth and try again. Alternatively, try chilling the dough in the press barrel for 5 minutes.
- Space the Spritz Cookies about 1 to 2 inches apart.
- Immediate Decoration: If you are using non-melting decorations like colored sugar crystals, small nonpareils, or larger decorative sprinkles, apply them now, before the cookie enters the oven. For inspiration on beautiful holiday dessert layouts, be sure to check out our Pinterest board for holiday baking ideas.
Step 7: Baking and Cooling for the Perfect Crispness
- Bake the cookies in the preheated 375°F (190°C) oven for 8 to 12 minutes. Monitor closely. Smaller, thinner shapes will bake faster (closer to 8 minutes).
- The Spritz Cookie is done when the edges are set, firm to the touch, and the absolute bottom rim of the cookie has turned a very light, faint golden-brown color. The centers should remain perfectly pale. Do not wait for the cookies to brown extensively; they will lose their signature tenderness.
- Remove the baking sheets from the oven. Let the cookies rest on the sheets for 2 to 3 minutes. This crucial rest time allows the delicate butter cookies to firm up sufficiently so they won’t break when handled.
- Using a thin, offset spatula, carefully transfer the cookies to a wire cooling rack to cool completely.
- Once cooled, store your finished Spritz Cookies in an airtight container at room temperature for up to one week, or freeze them for longer storage.
Tips, Flavor Variations, and Troubleshooting Your Pressed Cookies
While this recipe is robust, working with a cookie press can sometimes present unique challenges. Here are the professional tips and variations to ensure your baking session is smooth and successful, resulting in perfect, classic Spritz Cookies every time.
Advanced Flavor Variations
The beauty of this classic butter dough is its versatility. You can easily adapt the flavor without compromising the structural integrity needed for pressing:
- Citrus Zest: Add 1 tablespoon of finely grated lemon or orange zest during Step 3 (with the egg) for a bright, seasonal twist.
- Chocolate Spritz Cookie: Substitute 1/4 cup of the all-purpose flour with 1/4 cup of high-quality unsweetened cocoa powder. You may need to add 1-2 teaspoons of milk to achieve the correct dough consistency, as cocoa powder is very absorbent.
- Spiced Holiday Spritz: Add 1/4 teaspoon of ground nutmeg or cardamom (a key spice in Scandinavian baking) along with the salt and flour in Step 4.
- Coloring the Dough: Use gel food coloring (which is highly concentrated and won’t add excess liquid) to color the dough festive shades of green, red, or pink. Add the coloring during Step 3.
Troubleshooting Common Spritz Cookie Issues
The main frustrations when making pressed butter cookies usually center around adhesion and spreading. Here’s how to fix them:
1. The Cookie Won’t Stick to the Sheet
This is the most common issue. The main culprits are warmth and grease.
- Fix Warmth: If your kitchen is hot or the dough has been worked extensively, the butter may have softened too much. Place the dough (either in the bowl or in the press barrel) in the refrigerator for 10–15 minutes to firm up slightly.
- Fix Grease: Ensure the baking sheet is perfectly clean and cold. Wipe it down completely. If you are baking multiple batches, use a second, cool baking sheet while the first one is in the oven. Never press dough onto a warm sheet.
2. The Cookies Spread Too Much While Baking
If your shapes look blurred or flat after baking, the dough contained too much fat or not enough flour, or it was mixed too long.
- Solution: Ensure your flour was measured correctly (spoon and level!). If spreading is still an issue, try chilling the formed cookies on the sheet for 10 minutes before placing them in the hot oven. A quick chill can often stabilize the butter.
3. The Dough is Crumbly and Won’t Press
This usually means the dough is too dry, typically due to over-measured flour or butter that was too cold.
- Solution: Remove the dough from the press. Work in a few drops of milk (or melted butter, very sparingly) until the dough is just pliable enough to stick together when squeezed. Repack the press tightly.
Alternatives for Dietary Restrictions
While the classic Spritz Cookie relies heavily on butter, adjustments can be made for specific needs:
- Gluten-Free Spritz: Substitute the all-purpose flour with a high-quality 1:1 gluten-free baking blend that includes xanthan gum. You may need to slightly reduce the liquid (skip the egg or reduce butter by a tablespoon) or lightly chill the dough, as GF flours handle moisture differently.
- Vegan Spritz: Substitute the butter with high-quality vegan butter sticks (ensure they have a similar fat content to dairy butter). You will need an egg substitute, such as 1 tablespoon of ground flaxseed mixed with 3 tablespoons of water, or a commercial egg replacer, keeping in mind that the structural integrity of the cookie may be slightly reduced.
For more intricate holiday baking, such as delicate pies that pair wonderfully with these crisp cookies, don’t miss our guide on Apple Crumble Pie: A Delicious Fall Dessert.
Nutritional Values and Benefits of the Classic Butter Spritz Cookie
The Spritz Cookie is, first and foremost, a delightful treat. However, understanding the components of this rich butter cookie can help manage portion sizes and appreciate the quality ingredients used.
Estimated Nutritional Information
This recipe yields approximately 4 to 6 dozen small cookies, depending on the disc shape used. The nutritional estimates below are based on a typical 10-gram serving size (one medium Spritz Cookie).
| Nutrient | Approximate Value (Per Cookie) |
|---|---|
| Calories | 50-60 kcal |
| Protein | < 1 g |
| Total Fat | 3-4 g |
| Saturated Fat | 2 g |
| Carbohydrates | 5-7 g |
| Sugars | 3 g |
| Sodium | 15 mg |
Benefits of Quality Ingredients
While these pressed butter cookies are an indulgence, using high-quality, real ingredients offers better nourishment than highly processed store-bought options:
- Real Butter: When using genuine butter (especially grass-fed), you are incorporating healthy fats and fat-soluble vitamins like Vitamin A, D, E, and K. These fats are essential for hormone production and nutrient absorption. The high-fat content also contributes to satiety, making a single Spritz Cookie a satisfying snack.
- Energy Source: The combination of simple carbohydrates (sugar) and fats provides a quick, concentrated source of energy, making them excellent fuel for busy holiday preparations.
- Mood Booster: Perhaps the greatest benefit is the psychological one. Baking, especially intricate tasks like pressing the perfect Spritz Cookie, is a relaxing activity, and enjoying the fruits of your labor contributes significantly to overall happiness and emotional well-being a valuable component of holiday tradition!
By preparing these treats at home, you avoid the unnecessary additives, preservatives, and artificial flavorings often found in mass-produced cookies, allowing you to enjoy a pure, clean butter flavor.
Frequently Asked Questions About the Spritz Cookie (FAQ)
Why are my Spritz Cookies not sticking to the baking sheet?
The primary reason for non-adherence is grease or heat. The cookie press dough requires a cool, completely ungreased metal surface to stick upon release. Ensure you are not using parchment paper, silicone mats, or non-stick sprays. If the dough is too warm, chill it briefly (10-15 minutes) before attempting to press again.
Can I use margarine instead of butter in this classic Spritz Cookie recipe?
While possible, margarine is not recommended for traditional Spritz Cookies. Margarine contains different water and fat ratios than real butter, often leading to cookies that spread excessively and lose their definition. For the best flavor and texture required for a successful pressed cookie, use high-quality unsalted butter.
How do I store Spritz Cookies and how long do they last?
Once completely cooled, store the pressed butter cookies in an airtight container at room temperature. They will retain their freshness and crisp texture for up to one week. For longer storage, you can freeze the baked and cooled cookies for up to three months; thaw them at room temperature before serving.
What is the secret to getting crisp edges on my Spritz Cookie?
Crisp edges depend on a couple of factors: correct baking time and oven temperature. Ensure your oven is accurately preheated to 375°F (190°C). Bake the cookies until the edges just start to turn a pale golden color, but no longer. Immediately cooling the cookies on a wire rack allows residual heat to escape quickly, preventing them from steaming and becoming soft.
Can I make Spritz Cookie dough ahead of time and chill it?
Yes, you can prepare the dough 2-3 days in advance. Wrap the dough tightly in plastic wrap and chill. When ready to use, let the dough sit at room temperature for about 30–60 minutes until it is soft enough to pass easily through the cookie press barrel. If the dough is too cold, it will be impossible to press properly.
Conclusion: The Enduring Charm of the Pressed Butter Cookie
Why are my Spritz Cookies not sticking to the baking sheet?
The primary reason for non-adherence is grease or heat. The cookie press dough requires a cool, completely ungreased metal surface to stick upon release. Ensure you are not using parchment paper, silicone mats, or non-stick sprays. If the dough is too warm, chill it briefly (10-15 minutes) before attempting to press again.
Can I use margarine instead of butter in this classic Spritz Cookie recipe?
While possible, margarine is not recommended for traditional Spritz Cookies. Margarine contains different water and fat ratios than real butter, often leading to cookies that spread excessively and lose their definition. For the best flavor and texture required for a successful pressed cookie, use high-quality unsalted butter.
How do I store Spritz Cookies and how long do they last?
Once completely cooled, store the pressed butter cookies in an airtight container at room temperature. They will retain their freshness and crisp texture for up to one week. For longer storage, you can freeze the baked and cooled cookies for up to three months; thaw them at room temperature before serving.
What is the secret to getting crisp edges on my Spritz Cookie?
Crisp edges depend on a couple of factors: correct baking time and oven temperature. Ensure your oven is accurately preheated to 375°F (190°C). Bake the cookies until the edges just start to turn a pale golden color, but no longer. Immediately cooling the cookies on a wire rack allows residual heat to escape quickly, preventing them from steaming and becoming soft.
Can I make Spritz Cookie dough ahead of time and chill it?
Yes, you can prepare the dough 2-3 days in advance. Wrap the dough tightly in plastic wrap and chill. When ready to use, let the dough sit at room temperature for about 30–60 minutes until it is soft enough to pass easily through the cookie press barrel. If the dough is too cold, it will be impossible to press properly.
The Spritz Cookie is more than just a recipe; it is a delicious tradition, offering tender, buttery perfection molded into beautiful, intricate shapes. By focusing on temperature control, utilizing precise measurements, and adhering to the critical rule of the ungreased baking sheet, you have unlocked the secrets to perfectly pressed cookies that will be the centerpiece of any dessert table.
This classic butter formula delivers an unparalleled taste experience a pure, rich, shortbread-like flavor that is light enough to enjoy by the dozen. Whether you chose to infuse them with traditional almond extract or kept them pure with vanilla, the resulting cookie is a testament to the fact that the simplest recipes are often the most satisfying.
Now that you have mastered the art of the Spritz Cookie, we encourage you to grab your cookie press, embrace the creativity of the different discs, and fill your kitchen with the irresistible aroma of baking butter. Don’t forget to share your beautifully pressed creations with us! Try this recipe this week, bookmark it for your holiday baking plans, and let us know in the comments how your delicate pressed butter cookies turned out. Happy baking!
Classic Butter Spritz Cookie Recipe (Cookie Press)
Ingredients
Equipment
Method
- Preparation and Gathering: Adjust your oven rack to the middle position and preheat your oven to 375°F (190°C). Crucially, DO NOT grease the baking sheets, line them with parchment paper, or use silicone mats. Spritz cookies require a plain, ungreased metal surface to properly adhere when pressed.
- Creaming the Butter and Sugar: In the bowl of a stand mixer fitted with the paddle attachment, or using a large bowl and a handheld electric mixer, beat the softened butter and the granulated sugar together on medium speed for approximately 2 to 3 minutes, or until the mixture is light in color and fluffy in texture. Scrape down the sides of the bowl frequently.
- Incorporate Wet Ingredients: Stop the mixer and add the room temperature large egg and the vanilla extract (or almond extract). Mix again on medium speed until the egg is fully incorporated, about 1 minute. The mixture should come together smoothly.
- Add Dry Ingredients: In a separate bowl, whisk together the measured all-purpose flour and the salt. Reduce the mixer speed to low. Gradually add the flour mixture to the wet ingredients, mixing only until the flour is just combined and no streaks of dry flour remain. The dough should be soft, pliable, and hold its shape. Do not overmix.
- Loading the Cookie Press: If the dough is too soft or warm, chill it briefly (10-15 minutes). Select your desired cookie disc shape and lock it into the cookie press barrel. Carefully fill the cookie press barrel with the dough, packing it in tightly to remove any air pockets.
- Pressing the Cookies: Place the base of the cookie press firmly against the ungreased baking sheet. Press the lever or turn the crank once. Lift the cookie press straight up, ensuring the cookie adheres to the cool metal sheet. Space the cookies approximately 1 to 2 inches apart. Decorate immediately with sprinkles or colored sugar, if desired.
- Baking and Cooling: Bake the cookies in the preheated 375°F (190°C) oven for 8 to 12 minutes. The cookies are finished when the edges are lightly set and the very bottom rim just begins to turn a faint golden brown color (the center should remain pale). Remove the baking sheets and allow the cookies to cool on the sheets for 2 to 3 minutes before transferring them carefully to a wire cooling rack to cool completely.