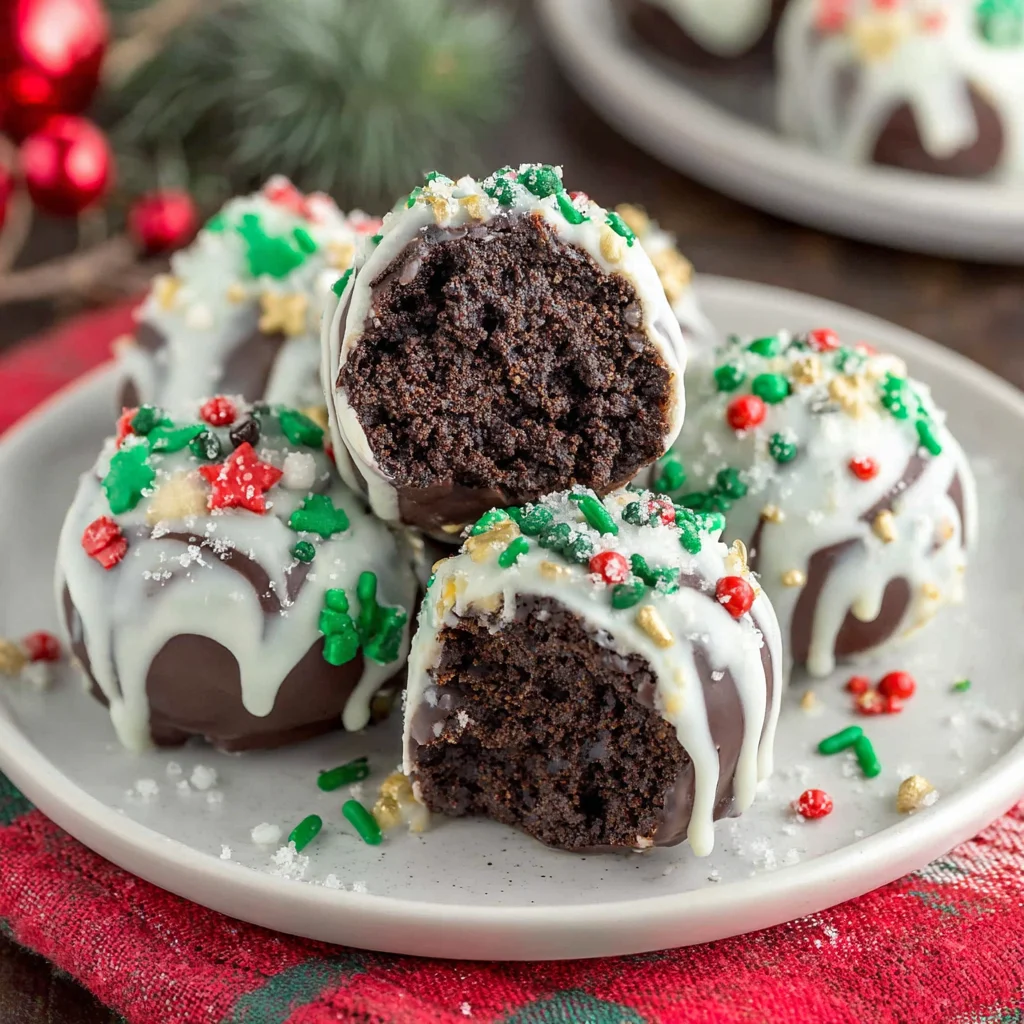
The holiday season is a time for warmth, togetherness, and of course, delicious treats! And what better way to celebrate the magic of Christmas than with these delightful Christmas Oreo Balls? These no-bake delights are surprisingly easy to make, irresistibly delicious, and perfect for sharing with family and friends. Forget the complicated baking projects; these festive bites require minimal effort, yielding maximum festive cheer. Imagine the joy on your loved ones’ faces as they bite into these creamy, chocolatey orbs, adorned with a festive red and green swirl. These Christmas Oreo Balls are not just a dessert; they’re an experience, a memory in the making, a perfect addition to your Christmas cookie platter, or a delightful standalone treat. Get ready to impress your guests and create a truly unforgettable Christmas experience with these easy-to-make, crowd-pleasing goodies.
Why You’ll Love This Christmas Oreo Balls Recipe
This Christmas Oreo Balls recipe is a winner for several reasons. Firstly, it’s incredibly simple. No oven required! This means less time spent in the kitchen and more time enjoying the festive season. Perfect for busy holiday schedules, these no-bake balls are a lifesaver when you’re short on time but still want to deliver a delicious and impressive dessert. Secondly, the flavor combination is irresistible. The classic crunch of Oreos pairs beautifully with the smooth cream cheese filling, all enveloped in a rich layer of white chocolate and adorned with festive Christmas colors. It’s the perfect balance of sweet, creamy, and crunchy, guaranteeing a satisfying treat for every palate. Thirdly, the recipe is highly customizable. Feel free to experiment with different colored candy melts, sprinkles, or even add a touch of peppermint extract to the cream cheese mixture for an extra festive zing. The possibilities are endless! These are truly versatile treats, easily adaptable to your preferences and dietary needs (we’ll explore some variations later!). Finally, these Christmas Oreo Balls are visually stunning. Their perfectly round shape and vibrant Christmas-themed decorations make them a showstopper on any dessert table. They look just as good as they taste, making them the perfect treat for any Christmas gathering.
Why You Should Try This Christmas Oreo Balls Recipe
Beyond the ease and deliciousness, this Christmas Oreo Balls recipe offers several compelling reasons to give it a try. It’s a great recipe to make with kids – it’s a fun and engaging activity that involves minimal risk and maximum festive fun. Rolling the balls and decorating them is a fantastic way to involve the whole family in the holiday baking tradition, creating cherished memories around the kitchen table. Furthermore, this recipe is perfect for holiday gifting. Beautifully packaged, these Christmas Oreo Balls make a thoughtful and delicious present for neighbors, friends, colleagues, or teachers. Imagine the delighted smiles when you present these festive treats! Lastly, they are incredibly versatile. This recipe is the ultimate blank canvas for festive creativity. You can tailor it to fit any theme or color scheme, ensuring it aligns perfectly with your holiday décor. They are a perfect addition to any Christmas celebration, making them an ideal centerpiece for your Christmas party or a simple yet delicious dessert for a cozy family night. You can even scale the recipe up or down to suit the number of guests you’re entertaining. So why not ditch the complicated recipes and embrace the simple joy of these delightful Christmas Oreo Balls?
Ingredients and Necessary Utensils for Christmas Oreo Balls
- Main Ingredients:
- 1 package (16 ounces) Oreo cookies – The foundation of our delicious treat! Choose your favorite flavor; classic Oreos work wonderfully.
- 8 ounces cream cheese, softened – Make sure your cream cheese is at room temperature for easy mixing. This adds creaminess to the Oreo mixture.
- 12 ounces white chocolate chips – High-quality white chocolate will enhance the overall taste and melt smoothly.
- 1/2 cup red candy melts – These will add the festive pop of Christmas color.
- 1/2 cup green candy melts – To complete your Christmas color scheme.
- Sprinkles (optional) – For that extra touch of festive sparkle and fun! Choose Christmas-themed sprinkles for an extra festive touch.
- Milk (optional, 1 teaspoon at a time) – To adjust the consistency of the Oreo and cream cheese mixture if needed.
- Utensils:
- Food processor or zip-top bag and rolling pin – For crushing the Oreos efficiently.
- Medium bowl – For mixing the crushed Oreos and cream cheese.
- Measuring cups and spoons – For accurate ingredient measurements.
- Spatula or wooden spoon – For mixing the ingredients.
- Baking sheet – For setting the Oreo balls.
- Parchment paper – To prevent sticking and for easy cleanup.
- Microwave-safe bowls (at least 3) – For melting the chocolate and candy melts.
- Small saucepan (optional) – For melting the chocolate and candy melts on the stovetop if you prefer.
- Double boiler (optional) – Another method for gently melting the chocolate and candy melts.
- Fork or toothpick – For drizzling the melted candy melts.
- Airtight container – For storing the finished Christmas Oreo Balls.
Detailed Recipe Steps for Making Christmas Oreo Balls
- Crush the Oreos: This is the first step in creating our Christmas Oreo Balls. Place the Oreo cookies in a food processor and pulse until they are finely crushed, almost resembling crumbs. If you don’t have a food processor, you can place the Oreos in a sturdy zip-top bag and crush them using a rolling pin. **Ensure that the Oreos are finely crushed for a smooth, consistent texture.**
- Combine with Cream Cheese: In a medium bowl, add the crushed Oreos and the softened cream cheese. Use a spatula or a wooden spoon to mix the ingredients thoroughly until they form a dough-like consistency. **If the mixture is too dry, add a teaspoon of milk at a time until it comes together, mixing well after each addition.** This will help you achieve the perfect consistency for rolling.
- Roll into Balls: Now, the fun begins! Using your hands, roll the Oreo and cream cheese mixture into 1-inch balls. **Make sure the balls are uniform in size for consistent baking and an attractive presentation.** Place the rolled balls onto a baking sheet lined with parchment paper. This prevents sticking and makes cleanup a breeze.
- Chill the Balls: Refrigerate the Oreo balls for at least 30 minutes to firm up. **Chilling the balls is crucial; it makes them much easier to dip in the melted chocolate and prevents them from melting or becoming misshapen.** While they are chilling, prepare your chocolate.
- Melt the White Chocolate: Place the white chocolate chips in a microwave-safe bowl. Microwave in 30-second intervals, stirring after each interval, until the chocolate is completely melted and smooth. **Avoid overheating the chocolate, as this can cause it to seize up and become grainy.** If you prefer, you can use a double boiler or a small saucepan over low heat to melt the chocolate gently.
- Dip the Balls: Once the white chocolate is melted, carefully dip each Oreo ball into the melted chocolate, ensuring it’s fully coated. **Gently tap off any excess chocolate** to prevent dripping and create a smooth, even coating. Place the chocolate-covered Oreo balls back onto the parchment-lined baking sheet.
- Melt the Candy Melts: Melt the red and green candy melts separately in microwave-safe bowls using the same method as the white chocolate. Again, **be mindful not to overheat the candy melts.**
- Decorate (Optional): Once the white chocolate has set slightly (but is still a little tacky), use a fork or toothpick to drizzle the melted red and green candy melts over the Oreo balls in a festive pattern. **Add sprinkles while the candy melts are still wet for extra sparkle and adhesion.**
- Chill Again: Refrigerate the decorated Oreo balls for another 15-20 minutes to allow the chocolate to fully set. **This ensures that the decorations stay in place and the chocolate creates a hard, smooth shell.**
- Enjoy!: Your Christmas Oreo Balls are now ready to enjoy! Store them in an airtight container in the refrigerator for up to a week. They make a wonderful addition to your Christmas cookie platter, or a delightful standalone treat.
Tips and Variations for Christmas Oreo Balls
For a richer flavor, consider using dark chocolate or milk chocolate instead of white chocolate. You can even use a combination of different chocolates for a unique taste experience. For a more intense Christmas flavor, add a teaspoon of peppermint extract to the cream cheese mixture before rolling the balls. If you’re looking for a vegan option, substitute the cream cheese with a vegan cream cheese alternative and use vegan white chocolate chips and candy melts. For a gluten-free version, use gluten-free Oreo cookies. To avoid common mistakes, ensure that the cream cheese is softened to room temperature, and don’t overheat the chocolate or candy melts. Overheating can result in a grainy texture or seizing. If you find your Oreo mixture too dry, add a teaspoon of milk at a time until you get the desired consistency. Lastly, chilling the balls properly before dipping them in chocolate is crucial for a smooth, professional finish.
Nutritional Values and Benefits of Christmas Oreo Balls
While Christmas Oreo Balls are undeniably indulgent, it’s important to be mindful of their nutritional content. A typical Oreo ball will contain a moderate amount of calories, primarily from the Oreo cookies, cream cheese, and chocolate. The Oreo cookies are a source of carbohydrates and some fats, while the cream cheese contributes to the fat and protein content. The chocolate chips add more fats and carbohydrates, as well as antioxidants. Remember that the exact nutritional values will vary depending on the specific brands of ingredients used. For a healthier alternative, consider reducing the amount of chocolate used or opting for dark chocolate, which has a higher concentration of antioxidants. You could also try substituting some of the Oreos with crushed nuts or seeds for a more nutritious and textured treat. Remember that moderation is key when enjoying these delightful treats, especially during the holiday season.
FAQs about Christmas Oreo Balls
How long do Christmas Oreo Balls last?
Can I make Christmas Oreo Balls ahead of time?
What kind of chocolate is best for Christmas Oreo Balls?
Are Christmas Oreo Balls gluten-free?
Can I freeze Christmas Oreo Balls?
Conclusion: Celebrate Christmas with Delicious Christmas Oreo Balls
These Christmas Oreo Balls are more than just a recipe; they’re a festive tradition waiting to be made. The ease of preparation, coupled with their irresistible flavor and stunning appearance, makes them the perfect treat for any holiday gathering. Don’t be afraid to experiment with different decorations and flavors to personalize them and make them truly your own. Share your creations with friends and family, and spread the Christmas cheer through these delightful little bites. We hope you enjoy making and sharing these festive treats as much as we do. Don’t forget to share your pictures and experiences in the comments below! And for more festive dessert ideas, why not check out our recipe for Oreo Fudge? Happy holidays!
Follow us on Pinterest for more delicious recipes!
Christmas Oreo Balls: Festive No-Bake Treats
Ingredients
Equipment
Method
- Crush the Oreos: Pulse Oreos in a food processor until finely crushed. Alternatively, crush in a bag with a rolling pin.
- Combine with Cream Cheese: In a bowl, mix crushed Oreos and softened cream cheese until a dough forms. Add milk, a teaspoon at a time, if needed.
- Roll into Balls: Roll mixture into 1-inch balls and place on a parchment-lined baking sheet.
- Chill: Refrigerate for at least 30 minutes to firm.
- Melt White Chocolate: Melt white chocolate chips in 30-second intervals, stirring until smooth.
- Dip and Set: Dip each Oreo ball in melted white chocolate, tapping off excess. Place back on the baking sheet.
- Melt & Decorate: Melt red and green candy melts separately. Drizzle over the slightly set white chocolate. Add sprinkles immediately.
- Chill Again: Refrigerate for 15-20 minutes to set the chocolate completely.