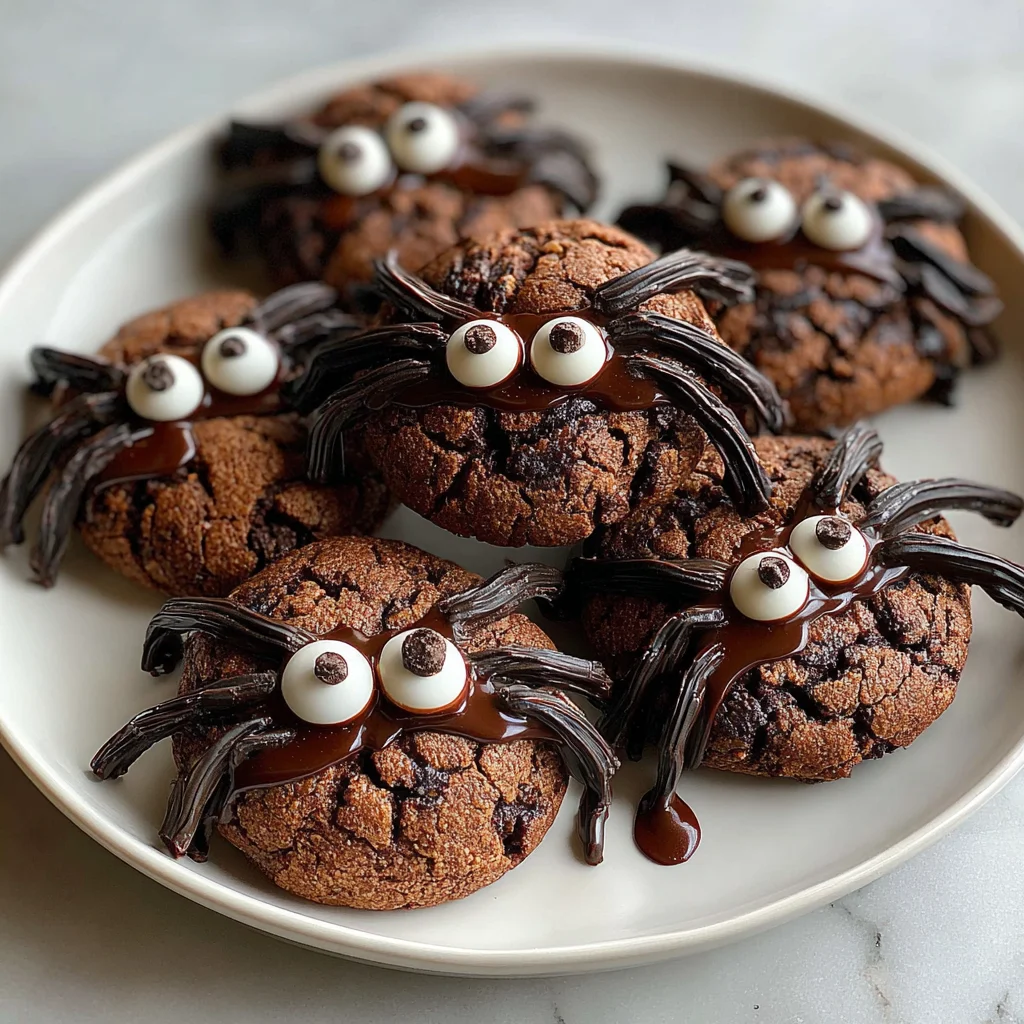
Halloween is just around the corner, and what better way to celebrate than with these frightfully delicious Chocolate Spider Cookies? These aren’t your average chocolate chip cookies; they’re a fun, festive treat perfect for parties, family gatherings, or a spooky movie night. Imagine sinking your teeth into a rich, chewy chocolate cookie, adorned with perfectly crafted spider legs, each one a testament to your baking prowess. This recipe is surprisingly simple, yet the results are incredibly impressive. From the moment you begin mixing the ingredients to the satisfying crunch of the final product, the entire process is a delightful experience. You’ll be amazed at how quickly you can whip up a batch of these captivating cookies, and even more delighted by the oohs and aahs they’ll elicit from your guests. Prepare to be the star baker of your Halloween celebration with these irresistible Chocolate Spider Cookies!
Why You’ll Love This Chocolate Spider Cookies Recipe
There are so many reasons why you’ll adore this Chocolate Spider Cookies recipe. First and foremost, the flavor is simply divine. The combination of rich, decadent chocolate and the chewy texture of the cookies is unbeatable. They’re not overly sweet, striking a perfect balance between chocolatey richness and subtle sweetness. Secondly, these cookies are incredibly easy to make. The recipe is straightforward, requiring no special skills or equipment. Even beginner bakers will find this recipe accessible and enjoyable. Thirdly, the spider decoration adds a touch of whimsy and fun. They’re perfect for Halloween, but honestly, they’re delightful any time of year. The spooky spider detail elevates these cookies from ordinary to extraordinary, making them a conversation starter at any gathering. Finally, these cookies are incredibly adaptable. You can easily customize them to your liking, adding different types of chocolate chips, nuts, or even a hint of spice. Get creative and make them your own! They’re also wonderfully versatile, perfect for sharing or enjoying as a personal indulgence. Consider these Chocolate Spider Cookies your new go-to recipe for any occasion that calls for a delicious and visually appealing treat. You’ll be making these again and again!
Why You Should Try This Chocolate Spider Cookies Recipe
Beyond the deliciousness, this Chocolate Spider Cookies recipe offers several compelling reasons to give it a try. Firstly, it’s a guaranteed crowd-pleaser. Whether you’re hosting a Halloween party or simply looking for a fun weekend baking project, these cookies are sure to be a hit with everyone. Their unique appearance and satisfying taste will impress even the most discerning palates. Secondly, this recipe provides a fantastic opportunity to get creative in the kitchen. Decorating the cookies with spider legs is a fun activity for kids and adults alike, making it a great family project. The simple process encourages creativity and makes baking more engaging. Thirdly, this recipe is a great way to use up ingredients you may already have in your pantry. The ingredients are common and readily available, meaning you can likely start baking without a trip to the store. Finally, these cookies are a delightful way to add a festive touch to any occasion. Their spooky appeal makes them perfect for Halloween, but their deliciousness transcends the holiday, making them a perfect treat year-round. So ditch the store-bought cookies and embrace the joy of homemade treats with this easy and fun recipe. Give this Chocolate Spider Cookies recipe a try; you won’t be disappointed! It’s a recipe you’ll want to keep in your recipe arsenal for years to come.
Ingredients and Utensils for Perfect Chocolate Spider Cookies
Gathering the right ingredients and utensils is key to creating the perfect Chocolate Spider Cookies. Let’s dive into a detailed list to ensure your baking success. Remember, precise measurements are essential for optimal results.
- Unsalted Butter: 1 cup (2 sticks), softened. Using softened butter ensures proper creaming with the sugars. Make sure your butter is at room temperature for optimal texture.
- Granulated Sugar: 1 cup. Provides sweetness and helps create a light and fluffy texture.
- Packed Light Brown Sugar: 1 cup. Adds moisture and a deeper caramel flavor to your cookies.
- Large Eggs: 2. Bind the ingredients together and add richness.
- Vanilla Extract: 2 teaspoons. Enhances the overall flavor of the cookies.
- All-Purpose Flour: 3 cups. The primary structure builder of the cookies. Spoon the flour into the measuring cup to avoid packing and ensure accuracy.
- Baking Soda: 1 teaspoon. Acts as a leavening agent, making the cookies rise.
- Salt: 1 teaspoon. Enhances the flavors and balances the sweetness.
- Unsweetened Cocoa Powder: 1 cup. Provides the rich chocolate flavor. Dutch-processed cocoa powder is recommended for a deeper, less acidic taste, but natural cocoa powder will work as well.
- Chocolate Chips: 1 cup. Semi-sweet chocolate chips are perfect here but feel free to experiment with milk chocolate or dark chocolate.
- Black Candy Melts or Decorating Icing: For creating the spider legs. Black candy melts provide a glossy finish, whereas decorating icing offers more control.
- Small Candy Eyeballs: Optional, but they add a spooky touch.
Recommended Tools and Utensils
- Electric Mixer (Stand or Handheld): Makes creaming butter and sugar much easier and faster.
- Large Mixing Bowls (at least 2): One for wet ingredients and one for dry ingredients. Using separate bowls prevents accidental clumping.
- Measuring Cups and Spoons: Accurate measuring is key for baking.
- Whisk: To combine dry ingredients smoothly.
- Rubber Spatula or Wooden Spoon: For scraping down the sides of the bowls and ensuring all ingredients are incorporated.
- Baking Sheets: At least two, to bake multiple batches simultaneously.
- Parchment Paper: Prevents cookies from sticking to the baking sheets.
- Cookie Scoop (optional but recommended): Ensures uniform cookie size and baking time.
- Toothpicks or Piping Bag: For drawing the spider legs onto the cookies.
- Wire Rack: For cooling cookies completely after baking. This prevents sogginess.
Detailed Steps for Baking Chocolate Spider Cookies
Following these detailed steps will ensure perfectly baked and decorated Chocolate Spider Cookies. Take your time and enjoy the process!
- Preheat your oven to 375°F (190°C). This is crucial for even baking. Make sure your oven is fully preheated before placing the cookies inside.
- Line your baking sheets with parchment paper. This prevents sticking and makes cleanup a breeze. You can use non-stick baking sheets if you prefer, but parchment paper is highly recommended.
- Cream together the butter and sugars: In a large bowl, cream together the softened butter, granulated sugar, and brown sugar until light and fluffy. This step is best done with an electric mixer. Creaming incorporates air, resulting in lighter and fluffier cookies. **Make sure the butter is truly softened, not melted.**
- Add eggs and vanilla: Beat in the eggs one at a time, then stir in the vanilla. Mix until well combined, but avoid overmixing. Overmixing can lead to tough cookies.
- Combine dry ingredients: In a separate bowl, whisk together the flour, baking soda, salt, and cocoa powder. Whisk thoroughly to ensure even distribution of the dry ingredients.
- Gradually add dry ingredients to wet ingredients: Gradually add the dry ingredients to the wet ingredients, mixing until just combined. **Be careful not to overmix.** Overmixing develops the gluten in the flour, leading to tough cookies.
- Stir in chocolate chips: Gently fold in the chocolate chips. Avoid overmixing at this stage to prevent the chocolate chips from breaking up.
- Scoop onto baking sheets: Drop by rounded tablespoons onto the prepared baking sheets, leaving about 2 inches between each cookie. This allows for proper expansion during baking. A cookie scoop helps ensure consistency in size and shape.
- Bake for 9-11 minutes, or until the edges are set and the centers are still slightly soft. Baking times may vary depending on your oven, so keep a close eye on the cookies. Start checking for doneness around the 9-minute mark. A slightly soft center ensures a chewy cookie.
- Cool on baking sheets for a few minutes before transferring to a wire rack to cool completely. This prevents breakage and allows the cookies to firm up properly.
- Make spider legs: Once the cookies are completely cool, melt the black candy melts or prepare the decorating icing according to package directions. Use a toothpick or piping bag to draw spider legs onto the cookies. Add candy eyeballs if desired.
- Let the spider legs set completely before serving or storing. Enjoy your spooky and delicious Chocolate Spider Cookies!
Tips, Variations, and Troubleshooting for Chocolate Spider Cookies
To elevate your Chocolate Spider Cookies game, here are some valuable tips and variations:
- Chill the dough: For thicker, chewier cookies, chill the dough for at least 30 minutes before baking. This allows the gluten to relax, resulting in a more tender crumb.
- Adjust sweetness: If you prefer less sweet cookies, reduce the amount of granulated sugar by ¼ cup.
- Add nuts: Enhance the texture and flavor with chopped walnuts, pecans, or even macadamia nuts. Add ½ cup to 1 cup.
- Spice it up: Add a pinch of cinnamon, nutmeg, or even a dash of cayenne pepper for a warming twist.
- Gluten-free version: Replace all-purpose flour with a gluten-free blend designed for baking. You may need to adjust the amount of liquid slightly.
- Vegan version: Replace butter with vegan butter and eggs with a flax egg (1 tablespoon flaxseed meal mixed with 3 tablespoons water per egg).
- Creative Decorations: Use different colored candy melts to create different spider variations. Use sprinkles, edible glitter, or other candies to add extra flair.
- Avoid overbaking: Overbaked cookies will be dry and crumbly. Start checking for doneness a few minutes before the suggested baking time.
- Proper cooling: Allow cookies to cool completely on the baking sheet before transferring them to a wire rack. This prevents breakage.
Nutritional Information and Health Benefits of Chocolate Spider Cookies
While Chocolate Spider Cookies are undeniably indulgent, let’s explore their nutritional aspects. A single cookie (approximately 35 grams) contains approximately:
- Calories: 150-180
- Protein: 2-3 grams
- Fat: 8-10 grams
- Carbohydrates: 20-25 grams
Note: These values are estimates and may vary depending on the specific ingredients used.
The ingredients themselves offer some nutritional benefits:
- Cocoa Powder: Rich in antioxidants, which can help protect cells from damage.
- Dark Chocolate (if used): Contains flavonoids, which have potential heart health benefits.
- Butter: Provides fat-soluble vitamins.
- Eggs (if not using a vegan substitute): Good source of protein and choline.
It’s important to remember that moderation is key. Enjoy these Chocolate Spider Cookies as an occasional treat as part of a balanced diet.
FAQs about Chocolate Spider Cookies
How long do Chocolate Spider Cookies last?
Can I use different types of chocolate chips in Chocolate Spider Cookies?
What can I substitute for black candy melts for the spider legs?
Are these Chocolate Spider Cookies gluten-free?
How can I make sure my Chocolate Spider Cookies are chewy?
Conclusion: Spooktacular Chocolate Spider Cookies Await!
These Chocolate Spider Cookies are more than just a recipe; they’re a Halloween experience. From the rich, chocolatey goodness to the fun of decorating them with spider legs, these cookies are sure to be a hit. Remember to follow the steps carefully, paying attention to the tips and variations to create cookies that are perfectly chewy and deliciously spooky. Whether you’re a seasoned baker or a kitchen novice, this recipe is sure to impress. Share your creations with us – tag us on social media and let us know how your Chocolate Spider Cookies turned out! Don’t forget to share this recipe with your friends and family. Happy baking!
For more delicious Halloween treats and recipes, be sure to check out our other blog posts like Chewy Maple Brown Sugar Cookies or perhaps some savory options like our Easy Black Pepper Chicken for a perfect Halloween feast! And don’t forget to pin this recipe to your Pinterest boards! Check out more recipes on our Pinterest
Chocolate Spider Cookies
Ingredients
Equipment
Method
- Preheat oven to 375°F (190°C). Line baking sheets with parchment paper.
- Cream together the softened butter, granulated sugar, and brown sugar until light and fluffy.
- Beat in the eggs one at a time, then stir in the vanilla.
- In a separate bowl, whisk together the flour, baking soda, salt, and cocoa powder. Gradually add the dry ingredients to the wet ingredients, mixing until just combined.
- Stir in the chocolate chips.
- Drop by rounded tablespoons onto the prepared baking sheets, leaving about 2 inches between each cookie.
- Bake for 9-11 minutes, or until the edges are set and the centers are still slightly soft. Cool on baking sheets for a few minutes before transferring to a wire rack to cool completely.
- Once cool, melt the black candy melts. Use a toothpick to draw spider legs onto the cookies. Add candy eyeballs if desired. Let the spider legs set completely before serving.