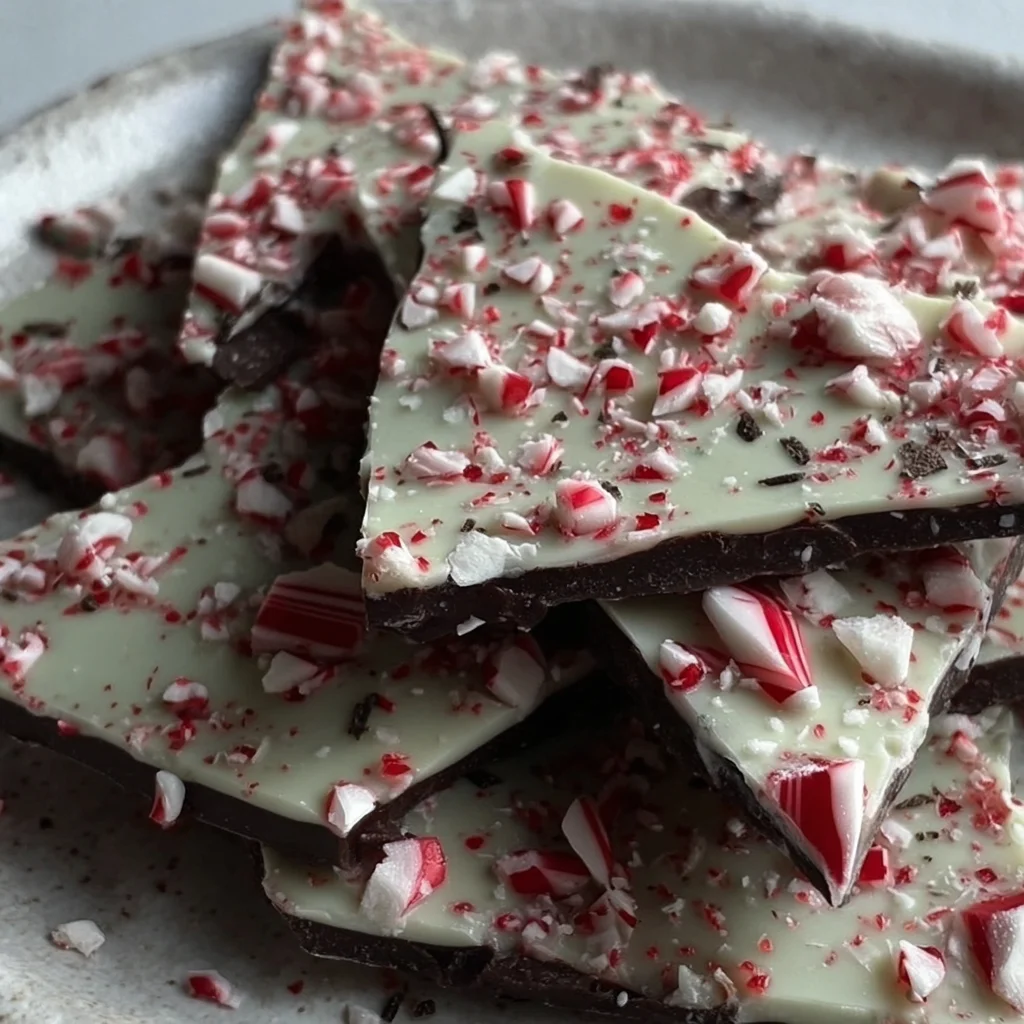
The holiday season simply wouldn’t be complete without the iconic, dual-layered crunch of perfect Peppermint Bark. This classic candy, known for its striking contrast of rich, dark chocolate and cool, creamy white chocolate studded with vibrant crimson peppermint pieces, is the quintessential festive treat. While store-bought versions are often expensive and lack the depth of flavor of homemade goods, crafting your own Peppermint Bark at home is surprisingly simple, deeply satisfying, and results in a superior product every single time. It’s a no-bake wonder that requires minimal effort but delivers maximum impact, making it an essential addition to your holiday baking repertoire, cookie exchange plates, and thoughtful gift boxes.
The beauty of homemade Peppermint Bark lies in its simplicity. We are focusing on using high-quality ingredients and specific techniques like the optional use of coconut oil to ensure a silky dark chocolate base that elevate this simple recipe from good to absolutely glorious. Forget the grainy texture or dull flavor of mass-produced sweets; this guide will walk you through creating glossy, snappy, and perfectly balanced peppermint goodness that captures the true spirit of the season. Get ready to embrace the aroma of mint and chocolate filling your kitchen as you create this stunning holiday confection.

Why You’ll Love This Homemade Peppermint Bark Recipe
If you’re seeking a holiday confection that combines ease of preparation with luxurious results, this homemade Peppermint Bark recipe is your answer. There are countless reasons why this particular recipe will quickly become a cherished holiday tradition, surpassing any pre-packaged version you might find. It all comes down to control, flavor, and the undeniable pleasure of creating something beautiful with your own two hands.
Achieving the Perfect Flavor Contrast
One of the most compelling reasons to fall in love with this recipe is the masterful flavor contrast. We start with a rich, high-quality dark chocolate base. The slight bitterness and depth of the dark chocolate (or semi-sweet, depending on your preference) provides the perfect counterpoint to the intensely sweet and creamy white chocolate layer above it. When you bite into the finished bark, you experience a complex symphony: the initial snap of the chocolate, the warmth of cocoa, the sweet creaminess of the white layer, and finally, the exhilarating, cooling burst of peppermint from the extract and the crushed candies. This layered approach ensures that the resulting Peppermint Bark is never overwhelmingly sweet, maintaining a mature and complex flavor profile that adults and children alike adore.
Simplicity and Speed: A Stress-Free Holiday Dessert
The holiday season is often synonymous with complex baking projects, involving delicate doughs and hours spent by the oven. This recipe for Peppermint Bark offers a beautiful reprieve. It is a true no-bake dessert that requires less than 30 minutes of active prep time. The majority of the time spent is waiting for the layers to chill and set. This simplicity makes it ideal for last-minute gifts, for involving children in the kitchen (crushing the candy canes is always a hit!), or for rapidly expanding your holiday treat stash without the stress of complicated techniques. Even novice confectioners will achieve stunning, professional-looking results.
The Joy of Gifting Homemade Peppermint Bark
Homemade gifts carry a unique weight of thoughtfulness, and a tin of elegant, glossy Peppermint Bark is one of the most appreciated edible gifts you can offer. Because this recipe yields a large quantity (over two pounds of delicious candy), it’s highly economical for large-scale gifting. Once broken into jagged, irregular pieces, the dark and white layers, speckled with brilliant red, are visually stunning. Packaged in cellophane bags tied with festive ribbons, or tucked into decorative tins, this bark elevates any holiday hamper. The ease of production means you can create dozens of personalized gifts without exhausting yourself, freeing up valuable time to enjoy the seasonal festivities.
If you are looking for other festive and easy treats perfect for gifting, you might also enjoy making delightful Strawberry Santas or our recipe for creamy Peppermint Swirl Fudge, though the Peppermint Bark remains the ultimate champion of simple elegance.
Why You Should Try This Recipe Over Others
While many recipes for Peppermint Bark exist, this particular formulation has been carefully calibrated for maximum success, focusing on achieving the perfect texture, clean flavor, and structural integrity. We focus heavily on quality ingredients and specific melting techniques that ensure a professional, shiny finish rather than a dull, brittle, or grainy outcome.
Focus on Chocolate Quality and Melting Techniques
The biggest difference between mediocre bark and magnificent Peppermint Bark lies in the quality of the chocolate used and how it’s melted. This recipe strongly encourages the use of good quality chocolate chips, feves, or finely chopped bars rather than cheaper melting wafers or compound chocolates. High-quality chocolate has better flavor, a smoother melt, and a superior “snap” when cooled. Crucially, we incorporate a small amount of solid coconut oil or vegetable shortening into the dark chocolate layer. This isn’t just for texture; it slightly lowers the melting point and increases the flow, making the dark chocolate layer easier to spread into a uniform, thin base. It also helps stabilize the chocolate, reducing the chances of dull streaking (known as blooming) as it sets.
Avoiding the Seizing Pitfall
White chocolate is notoriously finicky. It contains more cocoa butter and milk solids than dark chocolate, making it extremely sensitive to overheating and moisture the two primary causes of “seizing,” where the chocolate turns from smooth liquid into a grainy, unworkable paste. Our detailed instructions emphasize low, slow heat and, critically, introduce the peppermint extract only after the white chocolate has almost fully melted and been removed from the direct heat source. Water-based flavorings like extract (as opposed to oil-based) can sometimes trigger seizing if not handled correctly. By adding the extract to the already smooth and slightly cooled white chocolate, we minimize the shock and ensure the white chocolate remains perfectly silky for spreading.
The Perfect Ratio of Chocolate to Candy
Another key differentiator is the meticulous balance of ingredients. This recipe calls for 24 ounces of white chocolate against 16 ounces of dark chocolate, ensuring the thicker, more prominent layer of peppermint-flavored white chocolate stands out beautifully against the darker base. We also specify 1 1/2 cups of crushed candy canes. This amount is generous enough to fully coat the top layer, providing satisfying crunch in every bite, but not so excessive that the pieces fall off when the bark is broken. The resulting Peppermint Bark is visually striking, structurally sound, and texturally divine. If you love crunchy holiday treats, you might also appreciate our recipe for Gingerbread Fudge, which also leans into holiday spice and texture.
Ingredients and Necessary Utensils for Peppermint Bark
Success in making incredible Peppermint Bark starts with careful ingredient selection and having the right tools prepared. While the list is short, quality matters immensely, especially when working with chocolate.
Essential Ingredients List
For a large batch of rich, crisp Peppermint Bark, you will need the following high-quality components:
- 16 ounces (about 2 2/3 cups) good quality Dark Chocolate or Semi-Sweet Chocolate: This forms the base layer. Choose a chocolate you genuinely enjoy eating on its own. Options include chocolate chips, callets (feves), or a finely chopped baking bar. A cocoa content between 60% and 72% works best for flavor contrast.
- 1 tablespoon solid Coconut Oil or Vegetable Shortening (Optional): This ingredient is highly recommended for the dark chocolate layer. It aids in achieving a super smooth, spreadable consistency and contributes to a beautiful, glossy finish. Do not substitute this with liquid oil or butter, as they contain water and can cause seizing or prevent setting.
- 24 ounces (about 4 cups) good quality White Chocolate: This is the star layer. Again, avoid “melting wafers” if possible, and opt for true white chocolate, which contains cocoa butter. Chips, feves, or finely chopped bars are excellent choices. White chocolate requires careful handling due to its higher sugar content.
- 1/2 teaspoon pure Peppermint Extract: Crucial Note: Use pure extract, not peppermint oil. Peppermint oil is extremely concentrated and can often cause the white chocolate to seize almost instantly due to the difference in molecular structure when mixed with the fats in the chocolate. The extract delivers perfect flavor saturation without the risk.
- 1 1/2 cups crushed Peppermint Candy Canes or Hard Peppermint Candies: This typically equates to about 12 to 15 standard-sized candy canes. The pieces should be a mix of fine powder (which dissolves slightly into the white chocolate for color) and larger, crunchy chunks for texture.
Deep Dive into Ingredient Quality
Choosing the right components is perhaps the most critical step in creating homemade candy.
The Chocolate Dilemma: Dark vs. Semi-Sweet
The 16-ounce requirement for the dark base is flexible, allowing you to choose between rich dark chocolate (65% cocoa or higher) for a more intense, less sweet base, or classic semi-sweet (around 50% cocoa) for a gentler flavor. The key is balance. Because the white chocolate and peppermint candies are so sweet, the slight bitterness of quality dark chocolate anchors the entire confection, preventing it from tasting cloyingly sugary. Investing in a good brand like Ghirardelli, Callebaut, or Guittard will drastically improve your final product’s flavor and texture.
White Chocolate Sensitivity
White chocolate is the most challenging component. Unlike dark and milk chocolate, it contains no cocoa solids, only cocoa butter, milk solids, and sugar. This composition means it burns easily and seizes readily. Ensure your white chocolate is kept far away from any steam or water droplets during the melting process. Using finely chopped chocolate (feves or chopped bars) rather than chips will also help, as chips contain stabilizers that sometimes make them harder to melt smoothly.
Crushing the Peppermint Candies
The consistency of the crushed candy canes matters. A mixture of fine powder and small-to-medium chunks provides the best visual appeal and crunch. Too fine, and the texture is lost; too large, and the pieces don’t adhere well and can make the bark difficult to break or bite. A robust food processor pulsed carefully, or the classic zip-top bag and rolling pin method (see instructions), yields the perfect mixed texture.
Recommended Tools and Utensils
While Peppermint Bark is straightforward, having the right equipment ensures a smooth process and professional finish:
Essential Peppermint Bark Tools:
- Large Baking Sheet (10×15 inches or similar): Provides the surface area needed for a thin, quick-setting layer.
- Parchment Paper or Silicone Baking Mat: Absolutely essential for lining the pan. This ensures the bark can be easily lifted out without sticking.
- Heavy-Duty Zip-Top Bag: Necessary for safely crushing the candy canes without tearing the bag.
- Rolling Pin, Meat Tenderizer, or Heavy Pan: For crushing the peppermint candies.
- Two Heat-Proof Bowls (Glass or Metal): Required for melting the dark and white chocolate separately, ideally suitable for use over a double boiler or in the microwave.
- Rubber Spatula or Offset Knife: Crucial for spreading the chocolate layers thinly and evenly. An offset knife is particularly effective for achieving smooth edges.
- Sharp Kitchen Knife or Chef’s Knife: Used for cutting the bark into clean squares, though breaking by hand is also traditional.
Detailed Recipe Steps: Achieving Perfect Peppermint Bark
Follow these detailed instructions precisely, paying close attention to temperature and timing, to create snappy, glossy, and beautifully layered Peppermint Bark.
STEP 1: Prepare the Work Surface and Crush the Peppermint
Preparation is key to speed and success, especially since melted chocolate sets quickly.
Line a large baking sheet (approximately 10×15 inches) with parchment paper or a silicone baking mat. Ensure the lining extends over the sides. These overhangs act as handles for easy removal later. Set the pan aside in a cool location.
Next, focus on the peppermint. Place the 1 1/2 cups of candy canes into a heavy-duty zip-top bag. Seal the bag tightly, pressing out all excess air. Using a rolling pin or the bottom of a heavy pan, gently but firmly smash the candies until they are crushed into a mixture of small, medium, and powder pieces. Tip: Placing the bag inside a clean kitchen towel can help muffle the sound and prevent accidental punctures. Set the crushed candy aside in a small bowl; you will need this immediately after spreading the white chocolate.
STEP 2: Melt the Dark Chocolate Layer
Combine the 16 ounces of dark chocolate and the optional 1 tablespoon of solid coconut oil or shortening in a large, clean, dry, heat-proof bowl. Melting method choice is critical:
Microwave Method (Recommended for Chips/Chunks): Heat in 30-second intervals on 50% power, stirring thoroughly after each interval. Continue heating and stirring until the chocolate is about 80% melted, with only a few tiny lumps remaining. Crucial Tip: Remove the bowl from the microwave and stir vigorously until those last lumps dissolve from the residual heat. This prevents overheating and keeps the chocolate glossy.
Double Boiler Method: Place the bowl over a saucepan containing 1 to 2 inches of simmering (not boiling) water. Ensure the bottom of the bowl does not touch the water. Steam and indirect heat do the work. Stir constantly until the dark chocolate is completely smooth and melted.
STEP 3: Spread and Set the Dark Layer
Pour the melted dark chocolate onto the center of the prepared baking sheet. Working quickly, use a clean rubber spatula or offset knife to spread the chocolate evenly into a thin layer. Aim for a thickness of approximately 1/8 to 1/4 inch. Try to create a uniform rectangle or square shape that covers most of the parchment-lined surface.
Immediately transfer the baking sheet to the refrigerator and chill the dark chocolate for approximately 20 to 30 minutes. Essential Point: The dark layer must be completely set and firm to the touch before proceeding. If the dark chocolate is still soft, the white chocolate will marbleize with it, ruining the distinct layered effect.
STEP 4: Melt and Flavor the White Chocolate
While the dark layer chills, prepare the white chocolate. Place the 24 ounces of white chocolate into a second clean, dry, heat-proof bowl. Remember that white chocolate is much more prone to seizing than dark chocolate.
Use very gentle heat for melting:
Microwave Method: Use 15-second intervals on 50% power, stirring well after each. Stop when the chocolate is about 90% melted.
Double Boiler Method: Use very low simmering water, stirring constantly.
Once the white chocolate is nearly smooth, with only very tiny streaks or lumps remaining, remove it completely from the heat source. Stir in the 1/2 teaspoon of pure peppermint extract until the mixture is fully incorporated and beautifully smooth. If you find the white chocolate thickens too much upon adding the extract, you may return it to the residual heat (or a 5-second microwave burst) to regain a smooth, flowing texture.
STEP 5: Assemble and Top the Bark
Retrieve the baking sheet with the firmly set dark chocolate layer from the refrigerator.
Pour the warm, smooth white chocolate over the solidified dark chocolate layer. Work extremely fast now. Use a spatula or offset knife to spread the white chocolate evenly over the dark chocolate base. The cold dark chocolate will rapidly cool the white chocolate, causing it to set quickly. Aim for an even, smooth top layer.
Immediately and generously sprinkle the reserved crushed candy canes over the entire surface of the wet white chocolate. Gently press the peppermint pieces into the white chocolate with the back of a spoon or your fingertips to ensure they adhere firmly and don’t pop off when the bark is broken.
STEP 6: Chill and Break the Bark
Return the assembled Peppermint Bark to the refrigerator. Chill for at least 1 to 2 hours, or until both layers are completely firm and solid. The bark should snap cleanly when you test a small edge.
Remove the bark from the refrigerator. Lift the entire slab of bark off the baking sheet using the parchment paper lining and place it on a large, clean cutting board. Carefully peel the parchment paper away from the bottom of the dark chocolate layer.
You have two options for portioning:
1. Clean Cuts: Use a large, sharp knife to cut the bark into neat squares or rectangles.
2. Traditional Method: Simply use your hands to snap and break the slab into rustic, irregular, bite-sized pieces.
Store the finished Peppermint Bark in an airtight container. It keeps well at cool room temperature for up to 2 weeks, or in the refrigerator for extended freshness (up to 4 weeks).
Tips, Troubleshooting, and Variations for Peppermint Bark
While this recipe is foolproof, a few expert tips can ensure glossy perfection, and variations can keep your Peppermint Bark exciting year after year.
Troubleshooting Common Peppermint Bark Issues
Achieving the perfect snap and shine can sometimes be derailed by common issues, particularly involving the sensitive white chocolate.
1. My Chocolate Seized!
Seizing occurs when a small amount of liquid (even a drop of water or condensation) hits the melted chocolate, causing the cocoa solids or sugar to clump into a grainy, stiff mess.
Prevention: Ensure all bowls and utensils are perfectly dry. Never allow steam from the double boiler to enter the bowl. Add extracts/flavorings after removing chocolate from the heat source.
Fix: If a small amount seizes, sometimes you can salvage it by stirring in a teaspoon of melted coconut oil or vegetable shortening, or even a tiny amount of neutral vegetable oil, until it smooths out. If the white chocolate is fully seized, sadly, it often cannot be saved for bark texture.
2. My Layers Marbled or Blended Together.
This happens if the dark chocolate layer was not fully set when the white chocolate was poured over it.
Solution: Always verify the dark layer is rock solid and cool before applying the white chocolate. If your kitchen is warm, chill the dark layer longer. The cold surface is key to rapidly setting the white chocolate layer on top, maintaining the sharp separation.
3. The Candy Canes Fell Off.
If the white chocolate layer was too cool or beginning to set before the candy canes were added, they won’t adhere properly.
Solution: Once the white chocolate is spread, do not wait. Immediately top with the crushed candies and press them in gently. If the white chocolate looks dull (i.e., it’s setting), it’s too late.
Fantastic Peppermint Bark Variations
This classic recipe is easily adapted to suit different preferences or dietary needs.
Milk Chocolate Base
If you find dark chocolate too intense, substitute the 16 ounces of dark chocolate with good quality milk chocolate chips or chopped bars. Note that milk chocolate is sweeter, so the resulting bark will have a higher overall sweetness level.
Vegan Peppermint Bark
It is entirely possible to create delicious vegan Peppermint Bark by swapping the standard chocolate for high-quality, dairy-free alternatives.
Dark Chocolate: Use high-quality dark chocolate labeled “dairy-free” (most high-percentage dark chocolates are naturally vegan, but check the label).
White Chocolate: Use vegan white chocolate chips or bars, which are usually made with cocoa butter and rice powder or oat milk powder instead of dairy solids.
Extra Crunch: Nutty Peppermint Bark
For an added layer of flavor and texture, sprinkle a thin layer of finely chopped, toasted pecans or almonds over the dark chocolate layer just before it sets, then proceed with the white chocolate layer. The nuts add warmth that complements the cool mint perfectly.
Peppermint Bark Popcorn
Use the melted white chocolate (Step 4), but instead of pouring it over the dark base, toss it with 10 cups of freshly popped, unbuttered popcorn. Spread the mixture on a baking sheet, top with candy canes, and allow to set. This creates a highly addictive, shareable snack.
For more holiday baking inspiration and dessert ideas that pair perfectly with this classic treat, be sure to check out my Pinterest board dedicated to festive holiday recipes!
Nutritional Values and Benefits of Peppermint Bark
While Peppermint Bark is undoubtedly a decadent holiday confection, understanding the components of this treat can help you appreciate its role in moderation. Note that the nutritional information provided below is an estimate, as precise values depend heavily on the specific brands of chocolate and candy canes used, and the serving size.
Estimated Nutritional Breakdown (Per 1-ounce serving)
| Component | Estimated Value |
| :— | :— |
| Calories | 150 – 180 kcal |
| Total Fat | 10 – 12 g |
| Saturated Fat | 6 – 8 g |
| Carbohydrates | 15 – 20 g |
| Sugar | 12 – 18 g |
| Protein | 1 – 2 g |
Disclaimer: Peppermint Bark is a dessert high in sugar and fat. It should be enjoyed as an occasional holiday indulgence.
Ingredient Benefits (In Context)
While we are certainly not suggesting eating Peppermint Bark for health benefits, the high-quality ingredients used do contain beneficial properties that are worth noting.
Dark Chocolate: The Antioxidant Powerhouse
Our use of high-quality dark chocolate (60%+ cocoa) provides measurable benefits. Dark chocolate is rich in antioxidants, particularly flavonoids, which are linked to improved blood flow and reduced risk of heart disease when consumed in moderation. These cocoa solids also contain minerals like iron, magnesium, and copper. By using a deep, dark base, you maximize these benefits compared to using solely milk chocolate. The dark chocolate provides depth and complexity, offering a slightly “healthier” counterpoint to the sweetness.
Peppermint: A Digestif Aid
Peppermint, derived from the extract and candy canes, is well-known for its digestive properties. Menthol, the active compound in peppermint, can help soothe stomach discomfort and aid in digestion. It’s no coincidence that mint-flavored treats like Peppermint Bark are often served after a heavy holiday meal; the cooling sensation and the menthol compounds can help settle the stomach, offering a pleasant and functional end to a feast. The flavor itself is also known to stimulate alertness and focus, a nice benefit during the often-sluggish post-meal period.
Frequently Asked Questions (FAQ) About Peppermint Bark
We address some of the most common questions related to making and storing perfect homemade Peppermint Bark using structured data markup for optimal search engine recognition.
Peppermint Bark FAQs
How long does homemade Peppermint Bark last?
Properly stored, homemade Peppermint Bark can last up to 2 weeks at cool room temperature (below 70°F) in an airtight container. If stored in the refrigerator, it can last up to 4 weeks. Always ensure it is tightly sealed to prevent moisture or odors from spoiling the chocolate.
Why did my white chocolate seize or turn grainy?
White chocolate seizes when exposed to moisture (water or steam) or when overheated. Always use clean, dry equipment and melt the white chocolate slowly, using low heat or short microwave bursts. Adding the peppermint extract too early while the chocolate is still on the heat source can also introduce enough liquid to cause seizing.
Can I use vegetable oil instead of coconut oil to smooth the dark chocolate?
While some recipes suggest vegetable oil, solid coconut oil or vegetable shortening (like Crisco) is strongly recommended for this Peppermint Bark recipe. They are solid at room temperature and stabilize the dark chocolate without adding extra moisture, which helps ensure a quick and glossy set for the base layer.
How can I easily crush the candy canes without making a mess?
The best method is to place the candy canes inside a heavy-duty, double-layer zip-top bag, press out all the air, and wrap the bag in a kitchen towel. Use a rolling pin or meat tenderizer to smash them into the desired consistency. The towel helps contain the small, sharp pieces and reduces noise.
Does Peppermint Bark need to be tempered?
Tempering chocolate ensures a professional snap, shine, and prevents fat bloom (dull gray streaks). While using high-quality chocolate and careful low-heat melting (as outlined in the recipe steps) often results in a stable product, proper tempering is necessary for maximum shelf life and perfect shine. For simplicity, most home cooks rely on the quick refrigerator setting, which achieves a satisfactory result.
Conclusion: The Ultimate Holiday Confection
The allure of classic homemade Peppermint Bark is undeniable. This recipe provides you with the detailed knowledge and precise measurements needed to conquer this seemingly simple, yet often finicky, holiday treat. We’ve covered everything from selecting the right dark and white chocolates to mastering the delicate melting process and ensuring that crucial layer separation. The resulting bark is a symphony of flavor and texture: the dark, rich snap of the base, the cool, creamy melt of the white chocolate, and the exhilarating crunch of peppermint candy.
Making your own Peppermint Bark is not just about saving money; it’s about controlling the quality of the ingredients, ensuring optimal freshness, and delivering a personal touch that store-bought versions can never match. Whether you are preparing large batches for holiday parties, crafting elegant gifts for neighbors, or simply stocking your own pantry with festive treats, this recipe guarantees success. Remember the golden rules: use quality ingredients, melt chocolate low and slow, ensure the dark base is fully set, and work quickly when spreading the white layer.
We hope this comprehensive guide inspires you to make this cherished confection a cornerstone of your holiday traditions. Give this recipe for Peppermint Bark a try this season, and share the joy and the satisfying snap with everyone you love. Let us know in the comments below how your beautiful layers turned out! Happy baking!
Classic Homemade Peppermint Bark (Easy Two-Layer Recipe)
Ingredients
Equipment
Method
- Line a large baking sheet (approximately 10x15 inches or similar) with parchment paper or a silicone baking mat. Ensure the lining extends over the sides to make removing the finished bark easier. Set the prepared pan aside.
- Place the peppermint candy canes into a heavy-duty zip-top bag. Seal the bag and use a rolling pin or heavy object to carefully smash the candies until they are crushed into a mixture of small and medium-sized pieces. Set the crushed candy aside.
- Combine the dark chocolate and the optional coconut oil or shortening in a large, heat-proof bowl. Melt the chocolate either in a microwave (stirring every 30 seconds) or using a double boiler over simmering water until completely smooth.
- Pour the melted dark chocolate onto the center of the prepared baking sheet. Use a spatula or offset knife to spread the chocolate evenly into a thin layer (approximately 1/8 to 1/4 inch thick). Transfer the baking sheet to the refrigerator and chill for 20 to 30 minutes, or until the dark chocolate layer is completely set and firm to the touch.
- Place the white chocolate into a separate clean, dry, heat-proof bowl. Melt the white chocolate using extreme care—use 15-second intervals in the microwave or melt over very low heat via a double boiler. Once nearly smooth, remove from the heat source and stir in the 1/2 teaspoon of peppermint extract until the mixture is fully incorporated and smooth.
- Pour the melted white chocolate over the solidified dark chocolate layer. Quickly use a spatula or offset knife to spread the white chocolate evenly over the dark chocolate, working fast as the cold base will cause the top layer to set quickly.
- Immediately and generously sprinkle the reserved crushed candy canes over the top of the wet white chocolate layer. Gently press the peppermint pieces into the white chocolate with the back of a spoon to ensure they adhere firmly.
- Return the baking sheet to the refrigerator and chill for at least 1 to 2 hours, or until both layers are completely firm and solid. Remove the bark, peel away the parchment paper, and use your hands to break the chocolate slab into irregular, bite-sized pieces.