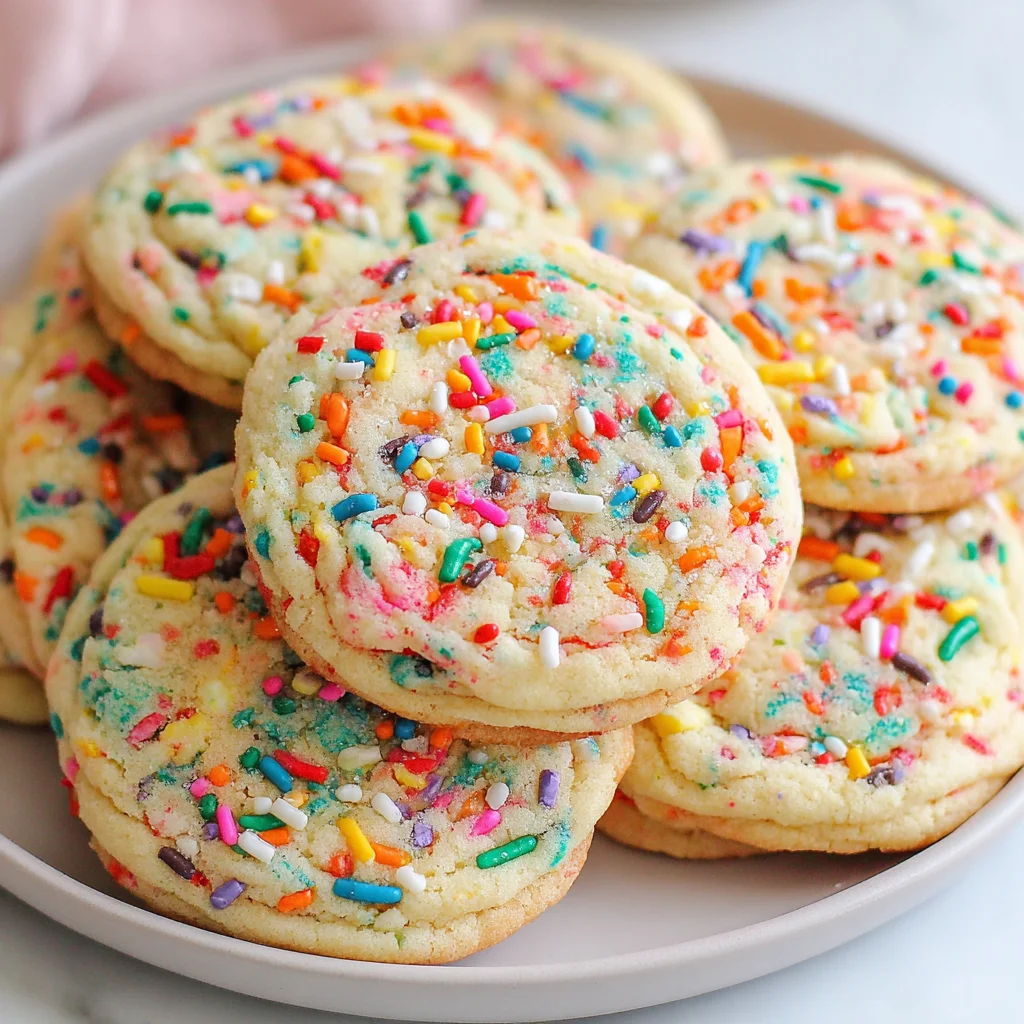
There is a special kind of magic that happens when you take the nostalgic joy of cake batter and transform it into a perfectly soft, chewy, and perpetually festive cookie. We’re talking about the ultimate celebration treat: homemade Funfetti Cookies. Forget those dry, cake-mix versions you might have tried before; this recipe delivers a buttery, rich, vanilla-forward flavor that tastes exactly like birthday cake, but with the satisfying chew of the world’s best chocolate chip cookie. Whether you are baking for a birthday party, a holiday gathering, or simply want to inject some unapologetic joy into a Tuesday afternoon, these rainbow sprinkle cookies are the answer.
This comprehensive guide will walk you through creating perfect Funfetti Cookies cookies that manage to stay beautifully thick, resisting the temptation to spread into flat discs, while keeping their centers marvelously soft. We detail everything from choosing the right type of sprinkles (yes, it matters!) to mastering the creaming process for maximum fluffiness. Get ready to turn your kitchen into a bakery of pure happiness. These aren’t just cookies; they are edible confetti, ready to celebrate anything and everything. Grab your mixing bowl, preheat your oven, and prepare for a burst of color and comfort that only the best Funfetti Cookies can provide.
Why You’ll Love These Funfetti Cookies: A Symphony of Texture and Flavor
What makes this specific recipe for Funfetti Cookies stand head and shoulders above the rest? It boils down to achieving that elusive balance: a chewy edge that provides structure, a melt-in-your-mouth center, and a flavor profile that screams “birthday cake” without being artificially sweet. Many store-bought or simplified recipes rely on instant cake mix for their flavor base, which often results in a cookie that is too cakey and lacks the rich depth of proper butter and sugar creaming.
Our method focuses on high-quality ingredients and precise technique. We leverage the power of both light brown sugar and granulated sugar. The brown sugar introduces molasses, which enhances moisture retention, resulting in a softer, chewier texture that lasts for days. Meanwhile, the granulated sugar helps achieve that crucial, slightly crisp edge. This combination is the foundation of the perfect cookie texture.
Furthermore, the generous addition of pure vanilla extract (and the option to use clear vanilla for that classic, artificial ‘cake batter’ scent) ensures that the flavor is intensely satisfying. These homemade celebration cookies are visually stunning, of course, thanks to the rainbow jimmie sprinkles. Unlike nonpareils (the tiny round balls), jimmie sprinkles are cylindrical and hold their shape better, significantly reducing the dreaded color bleed that can turn your cheerful dough into a murky mess. When you pull these Funfetti Cookies out of the oven, they are plump, golden, and speckled with vibrant, distinct rainbow hues, making them immediately appealing to both children and adults.
Beyond the technical perfection, you will love these cookies because they are a guaranteed mood booster. They are simple to prepare yet look impressive. The dough is robust and forgiving, making this recipe an excellent choice for beginner bakers. You don’t need fancy equipment, just a mixer and a desire for deliciousness. If you’re a fan of rich, chewy cookies, similar to our classic peanut butter cookies, but prefer a vanilla base, these sprinkle-studded delights will quickly become your new standard.
Why You Must Try This Celebration Cookie Recipe Today
The appeal of making a batch of scratch-made Funfetti Cookies extends far beyond mere dessert consumption; it’s about creating moments, sharing joy, and mastering a recipe that provides maximum return for minimal effort. This specific recipe is highly efficient and designed for success, regardless of your baking experience level.
Firstly, the versatility of these rainbow sprinkle cookies is unmatched. While they are the quintessential birthday treat, they adapt beautifully to any occasion. Swap out the rainbow sprinkles for specific holiday colors (red and green for Christmas, pastels for Easter, orange and black for Halloween) and you instantly have a custom, themed dessert. They freeze wonderfully, both as baked cookies and as pre-portioned dough balls, making them perfect for meal prepping your desserts or having a stash ready for unexpected guests. Imagine the convenience of having homemade cookies ready to bake in minutes!
Secondly, baking is often a science of ratios, and this formulation has been carefully calibrated. The inclusion of milk, an ingredient often overlooked in standard cookie recipes, contributes significantly to the final tenderness. Milk adds just enough liquid to create a slightly softer dough texture, preventing the cookies from becoming overly dense or dry, enhancing that desired cake batter flavor profile without turning them into actual miniature cakes.
Moreover, trying this recipe today means embracing accessible, nostalgic baking. Unlike complex layer cakes or fussy French pastries, these Funfetti Cookies require simple pantry staples and straightforward techniques, such as the critical step of creaming butter and sugar until truly fluffy (Step 2 in the instructions). Mastering this technique is fundamental to all great baking, and these cookies offer a perfect opportunity to practice it.
If you’re looking for other easy, crowd-pleasing dessert recipes that capture pure indulgence, consider trying our Sugar Cookie Cheesecake or our delightful Chocolate Chip Cheesecake Balls. But for an undeniable burst of color and buttery vanilla flavor, these Funfetti Cookies are the top priority. They are not just a dessert; they are an experience a bite of pure, unadulterated happiness.
Essential Ingredients and Tools for Perfect Homemade Funfetti Cookies
Achieving bakery-quality Funfetti Cookies relies not just on the steps you follow, but the quality and temperature of the ingredients you use, and the equipment that aids the process. Below is a detailed breakdown of everything you need, emphasizing why each element is crucial for success.
Funfetti Cookies Ingredients List: The Foundation of Flavor
Please note that precise measurements and adherence to ingredient quality are key to preventing overly thin or dry celebration cookies.
- Flour: 2 ¼ cups (270g) All-Purpose Flour. Measure this correctly! Use the spoon-and-level method: spoon the flour into the measuring cup, then level off the excess with a straight edge. Packing flour leads to dense cookies.
- Leavening Agents: 1 teaspoon Baking Soda and ½ teaspoon Salt. The baking soda provides the lift and helps achieve that characteristic chewy texture, while salt balances the sweetness and enhances the overall vanilla flavor.
- Fat: 1 cup (2 sticks or 227g) Unsalted Butter. Crucial Tip: The butter must be softened to room temperature not melted, and not cold. True room temperature butter (able to be easily indented but still holding its shape) is essential for proper creaming.
- Sugars: ¾ cup (150g) Granulated Sugar AND ¾ cup (165g) Packed Light Brown Sugar. Using a mix ensures the perfect blend of chewiness (brown sugar) and crisp edges (granulated sugar).
- Eggs and Dairy: 2 large Eggs, room temperature, AND 3 Tablespoons Milk (whole milk recommended). Room temperature eggs emulsify better with the butter mixture, creating a smoother dough. The milk adds necessary moisture for a tender crumb.
- Flavor: 1 Tablespoon Vanilla Extract. For that intense cake flavor, use a high-quality pure vanilla extract. For the bright, almost synthetic flavor associated with classic boxed Funfetti cake, consider using a clear vanilla extract.
- The Star: ½ cup (100g) Rainbow Jimmie Sprinkles. This is non-negotiable. Use Jimmie Sprinkles (the rod shapes). Nonpareils (tiny balls) have a greater surface area of color pigment and will almost certainly bleed their color into the dough, especially if you chill the dough, resulting in dull, gray-hued cookies.
Recommended Tools for Baking Perfect Rainbow Sprinkle Cookies
While simplicity is the goal, having the right tools makes the process of creating these delicious celebration cookies much easier and more consistent.
- Stand Mixer or Hand Mixer: This is highly recommended for Step 2 (Creaming Butter and Sugars). Achieving the necessary lightness and fluffiness is incredibly difficult and time-consuming by hand. A stand mixer with a paddle attachment provides the steady power needed.
- Parchment Paper or Silicone Baking Mats: Essential for lining your baking sheets. They ensure easy release, prevent sticking, and promote even baking. Silicone mats (like Silpat) are fantastic for achieving slightly crispier bottoms.
- Medium Bowl and Large Mixing Bowl: One medium bowl for whisking the dry ingredients, and the large bowl (or mixer bowl) for the wet ingredients and final dough assembly.
- Rubber Spatula: Necessary for scraping down the sides of the bowl during mixing and, most importantly, for gently folding in the sprinkles at the end.
- Measuring Cups and Spoons: Standard set for accurate ingredient quantification.
- Medium Cookie Scoop (1.5 to 2 Tablespoons): Using a scoop ensures every cookie is the same size. This consistency guarantees that all the Funfetti Cookies bake evenly and finish at the same time, preventing some from burning while others remain raw.
- Wire Cooling Rack: Critical for cooling the cookies properly, allowing air circulation underneath to stop the baking process and prevent soggy bottoms.
Detailed Step-by-Step Guide: How to Bake the Best Classic Funfetti Cookies
Following these steps precisely ensures the proper development of flavor, texture, and rise in your homemade Funfetti Cookies. Pay close attention to mixing times and ingredient temperatures.
Step 1: Prepare and Combine Dry Ingredients
- Preheat your oven to 350°F (175°C). Optimal oven temperature is key for setting the cookie structure quickly.
- Line two large baking sheets with parchment paper or silicone baking mats. This is mandatory for cleanup and preventing sticking.
- In a medium bowl, whisk together the all-purpose flour, baking soda, and salt. Whisking thoroughly ensures the leavening agent (baking soda) is evenly distributed, which is vital for a uniform rise. Set this bowl aside.
Step 2: Cream Butter and Sugars (The Secret to Fluffy Funfetti Cookies)
- In the bowl of a stand mixer fitted with the paddle attachment (or use a large mixing bowl with a hand mixer), beat the softened butter, granulated sugar, and light brown sugar together on medium speed.
- This step is the most critical for cookie texture: Continue beating until the mixture is light, fluffy, and noticeably paler in color. This process is called creaming, where tiny air pockets are incorporated into the fat and sugar mixture. This should take approximately 3 to 4 minutes. Stop and scrape down the sides of the bowl several times to ensure the ingredients are evenly mixed. If you skip this step or rush it, your cookies will be denser and flatter.
Step 3: Add Wet Ingredients and Emulsify
- Add the room temperature eggs one at a time, beating well after each addition until the yolk is fully incorporated into the mixture. The mixture might look slightly curdled after the first egg, but it should smooth out after the second.
- Add the vanilla extract and the milk. Beat on low speed until just combined. Be careful not to overmix at this stage; we only want to incorporate the liquid.
Step 4: Combine Wet and Dry Mixtures Gently
- Gradually add the reserved dry ingredient mixture to the wet ingredients. Start with the mixer on the lowest speed possible.
- Mix only until the dough is just combined and no streaks of flour remain. Pause often to scrape down the sides.
- Stop the mixer immediately once the flour disappears. Do not overmix the dough, as excess agitation develops gluten, which results in tough, hard, and unpleasant celebration cookies.
Step 5: Incorporate the Sprinkles (Folding is Key)
- Remove the bowl from the mixer and switch to a rubber spatula. Gently fold the rainbow jimmie sprinkles into the cookie dough.
- Mix only until the sprinkles are evenly distributed throughout the dough. Overmixing here can cause the sprinkles to begin dissolving, leading to color bleed. Be gentle and quick.
Step 6: Chill the Dough (Recommended for Thicker Cookies)
- For thicker cookies that spread less and retain their cheerful height, cover the bowl and chill the dough in the refrigerator for 30 minutes. Chilling solidifies the butter, delaying its melting point in the oven.
- If you are pressed for time, you may skip this step, but note that the Funfetti Cookies will spread more thinly.
Step 7: Scoop and Bake for Perfection
- Use a medium cookie scoop (about 1.5 to 2 tablespoons) to portion the dough. Roll the portions lightly into uniform balls. This ensures even baking.
- Place the dough balls 2 inches apart on the prepared baking sheets.
- Bake for 9 to 12 minutes, rotating the pan halfway through if your oven heats unevenly. Look for edges that are lightly golden brown and centers that are still slightly soft and puffy. They should look slightly underdone when you pull them out.
- Do not overbake! Overbaked Funfetti Cookies lose their essential softness and become dry.
Step 8: Cool for Setting
- Remove the sheets from the oven and let the cookies cool on the baking sheet for 5 minutes. The residual heat from the pan will continue to set the center of the cookies without drying them out.
- Transfer the cookies carefully to a wire rack to cool completely before serving or storing. Enjoy your perfect batch of homemade celebration cookies!
Tips, Tricks, and Funfetti Cookie Variations
Baking is about mastering the fundamentals, but also having fun with customization. These tips will help you troubleshoot common issues and explore exciting new versions of your favorite rainbow sprinkle cookies.
Troubleshooting Common Mistakes
- Why Did My Cookies Spread Too Much? The butter was likely too warm (or slightly melted), or you scooped the dough onto a warm baking sheet. Ensure your butter is merely softened, not greasy. If you are baking multiple batches, place the used baking sheet under cold running water or briefly in the freezer to cool it down before placing new dough on it. Another common cause is measuring too little flour or skipping the chill step.
- Why Did My Sprinkles Bleed Color? You used nonpareil sprinkles (the tiny balls) instead of jimmies. Or, you overmixed the dough after adding the sprinkles, causing the colored wax coating to dissolve. Always fold gently!
- My Cookies Are Too Cakey: This typically happens if you added too much flour or over-creamed the butter/sugar mixture for too long, incorporating too much air. Follow the measurements exactly and stop the creaming phase once the mix is visibly light and fluffy (around 3-4 minutes, max).
Flavor and Texture Variations
These variations transform the classic Funfetti Cookies into an entirely new experience:
- Cake Batter Boost: For an even more intense cake flavor, fold in 1–2 tablespoons of dry white or yellow cake mix powder along with the flour mixture. This amps up the vanilla and almond notes.
- Frosting Sandwich: Once cooled, pair two cookies together with a generous dollop of cream cheese frosting or classic buttercream. The texture contrast is divine.
- Double Chocolate Funfetti: Substitute ¼ cup of the all-purpose flour with unsweetened cocoa powder. Add a few tablespoons of mini chocolate chips along with the sprinkles for a richer, cocoa-flavored base.
- Vegan Funfetti Cookies: Substitute the butter with high-quality vegan butter sticks (ensure they have a similar fat content to dairy butter). Use a reliable plant-based milk (like oat or soy milk) and use a flax egg (1 tablespoon ground flaxseed mixed with 3 tablespoons water, rested for 5 minutes) in place of the chicken eggs.
- Gluten-Free Funfetti: Use a high-quality 1:1 gluten-free baking blend that contains xanthan gum. No other modifications should be necessary. Ensure your baking time remains the same, but monitor the centers closely as GF flours can dry out quickly.
- Holiday Sprinkles: As mentioned, customizing the sprinkles is the easiest way to adapt these celebration cookies. For more festive baking inspiration, check out our boards on Pinterest.
Nutritional Insights and Why Homemade is Best (400-600 words)
While Funfetti Cookies are undoubtedly a celebratory indulgence, choosing to bake them at home provides significant control over the ingredients used compared to purchasing pre-made dough or relying on industrial cake mixes. This control directly impacts the nutritional profile and overall quality of the treat.
Approximate Nutritional Breakdown (Per 1.5 oz Cookie, assuming 24 cookies)
Since the ingredients are primarily comprised of fats and carbohydrates, these cookies are energy-dense. The following values are estimates based on standard ingredients and dough yield:
- Calories: 150 – 180 kcal
- Total Fat: 8g – 10g
- Saturated Fat: 5g – 6g
- Carbohydrates: 18g – 22g
- Sugars: 12g – 15g
- Protein: 2g – 3g
These values highlight that Funfetti Cookies are intended as a treat, but when consumed in moderation, they fit easily into a balanced diet, especially when homemade. The primary benefits of scratch baking include ingredient transparency and better control over refined ingredients.
The Benefits of Baking Funfetti Cookies at Home
1. Reduced Preservatives and Artificial Additives: Boxed mixes and commercial cookies often contain a long list of stabilizers, artificial colors, and preservatives to extend shelf life. By making these rainbow sprinkle cookies from scratch, you rely only on fresh butter, eggs, flour, and sugar. The only highly processed ingredients are the sprinkles themselves.
2. Control Over Sodium and Sweetness: This recipe uses unsalted butter, allowing you to control the exact amount of salt added. Similarly, while sugar is essential for flavor and structure, you can confidently verify the exact amount of sweetener used, avoiding high-fructose corn syrup or hidden sugars common in mass-produced items.
3. Quality of Fat: We use real unsalted butter, which provides superior flavor and texture compared to the hydrogenated oils or vegetable shortening often found in industrial baking, which can contain higher levels of trans fats.
4. Psychological and Mental Benefits: The act of baking itself is often therapeutic. The nostalgic scents of vanilla and warm butter, combined with the visual appeal of the colorful sprinkles, offer a significant mood lift. Sharing these homemade celebration cookies with others also fosters connection and joy, which are benefits that far outweigh the simple calorie count.
In essence, choosing to make these delicious Funfetti Cookies yourself means opting for better flavor, better texture, and a cleaner list of ingredients, ensuring that your indulgence is as high-quality and delicious as possible.
Funfetti Cookies FAQs
We’ve gathered the most common questions about baking perfect Funfetti Cookies to ensure your batch is a smashing success. This section utilizes Schema.org microdata for optimal search engine recognition.
What is the difference between Funfetti and rainbow sprinkle cookies?
The terms are often used interchangeably, but ‘Funfetti’ originally refers to a specific Pillsbury boxed cake mix known for its distinct vanilla-cake batter flavor and vibrant sprinkles. Rainbow sprinkle cookies refer to any cookie utilizing colorful sprinkles. This recipe captures the nostalgic cake batter flavor associated with true Funfetti Cookies using scratch ingredients like extra vanilla and milk.
Do I have to chill the Funfetti Cookies dough?
While chilling is technically optional, it is highly recommended. Chilling the dough for at least 30 minutes solidifies the butter, which prevents the dough from spreading excessively when baked. This results in thicker, chewier, and taller celebration cookies that look much more appetizing. If you skip the chill, expect flatter cookies.
How do I prevent the sprinkles from bleeding color into the cookie dough?
To prevent color bleeding, use high-quality jimmie sprinkles (the long, rod-shaped type) instead of nonpareils (the tiny balls), as jimmies contain less surface dye. Crucially, only fold the sprinkles into the dough right before baking, and mix them minimally. Avoid chilling the dough for more than an hour, as prolonged moisture exposure causes colors to bleed.
Can I freeze Funfetti Cookie dough?
Absolutely! Scoop the dough balls onto a baking sheet, freeze them until solid (about 1 hour), and then transfer them to an airtight freezer bag. Frozen Funfetti Cookies dough balls can be stored for up to 3 months. When ready to bake, place them on a lined sheet and bake for 1-3 minutes longer than the recipe specifies.
What ingredient gives Funfetti Cookies their specific cake flavor?
The classic Funfetti flavor comes primarily from a generous amount of vanilla extract, combined with the presence of milk in the dough. Some bakers also use a tiny amount of almond extract or clear vanilla (which mimics the artificial flavoring used in commercial cake batter) to amplify that distinctive, nostalgic flavor profile in their rainbow sprinkle cookies.
Conclusion: The Ultimate Celebration Cookie
These Classic Funfetti Cookies are more than just a baked good; they are an instant dose of happiness, capturing the essence of a birthday party in a single, chewy, buttery bite. We’ve covered every critical step to ensure your success, from the precise ratio of brown to granulated sugar for ideal chewiness, to the importance of using jimmie sprinkles to maintain those vibrant, distinct colors.
Remember that the key to avoiding flat, dull cookies lies in two simple techniques: properly creaming your butter and sugar until light and airy, and gently folding in those colorful sprinkles just before baking. Whether you choose to chill your dough for a full hour or go straight into the oven, the result is guaranteed to be a crowd-pleaser that elevates any simple gathering into a true celebration.
If you’ve followed this guide, you now have a batch of truly extraordinary homemade Funfetti Cookies that will quickly disappear. We encourage you to share this vibrant recipe with friends and family who need a little extra cheer. Did you try a variation, like adding white chocolate chips or frosting them with buttercream? We love hearing about your baking adventures! Leave a comment below and let us know how your batch of rainbow sprinkle cookies turned out. Happy baking!
Classic Funfetti Celebration Cookies
Ingredients
Equipment
Method
- Preheat your oven to 350°F (175°C). Line two large baking sheets with parchment paper or silicone baking mats.
- In a medium bowl, whisk together the all-purpose flour, baking soda, and salt. Set the bowl aside.
- In the bowl of a stand mixer fitted with the paddle attachment (or use a large mixing bowl with a hand mixer), beat the softened butter, granulated sugar, and light brown sugar together on medium speed.
- Continue beating until the mixture is light, fluffy, and noticeably paler in color, which should take approximately 3 to 4 minutes. Stop and scrape down the sides of the bowl as needed.
- Add the eggs one at a time, beating well after each addition until the yolk is fully incorporated into the mixture.
- Add the vanilla extract and the milk. Beat on low speed until just combined. Be careful not to overmix at this stage.
- Gradually add the reserved dry ingredient mixture to the wet ingredients. Mix on low speed, pausing often to scrape down the sides, until the dough is just combined and no streaks of flour remain.
- Do not overmix the dough, as this develops gluten and can result in tough cookies.
- Gently fold the rainbow jimmie sprinkles into the cookie dough using a rubber spatula. Mix only until the sprinkles are evenly distributed throughout the dough.
- For thicker cookies that spread less, cover the bowl and chill the dough in the refrigerator for 30 minutes. If you are in a rush, you may skip this step, but the cookies will spread more.
- Use a medium cookie scoop (about 1.5 to 2 tablespoons) to portion the dough. Roll the portions into uniform balls and place them 2 inches apart on the prepared baking sheets.
- Bake for 9 to 12 minutes, or until the edges are lightly golden brown and the centers are still slightly soft and puffy. Do not overbake.
- Remove the sheets from the oven and let the cookies cool on the baking sheet for 5 minutes. The cookies will continue to set during this time.
- Transfer the cookies to a wire rack to cool completely before serving or storing.