There are certain cookies that immediately conjure up feelings of nostalgia, holidays, and cozy comfort. The Peanut Butter Blossom a soft, chewy peanut butter cookie crowned with a melted milk chocolate kiss is undoubtedly one of them. While the concept is simple, achieving that perfect balance of texture and flavor requires precision. This is the definitive guide to baking the most delicious, melt-in-your-mouth soft, and truly Perfect Peanut Butter Blossoms you will ever make. Forget dry edges and crumbly centers; we are aiming for a pillowy, rich cookie base that perfectly supports that iconic chocolate peak.
This recipe isn’t just about following steps; it’s about understanding the science behind the dough. We’ll explore why the blend of sugars matters, how to prevent spreading, and the exact moment to add the kiss for maximum visual appeal and flavor fusion. Whether you are prepping for a cookie exchange, stocking up your freezer for the holidays, or simply craving the classic combination of peanut butter and chocolate, mastering these Perfect Peanut Butter Blossoms is a rewarding endeavor that guarantees rave reviews.
The secret lies in the careful balance of ingredients specifically the ratio of fats and sugars which ensures the cookies remain tender without being overly cakey. Follow along, and prepare to bake a batch of cookies so flawless, they’ll become a staple in your kitchen year after year.
Why You’ll Fall in Love with This Perfect Peanut Butter Blossoms Recipe (The Texture & Flavor Breakdown)
The internet is flooded with peanut butter cookie recipes, but few capture the specific textural requirements that make the Peanut Butter Blossom a true classic. This specific formulation is beloved because it manages to deliver deep, savory peanut flavor while maintaining an exquisite, soft chewiness. Here is a comprehensive look at why this recipe rises above the rest and guarantees truly Perfect Peanut Butter Blossoms every time (300-500 words).
Unparalleled Softness and Chew
Unlike standard peanut butter cookies that can often turn crisp or dry quickly, this recipe utilizes a crucial ratio of both butter and sugar. We use a combination of granulated sugar and packed light brown sugar. The granulated sugar provides structure and helps with the initial creaming process, while the brown sugar is key for moisture retention. Brown sugar contains molasses, which is naturally hygroscopic (water-retaining). This moisture ensures the final baked cookie remains soft and chewy for days. The higher fat content from the stick of butter and the creamy peanut butter also contributes to a tender crumb that resists drying out.
The Dynamic Duo: Sweet and Salty Harmony
The defining characteristic of any superior peanut butter cookie is the interplay between the sweetness of the dough and the subtle saltiness of the peanut butter. We recommend using a conventional creamy peanut butter (such as Jif or Skippy) for consistent results, as natural peanut butter separates and can drastically alter the dough’s texture. The slight salinity in commercial peanut butter, combined with the measured salt in the dry ingredients, enhances the overall sweetness of the chocolate kiss, creating a perfectly balanced bite. When you taste these Perfect Peanut Butter Blossoms, you get that signature nutty depth followed immediately by the smooth, melting dairy chocolate.
The Iconic Chocolate Finish
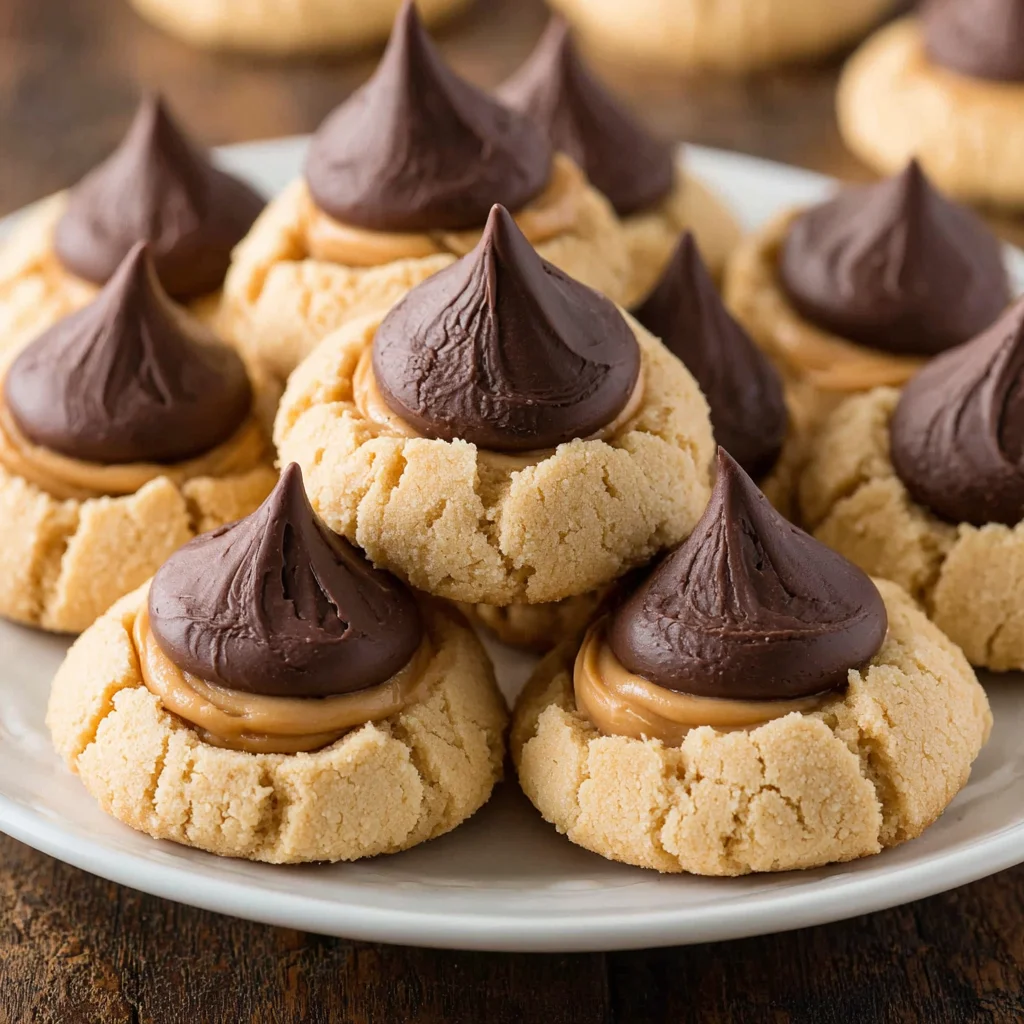
The visual appeal of these cookies is undeniable, but the chocolate kiss is more than just a garnish it’s an essential element of the flavor profile. Adding the kiss immediately when the cookies are hot out of the oven ensures that the base of the chocolate softens and adheres perfectly to the cookie. When the cookie cools, the chocolate sets, but the base remains slightly soft where it melted into the warm dough. This results in a seamless fusion of the peanut butter base and the milk chocolate topper, making every bite satisfyingly rich. If you love the classic pairing, achieving this perfect merger is what makes these the definitive Perfect Peanut Butter Blossoms.
Simple, Yet Spectacular Results
Despite yielding such a professional and delicious result, the process is incredibly straightforward. It uses standard pantry ingredients and requires no advanced baking techniques. It is the ideal recipe for beginners looking for a guaranteed win, or for experienced bakers seeking a reliable, high-volume recipe for gatherings. Furthermore, the dough handles beautifully, making the rolling and sugar coating process easy and enjoyable. The final product is a beautifully cracked, sugared sphere topped with glossy chocolate a treat that looks as good as it tastes.
Why You Should Try This Recipe: Beyond the Flavor of Perfect Peanut Butter Blossoms
If the promise of unparalleled softness and rich chocolate isn’t enough, there are practical reasons why this specific recipe for Perfect Peanut Butter Blossoms deserves a permanent spot in your rotation. These cookies offer tremendous value in terms of ease of preparation, storage flexibility, and their universal appeal (300-500 words).
A Crowning Achievement in Holiday Baking
Peanut Butter Blossoms, often referred to as Peanut Butter Kiss Cookies, are a staple on holiday platters, but they are often the first to disappear. They travel well, stack easily, and their bright, recognizable appearance makes them a fantastic addition to cookie exchanges. Because the recipe yields approximately four dozen cookies (48 blossoms), it’s highly efficient for large-scale baking. If you are preparing for a major event or the holiday rush, streamlining your process with high-yield recipes like this one for Perfect Peanut Butter Blossoms is essential. Moreover, the dough freezes exceptionally well, allowing you to prepare balls weeks in advance and simply bake them when fresh cookies are needed. For more festive baking inspiration, including delightful no-bake treats, consider checking out how we make Christmas Oreo Balls.
High Readability and Consistency
One of the biggest struggles home bakers face is inconsistent results. This recipe is designed with meticulous measurements to minimize error. The instruction to use an electric mixer to achieve a “light and fluffy” creamed mixture is non-negotiable, as proper aeration is what gives the cookie its slight lift and tenderness. Furthermore, the detailed steps, including the exact temperature and timing for baking (8-10 minutes), minimize the risk of overbaking the primary cause of dry peanut butter cookies. When you commit to precision in this recipe, you are virtually guaranteed successful results every time you bake these classic Perfect Peanut Butter Blossoms.
Budget-Friendly Ingredients
Cookies don’t have to be complicated or expensive. The ingredients required for these Perfect Peanut Butter Blossoms flour, sugar, butter, peanut butter, eggs, and baking soda are kitchen staples. This makes them an excellent, economical dessert choice. You don’t need specialty flours or expensive extracts; the rich flavor is derived almost entirely from the quality of the peanut butter and the careful preparation.
Perfect for Beginner Bakers
If you are new to baking, the sheer simplicity of drop cookie dough preparation makes this an ideal starting point. There’s no fancy frosting or complex layering involved. The steps involve creaming, mixing dry ingredients, combining, rolling, and baking. The visual cue of pressing the chocolate kiss into the hot cookie is immensely satisfying and rewarding. This successful experience can build confidence, paving the way for more complex baking projects down the line. Start your journey with these easy-to-master, Perfect Peanut Butter Blossoms.
Ingredients and Necessary Utensils for Perfect Peanut Butter Blossoms Success
Achieving the perfect texture in these classic Peanut Butter Kiss Cookies starts with understanding the role each ingredient plays and having the right tools on hand. Don’t underestimate the power of preparation; gathering your mise en place (all ingredients measured and ready) before you start is key to baking these Perfect Peanut Butter Blossoms smoothly (700-900 words).
Detailed Ingredient Breakdown (The Core Components)
The quantities listed below are crucial for maintaining the dough’s optimal moisture and fat content, ensuring the finished product is perfectly soft and chewy.
For the Cookies:
- 1/2 cup (1 stick) unsalted butter, softened: Temperature is critical. The butter must be truly softened (room temperature, easily indented by a finger) but not melted. Cold butter won’t cream properly, and melted butter will result in greasy, flat cookies.
- 1/2 cup granulated sugar: Provides structure and crispness around the edges, balancing the chewiness from the brown sugar.
- 1/2 cup packed light brown sugar: This is the moisture MVP. Ensure it is firmly packed into the measuring cup for an accurate amount, which directly impacts the softness of the Perfect Peanut Butter Blossoms.
- 1/2 cup creamy peanut butter: Use a shelf-stable, commercial brand (like Jif or Skippy). Natural peanut butter, due to its varying oil content, can make the dough too soft or greasy. For another delightful use of this classic spread, consider my recipe for no-bake peanut butter pie.
- 1 large egg: Acts as a binder and adds richness. Ensure the egg is also at room temperature to incorporate fully into the creamed mixture without curdling.
- 1 teaspoon vanilla extract: Pure vanilla enhances the overall flavor profile, especially the nuttiness of the peanut butter.
- 1 3/4 cups all-purpose flour: Measured using the spoon-and-level method to avoid dense cookies. Scooping directly from the bag packs the flour too tightly, leading to dry results.
- 1 teaspoon baking soda: The primary leavening agent. This reacts with the acidic brown sugar to give the cookie its signature lift and slightly cracked texture.
- 1/2 teaspoon salt: Essential for balancing sweetness and intensifying the peanut butter flavor.
For Rolling and Garnish:
- 1/4 cup granulated sugar (for rolling): Used to coat the dough balls, providing a beautiful sparkle and a delightful textural crunch to the exterior of the cookie.
- Approximately 48 milk chocolate candy kisses, unwrapped: While 48 is the target yield, always have a few extra on hand just in case. Ensure these are unwrapped BEFORE the cookies come out of the oven. The time sensitivity here is crucial.
Secondary Keywords Integration: Essential Baking Tools
Having the right equipment streamlines the process and helps ensure your Perfect Peanut Butter Blossoms come out consistently beautiful and properly baked.
Essential Tools & Utensils:
- Electric Mixer (Stand or Handheld)
- Absolutely necessary for creaming the butter and sugars properly. Achieving that “light and fluffy” stage is difficult to impossible by hand and is key to a tender cookie crumb.
- Rubber Spatula/Scraper
- Used constantly to scrape down the sides of the mixing bowl, ensuring all ingredients are uniformly incorporated. This prevents pockets of unmixed flour or butter.
- Measuring Cups and Spoons
- Accuracy matters. Use dry measuring cups for flour and sugars, and liquid measuring cups for wet ingredients like vanilla.
- Small Cookie Scoop (1-tablespoon size)
- The secret weapon for uniformity. Using a scoop ensures every cookie is the same size, leading to even baking and beautiful, symmetrical Perfect Peanut Butter Blossoms. This standard size yields approximately 4 dozen cookies.
- Parchment Paper or Silicone Mats
- Highly recommended! Lining your baking sheets prevents sticking and makes cleanup a breeze. Silicone mats offer superior heat distribution and a slightly chewier base.
- Wire Cooling Rack
- Necessary for allowing the cookies to cool completely. Air circulation is vital to stop the baking process and set the structure, especially the freshly pressed chocolate kiss.
Preparation tip: Remember to set aside the 1/4 cup of sugar for rolling in a shallow dish right at the beginning, so it is ready when the dough is mixed.
Detailed Recipe Steps: Baking Perfect Peanut Butter Blossoms
Follow these steps precisely to guarantee chewy centers, light golden edges, and that stunning, perfectly placed chocolate crown. Precision in timing, especially during the addition of the chocolate kiss, is the difference between a good cookie and truly Perfect Peanut Butter Blossoms (800-900 words).
Step 1: Preparation is Paramount
- Preheat and Prep: Preheat your oven to 375°F (190°C). This higher temperature helps the cookies set quickly before spreading too much. Line two large baking sheets with parchment paper or silicone baking mats.
- Unwrap the Kisses: This is the most crucial preparation step you can easily forget. Unwrap all 48 milk chocolate candy kisses and place them near your oven. Once the cookies are out, you will have less than 60 seconds to press the kisses in, and unwrapping them then is impossible.
Step 2: Creaming the Foundation
The creaming process incorporates air into the butter and sugar, which contributes significantly to the cookie’s light texture.
- Combine Wet Ingredients and Sugars: In a large mixing bowl, using an electric mixer fitted with the paddle attachment (or a hand mixer), combine the softened butter, 1/2 cup granulated sugar, and light brown sugar.
- Cream until Fluffy: Beat on medium-high speed for 2 to 3 minutes. The mixture must transform from gritty to light, pale yellow, and noticeably fluffy. This aeration step prevents the final cookie from being dense. Scrape down the sides of the bowl often.
- Incorporate Peanut Butter and Flavoring: Reduce the mixer speed to low. Beat in the 1/2 cup of creamy peanut butter until fully combined. Ensure there are no lumps of plain butter remaining. Add the large egg and vanilla extract and mix until just blended. Stop mixing the moment the egg yolk disappears; overmixing incorporates too much air at this stage, which can toughen the cookies later.
Step 3: Mixing the Dough
The key here is gentle incorporation of the dry ingredients to avoid developing the gluten, which leads to tough cookies.
- Combine Dry Ingredients: In a separate medium bowl, whisk together the all-purpose flour (1 3/4 cups), baking soda, and salt. Whisking ensures the leavening agent (baking soda) and salt are evenly distributed throughout the flour.
- Mix Dough Gently: Gradually add the dry mixture to the wet mixture, mixing on the absolute lowest speed (or folding by hand) until the dough comes together. Stop mixing immediately once the flour streaks disappear. A few lumps of dough are fine; continue scraping down the sides to ensure everything is incorporated. The final dough for these Perfect Peanut Butter Blossoms should be cohesive, slightly sticky, and easy to handle.
Step 4: Scooping and Coating for Uniformity
Uniformity is the key to aesthetically pleasing and evenly baked cookies.
- Prepare Rolling Station: Pour the reserved 1/4 cup of granulated sugar into a small, shallow dish for rolling the dough.
- Scoop and Roll: Use a small cookie scoop (about 1 tablespoon) to portion the dough. If you don’t have a scoop, roll the dough into uniform balls, approximately 1 inch in diameter. Even size ensures even baking.
- Coat with Sugar: Roll each dough ball thoroughly in the dish of granulated sugar to coat all sides completely. This sugar layer not only adds crunch and sparkle but also helps prevent the cookies from spreading too rapidly.
- Arrange and Bake: Place the sugared dough balls onto the prepared baking sheets, spacing them about 2 inches apart.
Step 5: The Critical Final Step
The timing of the initial bake and the addition of the kiss are what perfects this recipe.
- Initial Bake: Bake the cookies for 8 to 10 minutes. Do not exceed 10 minutes. The cookies should be lightly golden brown around the edges and appear set, but the center should still look slightly soft and puffy. Under-baking slightly is essential for a chewy final texture.
- Add Chocolate Kisses IMMEDIATELY: Remove the baking sheet from the oven and set it on a heatproof surface. Working quickly, gently press one unwrapped chocolate kiss firmly into the center of each hot cookie. The pressure should cause the cookie to crack slightly around the edges this is the signature look of a Perfect Peanut Butter Blossom. The heat from the cookie base will immediately start softening the chocolate.
- Cool Completely: Allow the cookies to cool on the baking sheet for 5 minutes. This cooling time allows the delicate structure to firm up before moving. After 5 minutes, carefully transfer them to a wire rack to cool completely. The chocolate kisses will be soft and meltable; do not touch, move, or stack them until the chocolate has fully set, which may take up to an hour at room temperature or 30 minutes in the refrigerator.
Tips, Troubleshooting, and Delicious Variations (Customizing Your Perfect Peanut Butter Blossoms)
Once you have mastered the classic technique, you can explore several variations and troubleshooting tips to ensure continuous success, even when adapting this recipe for different dietary needs or preferences (500-600 words).
Troubleshooting Common Mistakes
Why are my cookies flat and greasy?
Flat, greasy cookies are typically caused by butter that was too warm (partially melted) or by dough that was mixed for too long after the flour was added. Ensure your butter is only softened, not slick, and that you stop mixing the dry ingredients the moment they combine. Chilling the dough for 30 minutes before rolling can also help prevent excessive spreading, especially if your kitchen is warm.
Why is my dough dry and crumbly?
This is often due to over-measuring the flour (using the scoop method instead of spoon-and-level) or overbaking. Remember that these Perfect Peanut Butter Blossoms should look slightly underdone and pale in the center when you pull them from the oven. If your dough feels too dry, try adding 1/2 teaspoon of milk or water to the mixture to increase the moisture slightly.
My chocolate kisses slid off!
This happens if you wait too long to press the kisses in, or if you don’t press them hard enough. The residual heat from the cookie must melt the base of the chocolate to act as an adhesive. You must press them firmly enough to create a small crack around the edges; this is a sign that the chocolate has fully seated itself into the structure of the cookie.
Delicious Variations for Peanut Butter Blossom Cookies
You can easily modify these classic Perfect Peanut Butter Blossoms to suit different tastes or dietary requirements:
- Gluten-Free Blossoms: Swap the all-purpose flour for a high-quality 1:1 gluten-free baking blend (ensure the blend includes xanthan gum). Follow all other steps exactly. The texture will remain surprisingly soft and delicious.
- Vegan Adaptation: Replace the unsalted butter with a high-quality vegan butter substitute (stick form, not tub). Substitute the large egg with a flax egg (1 tablespoon ground flaxseed + 3 tablespoons water, rested for 5 minutes). The result is a chewy, vegan-friendly version of the classic.
- Flavor Swaps for the Kiss: While the milk chocolate kiss is traditional, you can easily change the flavor profile. Try dark chocolate kisses for a richer, less sweet cookie, or use caramel-filled kisses for a decadent twist. For a festive alternative during the holidays, use peppermint bark kisses!
- Different Rolling Coats: Instead of granulated sugar, roll the dough balls in powdered sugar for a crinkle effect (like a crinkle cookie), or roll them in finely chopped nuts (pecans or walnuts) for added crunch.
Storage and Make-Ahead Advice
These cookies are excellent make-ahead options. The unbaked dough balls, once rolled in sugar, can be frozen solid on a baking sheet, then transferred to an airtight container. When ready to bake, place them directly on the prepared sheet and add 2–3 minutes to the baking time. Baked Perfect Peanut Butter Blossoms can be stored in an airtight container at room temperature for up to one week, maintaining excellent texture. For more insights on achieving chewy perfection in other popular recipes, don’t forget to check out my guide on soft peanut butter cookies.
For endless cookie inspiration and festive dessert ideas, be sure to follow my Pinterest baking board!
Nutritional Values and Benefits of Perfect Peanut Butter Blossoms
While cookies are undeniably a treat, understanding the nutritional components of these Perfect Peanut Butter Blossoms can help you appreciate them as part of a balanced diet. This section provides an estimated nutritional breakdown and highlights the benefits derived from key ingredients (400-600 words).
Estimated Nutritional Breakdown (Per Cookie, based on 48 servings)
Please note that these values are estimates and can vary based on the specific brands of peanut butter and chocolate kisses used.
| Nutrient | Estimated Value |
|---|---|
| Calories | 100–120 kcal |
| Total Fat | 5–6g |
| Saturated Fat | 3g |
| Cholesterol | 10mg |
| Sodium | 50mg |
| Total Carbohydrates | 13–15g |
| Dietary Fiber | <1g |
| Total Sugars | 8–10g |
| Protein | 2–3g |
Benefits of Key Ingredients
Peanut Butter (Healthy Fats and Protein)
Peanut butter is the star of the show and provides a valuable nutritional contribution. It is rich in monounsaturated fats, which are considered heart-healthy. Furthermore, each of these Perfect Peanut Butter Blossoms contains a decent amount of plant-based protein (2-3g per cookie). While this recipe uses sugar-added peanut butter, the inclusion of peanuts means you are also consuming essential vitamins and minerals, including magnesium, phosphorus, zinc, and Vitamin E.
The Role of Flour and Eggs
All-purpose flour provides the necessary carbohydrates, which are the body’s primary source of energy. The small amount of egg in each serving acts as a complete protein source, containing essential amino acids, and also provides Choline, which is important for brain health.
A Note on Indulgence
It is important to remember that these Perfect Peanut Butter Blossoms are a dessert, designed for enjoyment and indulgence. The combination of fats and sugars makes them deeply satisfying. When consumed in moderation, they provide comfort and joy, which are essential elements of a healthy, balanced lifestyle. Because this recipe yields 4 dozen cookies, it’s easy to freeze batches to ensure portion control and prevent overconsumption, making these treats last longer.
Frequently Asked Questions (FAQs) about Perfect Peanut Butter Blossoms
What is the secret to keeping Peanut Butter Blossoms soft?
The secret to soft Perfect Peanut Butter Blossoms lies in the brown sugar ratio and the baking time. Brown sugar retains moisture due to its molasses content, ensuring a chewy result. Additionally, you must slightly under-bake the cookies; they should look set on the edges but still pale and slightly soft in the very center when removed from the oven. The cookies continue to cook on the sheet after removal.
Can I use natural peanut butter for these cookies?
It is generally advised against using natural, oil-separated peanut butter for Perfect Peanut Butter Blossoms. Natural peanut butter has a higher fat content that can separate during baking, causing the cookies to spread excessively and become greasy. For consistent texture and reliable structure, use creamy, commercial-grade peanut butter like Jif or Skippy.
How do you prevent the chocolate kisses from melting entirely?
To prevent the chocolate kisses from melting entirely, they must be added immediately after the cookies exit the oven, allowing just the base to soften and adhere. Crucially, they must be allowed to cool and set fully without being touched. If your kitchen is very warm, you can transfer the cookies to the refrigerator after the initial 5-minute cooling period to help the chocolate set quickly.
Do I need to chill the dough for Perfect Peanut Butter Blossoms?
If you follow the ingredient ratio and measure accurately, chilling the dough is not strictly necessary unless your kitchen is excessively warm. However, if you notice the dough is very sticky or hard to roll, a 30-minute chill can help the fat solidify, leading to thicker, less-spread cookies. For freezer storage, chilling before rolling is unnecessary.
What is the correct temperature for the butter?
The butter should be truly softened about 68°F (20°C) which means it should be pliable enough to leave an indentation when pressed, but still hold its shape. If the butter is too cold, it won’t cream properly, resulting in a dense cookie. If it’s melted or oily, the cookies will spread excessively and become greasy, undermining the texture of your Perfect Peanut Butter Blossoms.
Conclusion: The Last Batch of Perfect Peanut Butter Blossoms
The journey to creating the truly Perfect Peanut Butter Blossoms is a rewarding one that culminates in a cookie that is rich in flavor, delightful in texture, and iconic in appearance. By adhering to the precise instructions especially regarding the dual-sugar composition, the quick baking time, and the immediate addition of the chocolate kiss you ensure a final product that is far superior to standard recipes. This cookie is not just an item on a dessert platter; it’s a tiny monument to comfort food, effortlessly blending creamy, salty peanut butter with smooth, sweet milk chocolate.
Whether you were drawn to this recipe for holiday baking, a simple weeknight treat, or a nostalgic craving, these Peanut Butter Kiss Cookies are guaranteed to satisfy. They are robust enough for mailing, perfect for freezing, and simple enough for baking with children. Remember the essential tips: unwrap those kisses ahead of time, stop mixing the dough the moment the flour disappears, and never, ever overbake. Embrace the crack that forms when you press the chocolate into the hot dough; it is the definitive sign of a cookie baked to perfection.
We encourage you to try this ultimate recipe and share your baking successes. If you loved these chewy, Perfect Peanut Butter Blossoms, please consider leaving a comment below with your feedback or sharing this article with fellow peanut butter and chocolate enthusiasts. Happy baking!
PERFECT PEANUT BUTTER BLOSSOMS
Ingredients
Equipment
Method
- Preheat your oven to 375°F (190°C). Line two large baking sheets with parchment paper or silicone baking mats. Unwrap all of the chocolate kisses and set them aside.
- In a large mixing bowl, using an electric mixer, cream together the softened butter, 1/2 cup granulated sugar, and light brown sugar until the mixture is light and fluffy, about 2 to 3 minutes.
- Beat in the peanut butter until fully combined. Add the egg and vanilla extract and mix until just blended, scraping down the sides of the bowl as needed.
- In a separate medium bowl, whisk together the all-purpose flour, baking soda, and salt. Gradually add the dry ingredient mixture to the wet mixture, mixing on low speed until the dough comes together and no streaks of flour remain. Be careful not to overmix the dough.
- Pour the reserved 1/4 cup of granulated sugar into a small, shallow dish for rolling the cookie dough. Scoop the cookie dough using a small cookie scoop (about 1 tablespoon) or roll the dough into uniform balls, approximately 1 inch in diameter.
- Roll each dough ball thoroughly in the dish of granulated sugar to coat all sides completely. Place the sugared dough balls onto the prepared baking sheets, spacing them about 2 inches apart.
- Bake the cookies for 8 to 10 minutes. The cookies should be lightly golden brown and appear set, but they should still look slightly soft in the center.
- Immediately upon removing the cookies from the oven, gently press one unwrapped chocolate kiss firmly into the center of each hot cookie. The pressure should cause the cookie to crack slightly around the edges.
- Allow the cookies to cool on the baking sheet for 5 minutes before carefully transferring them to a wire rack to cool completely. The chocolate kisses will be soft; do not touch or move them until the chocolate has fully set, which may take up to an hour at room temperature.