There are few candies that evoke the same sense of nostalgic luxury as the classic Chocolate Turtle. A perfectly balanced bite of crunchy pecans, chewy, buttery caramel, and a rich cloak of high-quality chocolate, these confections are truly special. While store-bought versions are often overly sweet or lacking in texture, creating your own Homemade Chocolate Turtles allows you to achieve the perfect harmony of flavors and textures.
This comprehensive guide walks you through every precise step, from toasting the pecans to mastering the art of the perfect, non-sticky homemade caramel. Forget complicated tempering processes we focus on creating a stunningly delicious, professional-quality treat right in your kitchen. Whether you are seeking the ideal holiday gift, a show-stopping dessert for a party, or simply a decadent reward for yourself, mastering these Homemade Chocolate Turtles is a confectionery skill worth acquiring.
Prepare your candy thermometer and your saucepan, because the journey to making the best chocolate-pecan caramel candies starts now. Get ready to impress everyone with these truly gourmet, scratch-made delights.
Decadence Defined: Why These Homemade Chocolate Turtles Will Steal Your Heart
Why bother making a classic like this from scratch when you can grab a box at the store? The answer lies entirely in the quality and the unparalleled customization that homemade offers. When you compare mass-produced candies to scratch-made Homemade Chocolate Turtles, the difference is night and day. This recipe prioritizes ingredients and technique, resulting in a candy that is superior in every way.
The Magic of Scratch-Made Caramel
The core of any great turtle is its caramel center, and that’s where this recipe shines. Many commercial turtles use a quick, sugar-syrup-based caramel that can be grainy, overly stiff, or stick fiercely to your teeth. Our recipe uses a rich, dairy-based caramel featuring unsalted butter, light brown sugar, light corn syrup, and, crucially, sweetened condensed milk. This combination guarantees several things:
- Perfect Chewiness: By cooking the caramel precisely to 245°F (118°C), we ensure it sets firm enough to hold its shape when cool but remains satisfyingly soft and chewy it melts beautifully, not sticks.
- Depth of Flavor: The brown sugar adds molasses notes, deepening the overall flavor profile far beyond simple white sugar syrups.
- Control Over Sweetness: While undeniably sweet, the balance of salt and high-quality butter prevents the caramel from tasting overwhelmingly sugary, allowing the rich notes of the pecans and chocolate to come through.
Unbeatable Texture and Flavor Fusion
A turtle is a symphony of textures: the crisp crunch of the pecans, the soft chew of the caramel, and the satisfying snap of the chocolate shell. This recipe maximizes that sensory experience:
Toasted Pecans: We specifically instruct you to toast the whole pecan halves. This crucial step releases the nuts’ natural oils, intensifying their nutty, buttery flavor. A raw pecan simply cannot compete with the fragrant depth of a toasted one. These toasted nuts, arranged artfully, form the “legs” of our Homemade Chocolate Turtles, ensuring maximum structural integrity and flavor.
Customization is King
When you make these at home, you are the master chocolatier. You control the most important element: the chocolate coating. Do you prefer the classic, creamy sweetness of milk chocolate? The complex balance of semi-sweet? Or the intense, slightly bitter notes of dark chocolate? You can choose a high-quality melting wafer or bar that complements your preference. Furthermore, the option to add a touch of shortening or coconut oil guarantees a thinner, smoother melt, making the dipping process simple and giving your finished Homemade Chocolate Turtles a beautiful, professional sheen.
Ultimately, loving this recipe comes down to quality control. You are creating a gourmet confection using premium ingredients and proven candy-making techniques. The result is an heirloom-quality candy that tastes infinitely better than anything you can buy ready-made, making it the perfect centerpiece for any gathering.
Mastering the Art of Confectionery: The Joy of Making Homemade Chocolate Turtles
Beyond the superior taste, there are compelling reasons why you should carve out the time to craft these exquisite Homemade Chocolate Turtles. This process is not just about producing a treat; it’s about engaging in a satisfying culinary project that yields wonderful rewards, both personal and social. It is a fantastic skill-builder for any home baker or candy enthusiast.
Perfect for Gifting and Holidays
When the holiday season approaches, or when you need a truly special, handmade gift, nothing tops Homemade Chocolate Turtles. They look professional, taste incredible, and signify effort and care that pre-packaged treats simply lack. Imagine beautifully packaged boxes filled with your own creations they make magnificent host gifts, teacher appreciation presents, or additions to a cookie exchange platter. Because they are stable at room temperature and freeze well, they can be made weeks ahead of time, easing holiday preparation stress.
A Lesson in Candy Making Precision
This recipe introduces the foundational techniques of sugar work. Making caramel requires attention, precision, and the use of a candy thermometer, which is a valuable tool in any serious kitchen. By successfully monitoring the temperature and achieving that critical 245°F stage known as the “firm ball” stage you gain confidence in tackling other challenging confectionery projects, from chewy caramel pecan pie cookies to traditional toffee.
Cost-Effective Gourmet Indulgence
Gourmet chocolate turtles sold in specialty candy shops can be incredibly expensive. By making them at home, even utilizing high-quality chocolate and premium pecans, you drastically reduce the per-unit cost. You can produce a large batch of stunning, gourmet-level candy for a fraction of the price of buying a small handful from a boutique store. This makes luxury accessible, allowing you to enjoy more of this delicious indulgence without breaking the bank.
A Reliable, Tried-and-True Recipe
We’ve meticulously broken down the instructions to ensure success. The detailed phases (Preparation, Caramel Cooking, Assembly, Coating) provide a clear roadmap. The inclusion of condensed milk in the caramel recipe acts as a stabilizer, helping prevent crystallization (the enemy of smooth caramel) and making the entire process more forgiving than traditional water and sugar caramel recipes. Even if you’ve been intimidated by candy making before, this guide provides the necessary safeguards and checkpoints to ensure you succeed in creating perfectly formed, deliciously chewy Homemade Chocolate Turtles every single time.
By engaging in this recipe, you are not just baking; you are creating memories, mastering a classic confectionery art, and producing a treat that genuinely tastes like a million bucks.
Essential Elements for Perfect Homemade Chocolate Turtles: Ingredients and Tools
Achieving truly spectacular Homemade Chocolate Turtles depends entirely on the quality of your ingredients and having the right tools on hand. Precision is key in candy making, particularly with caramel, so please read through these requirements carefully.
Ingredients Checklist
Using quality ingredients ensures that the final flavor is rich and complex, worthy of a gourmet price tag.
For the Caramel Center
- 1 cup (2 sticks) unsalted butter: High-fat butter contributes greatly to the richness and texture of the caramel. Using unsalted butter allows you to control the exact level of salt added later.
- 1 cup packed light brown sugar: Provides the classic molasses flavor that distinguishes this type of caramel from simple white sugar candy. Ensure it is packed firmly when measuring.
- ½ cup light corn syrup: This is a crucial ingredient! Corn syrup (glucose syrup) prevents sugar crystallization, ensuring your caramel stays smooth, glossy, and beautifully chewy rather than grainy or stiff.
- 1 (14 ounce) can sweetened condensed milk: This adds a creamy, decadent texture and helps the caramel set up with the ideal balance of firmness and chewiness. Do not substitute this with evaporated milk or heavy cream.
- 1 teaspoon vanilla extract: Added at the very end to prevent evaporation, vanilla boosts the overall aromatic quality of the caramel.
- ½ teaspoon salt: Salt is essential for balancing the intense sweetness of the caramel, highlighting the butter and brown sugar notes.
For the Turtles Assembly
- 2 cups whole pecan halves (approximately 48 to 60 halves): Use high-quality, fresh pecans. We rely on their flavor and structural integrity for the turtle base. For other dessert ideas using this wonderful nut, check out our guide on Pecan Pie Cobbler.
- 2 pounds high-quality chocolate for melting: The quality of your chocolate directly impacts the taste and melting performance.
- Recommendation: Use chocolate specifically labeled as melting wafers (such as Ghirardelli, Callebaut, or Guittard) as they contain stabilizers that help them melt smoothly without requiring formal tempering.
- Types: Choose milk, semi-sweet, or dark chocolate based on your preference. For a truly rich, gourmet Homemade Chocolate Turtles, dark chocolate (60% or higher) is highly recommended.
- 2 teaspoons shortening or coconut oil (optional): This additive, often called “silk,” helps thin the melted chocolate slightly, making dipping easier and creating a glossier, firmer shell when set.
Recommended Tools and Utensils
Candy making is precise, and the right equipment ensures safety and success.
Crucial Equipment
- Heavy-Bottomed Saucepan: Essential for caramel making. A heavy bottom distributes heat evenly, significantly reducing the risk of scorching the milk solids in the condensed milk, which would ruin the caramel’s flavor.
- Candy Thermometer: This is NON-NEGOTIABLE for the success of Homemade Chocolate Turtles. You must hit exactly 245°F (118°C). Do not rely on visual cues or the “cold water test.” Ensure the thermometer clip is attached firmly and the tip is submerged in the caramel mixture but does not touch the bottom of the pan.
- Large Baking Sheets (2 or 3): Needed for arranging the pecans and cooling the finished candies.
- Parchment Paper or Silicone Mats: Absolutely essential. Caramel and melted chocolate are notoriously sticky. Lining your sheets ensures easy removal of your delicate Homemade Chocolate Turtles.
- Wooden Spoon or Heat-Resistant Spatula: Necessary for constant stirring to prevent scorching the caramel mixture.
- Microwave-Safe Bowl or Double Boiler: For melting the chocolate. A double boiler (or a bowl set over simmering water) offers the most control, but a microwave works well if done in short bursts.
Preparation is half the battle when crafting these luxurious Homemade Chocolate Turtles. Gather your ingredients, ensure your thermometer is calibrated, and line those baking sheets before the stove even turns on.
Step-by-Step Guide to Crafting Homemade Chocolate Turtles (The Full Recipe)
This recipe is divided into four distinct phases. Following these steps systematically ensures a flawless execution and the perfect caramel consistency.
Phase 1: Preparation and Pecan Assembly
This phase is about setting the foundation for your turtles. Do not skip the toasting step it dramatically enhances the final flavor.
- Prepare the Surface: Line two large baking sheets with parchment paper or silicone mats. This is crucial for preventing sticking. Have these ready before you start cooking the caramel.
- Toast the Pecans: Preheat your oven to 350°F (175°C). Spread the pecan halves in a single layer on a baking sheet. Toast them for 5 to 7 minutes until they smell deliciously fragrant. Watch them meticulously, as they can burn quickly. Remove the nuts and allow them to cool completely. Warm nuts will melt your caramel prematurely.
- Assemble the Bases: Once the pecans are cool, arrange them onto the prepared baking sheets. Create small clusters of three or four nuts, positioned close together in a star or cross pattern to form a solid base for the caramel center. Leave adequate space (about 2 inches) between each cluster.
Phase 2: Cooking the Homemade Caramel
This is the most critical stage. Precision temperature control guarantees that signature chewy texture.
- Combine Wet and Sugar Ingredients: In a heavy-bottomed saucepan, combine the butter, brown sugar, corn syrup, and sweetened condensed milk. Using a heavy pan is vital to prevent scorching.
- Melt and Dissolve: Place the saucepan over medium heat. Stir the mixture constantly using a wooden spoon or heat-resistant spatula until the butter has fully melted and the brown sugar has completely dissolved. The mixture should look homogeneous before boiling begins.
- Begin the Boil: Attach a candy thermometer to the side of the pan. Ensure the tip is fully submerged in the mixture but does not touch the bottom of the pot (this provides an inaccurate reading). Bring the mixture to a slow, rolling boil.
- Cook to Temperature: Continue to cook the caramel, stirring frequently, especially around the edges and bottom, to prevent scorching. Cook until the mixture reaches a temperature of 245°F (118°C). This temperature corresponds to the “firm ball” stage and is essential for achieving a chewy, non-sticky texture. This cooking phase usually takes 15 to 20 minutes of steady simmering.
- Finish the Caramel: Remove the saucepan immediately from the heat once the 245°F mark is reached. The caramel will continue to cook quickly if left on the burner.
- Incorporate Flavor: Quickly stir in the vanilla extract and salt until they are fully incorporated into the hot caramel mixture. Stirring in the vanilla last preserves its flavor.
Phase 3: Assembling the Caramel Centers
You must work quickly here, as the caramel will begin to stiffen as it cools.
- Spoon and Pour: Working immediately while the caramel is still hot and pourable, use a standard kitchen teaspoon or a small cookie scoop to portion the mixture. Spoon a heaping teaspoon of the caramel directly over the center of each pecan cluster. The caramel should gently pool, covering the central intersection of the nuts but leaving the tips exposed.
- Shape (Optional): If the caramel is too runny, you can gently nudge it into a slightly more rounded shape using the back of a lightly oiled spoon.
- Set the Caramel: Allow the assembled pecan and caramel clusters to cool and set completely. This process can take several hours at cool room temperature. To speed things up dramatically, transfer the baking sheets to the refrigerator for approximately 30 to 45 minutes. The caramel must be firm to the touch before proceeding. If it is sticky or soft, the dipping process will fail.
Phase 4: Coating with Chocolate
The final step brings the three elements together to create beautiful, glossy Homemade Chocolate Turtles.
- Prepare the Chocolate: If using chocolate bars, chop the chocolate into small, uniform pieces. Place the chocolate in a microwave-safe bowl.
- Melt Safely: Microwave the chocolate in 30-second intervals (or use a double boiler for better control). Stir thoroughly after each interval. Continue until the chocolate is smooth and completely melted, with no lumps remaining. If using shortening or coconut oil, stir it in now to slightly thin the chocolate for a smoother finish.
- Dip the Turtles: Carefully peel one set caramel turtle off the parchment paper. There are two preferred methods for coating:
- Method A (Full Coverage): Dip the entire turtle into the melted chocolate, coating the caramel and pecans fully. Lift it out with a fork, allowing excess chocolate to drip back into the bowl.
- Method B (Classic Look): Place the turtle on a fork and use a spoon to drizzle the melted chocolate over the entire surface. Ensure the caramel is fully encased, but strategically leave some pecan tips visible for that classic turtle aesthetic.
- Return to Set: Return the coated turtle to a clean, parchment-lined baking sheet.
- Repeat and Finish: Repeat this process for all remaining turtles. If the chocolate starts to thicken, return it to the microwave for a quick 15-second blast. For a decorative finish, you can drizzle a contrasting chocolate (white or dark) over the tops. Take a moment to also explore our fantastic Triple Chocolate Pie recipe for more decadent inspiration.
- Final Set: Allow the finished Homemade Chocolate Turtles to set completely at room temperature for several hours, or chill them in the refrigerator for 20 minutes until the chocolate shell is firm, glossy, and snaps when broken.
- Storage: Once set, store the Homemade Chocolate Turtles in an airtight container at cool room temperature (ideally 65-70°F/18-21°C) for up to 2 weeks, or freeze them for longer storage.
Elevating Your Homemade Chocolate Turtles: Tips, Tricks, and Variations
Once you have mastered the basic recipe, you can easily adapt and elevate these spectacular candies. Whether you need dietary adjustments or just want to experiment with new flavors, these tips and variations will ensure every batch of your Homemade Chocolate Turtles is unique and successful.
Troubleshooting Common Caramel Issues
Caramel making can be intimidating, but most issues stem from improper temperature or insufficient stirring.
- Scorching: If the caramel burns on the bottom, it imparts a bitter flavor that cannot be salvaged. Tip: Always use a heavy-bottomed pan and stir constantly, scraping the sides and bottom. Keep the heat strictly at medium.
- Graniness/Crystallization: If your caramel turns gritty, it means sugar crystals formed. Tip: The corn syrup in this recipe helps prevent this, but also ensure you do not scrape down the sides of the pot once boiling begins, as stray crystals could fall back in and seed the entire batch. If necessary, quickly brush down the sides with a wet pastry brush before the temperature reaches 245°F.
- Caramel is Too Hard/Brittle: This means you cooked the caramel past 245°F. Tip: Use a precise thermometer and remove the pan immediately when the temperature is hit. For a chewier texture, aim for 242-243°F.
Flavor Variations for Your Turtle Recipe
While the classic pecan turtle is divine, don’t hesitate to switch up the nuts and seasonings:
- Nut Alternatives: While they won’t technically be “turtles” (named for their pecan appearance), you can easily substitute the nuts. Try using toasted walnuts, macadamia nuts (for a softer texture), or blanched almonds. Ensure the nuts are fully toasted for maximum flavor.
- Espresso Turtles: Add 1 teaspoon of espresso powder (instant coffee grounds) to the caramel mixture along with the vanilla and salt. This deepens the complexity and enhances the chocolate flavor.
- Sea Salt Finish: Before the chocolate coating fully sets, sprinkle the top of each turtle with flaky sea salt (such as Maldon). The salt crystals provide a delightful textural crunch and an excellent counterpoint to the sweetness.
- Spice Infusion: For a holiday twist, stir in ½ teaspoon of ground cinnamon and a pinch of nutmeg into the caramel mixture when you add the vanilla.
Tips for Perfect Chocolate Coating
The final finish makes all the difference in Homemade Chocolate Turtles presentation.
- Use Wafers for Ease: If you find melting difficult, invest in professional melting wafers. They contain cocoa butter and palm oil substitutes that stabilize the chocolate, giving you a beautiful, professional finish without needing to temper the chocolate manually.
- Keep Water Away: Ensure your bowl, spatula, and hands are completely dry when melting chocolate. Even a drop of water can cause the chocolate to “seize,” turning it into a stiff, unusable paste.
- Consider Tempering: If you use high-quality chocolate bars (couverture) without additives, they may bloom (develop white streaks) when stored at room temperature. To prevent this, look up guides on basic chocolate tempering. A properly tempered chocolate coating is shiny, snaps cleanly, and resists melting at room temperature.
Dietary Adjustments (Vegan/Dairy-Free Options)
It is possible to make excellent dairy-free or vegan Homemade Chocolate Turtles, though the texture of the caramel will vary slightly.
- Vegan Caramel: Replace the dairy butter with a high-quality vegan butter stick. Substitute the sweetened condensed milk with a can of full-fat sweetened condensed coconut milk (or coconut cream) and slightly reduce the corn syrup. The process and target temperature (245°F) remain the same.
- Dairy-Free Chocolate: Ensure you select a dark chocolate or semi-sweet option that is certified dairy-free, as many high-quality dark chocolates naturally are.
For more great inspiration on presentation and confectionery ideas, make sure to check out my Pinterest board for treats and desserts: Amazing Homemade Dessert Ideas.
Understanding the Richness of This Gourmet Candy: Nutritional Values and Benefits
While Homemade Chocolate Turtles are undeniably an indulgent treat, they also incorporate ingredients that offer certain nutritional advantages, particularly the pecan base. It’s important to appreciate this dessert for what it is: a rich source of energy and healthy fats, best enjoyed in moderation.
Approximate Nutritional Breakdown (Per Turtle)
Since this recipe yields about 48–60 smaller turtles, the precise values vary based on the size of your portion and the type of chocolate used (dark chocolate tends to have less sugar than milk chocolate). The following is an approximation for a single, medium-sized turtle:
- Calories: 180–220 kcal
- Total Fat: 15–18g (Primarily from butter, pecans, and cocoa solids)
- Saturated Fat: 7–9g
- Carbohydrates: 15–20g (Mostly from the sugars in caramel and chocolate)
- Sugars: 12–16g
- Protein: 2–3g
- Fiber: 1–2g
It is important to remember that candies like Homemade Chocolate Turtles are energy-dense because of the high concentration of quality fats and sugars, which is why they are so satisfying and rich. They are designed to be a treat, not a primary source of nutrition.
The Power of Pecans
The foundation of every turtle is the pecan, and these nuts provide significant health benefits that contribute positively to the overall indulgence:
- Heart-Healthy Fats: Pecans are rich in monounsaturated fats, specifically oleic acid, the same type of fat found in olive oil. These fats are known to help lower bad LDL cholesterol levels and reduce the risk of heart disease.
- Antioxidant Rich: Pecans rank high among nuts for antioxidant content, helping combat oxidative stress and inflammation in the body.
- Vitamin and Mineral Source: Pecans are excellent sources of manganese, a mineral vital for metabolic health and bone strength. They also provide zinc (important for immune function) and Vitamin E.
By using fresh, toasted whole pecans, you ensure that the beneficial oils and nutrients remain intact, making these Homemade Chocolate Turtles a more thoughtful indulgence than simple sugary sweets.
The Benefit of High-Quality Chocolate
When you opt for high-quality dark chocolate (70% cocoa or higher) for your coating, you incorporate powerful antioxidants called flavonoids. These compounds have been linked to improved blood flow and reduced blood pressure. While milk chocolate offers less of this benefit due to lower cocoa content, using premium chocolate always ensures a cleaner flavor profile and better performance during melting and setting, elevating the experience of these luxurious Homemade Chocolate Turtles.
Frequently Asked Questions About Homemade Chocolate Turtles
What is the secret to making Homemade Chocolate Turtles caramel chewy and not rock hard?
The secret lies in precise temperature control. You must use a candy thermometer and cook the caramel mixture to exactly 245°F (118°C), known as the firm ball stage. Cooking even a few degrees higher will result in a hard or brittle caramel, while cooking lower will result in a sticky, runny mess. The addition of corn syrup also helps stabilize the caramel’s final texture.
Can I use chocolate chips instead of melting wafers for coating my Homemade Chocolate Turtles?
It is highly discouraged. Standard chocolate chips contain stabilizers designed to help them hold their shape during baking, not melt smoothly for dipping. This often results in a thick, dull, or grainy coating that will likely melt when handled at room temperature. For professional results on your Homemade Chocolate Turtles, use high-quality melting wafers or tempering chocolate (couverture).
How do I store Homemade Chocolate Turtles, and how long do they last?
Store your finished Homemade Chocolate Turtles in an airtight container at cool room temperature (ideally below 70°F). If properly sealed and stored, they will maintain their quality and freshness for up to two weeks. For longer storage, you can freeze them for several months; just ensure they are wrapped tightly before placing them in the freezer and thaw them slowly in the refrigerator overnight.
Why do I need corn syrup in the recipe for Homemade Chocolate Turtles?
Corn syrup acts as an interfering agent, specifically preventing sugar molecules from linking up and forming crystals. Without corn syrup, your caramel mixture is prone to crystallization, which results in a grainy, unpleasant texture. Using corn syrup ensures the caramel remains smooth, glossy, and beautifully chewy once cooled.
What are the best tips for melting chocolate for dipping Homemade Chocolate Turtles?
Melt the chocolate slowly and gently. Use either a double boiler for constant, low heat, or microwave it in short 30-second bursts, stirring vigorously after each time. Never let the chocolate get too hot, as this causes it to burn or seize. If you are using standard melting chocolate, adding a small amount of shortening or coconut oil helps achieve a thinner, smoother consistency for easier dipping and a glossier finish on your Homemade Chocolate Turtles.
Your Journey to Perfect Confectionery
Creating Homemade Chocolate Turtles from scratch is a rewarding experience that elevates a classic candy from simple indulgence to gourmet mastery. By focusing on quality ingredients perfectly toasted pecans, rich butter, and high-grade chocolate and employing the precision required for candy making, you produce a confectionary delight that is superior to any store-bought version. The chewy snap of the caramel, achieved through careful monitoring of temperature to 245°F, combined with the buttery crunch of the pecan base, makes these treats truly irresistible.
This detailed recipe provides the foundational knowledge necessary for successful sugar work, equipping you with the skills to tackle future confectionery challenges. Whether you prepared these for an elegant dessert platter, a treasured holiday gift, or simply to satisfy a craving for high-quality sweets, the effort put into these Homemade Chocolate Turtles will be evident in every luxurious bite.
Don’t hesitate to personalize your batch with variations a sprinkle of sea salt, a switch to walnuts, or a preference for intense dark chocolate. The best part of homemade treats is making them uniquely yours. If you love working with simple, yet decadent ingredients, be sure to also try our recipe for Easy Chocolate Pudding Pie next for another satisfying dessert.
Now that you have perfected these stunning Homemade Chocolate Turtles, we invite you to share your success! Snap a picture, share your variations, and let us know in the comments below how this recipe turned out for you. Happy candy making!
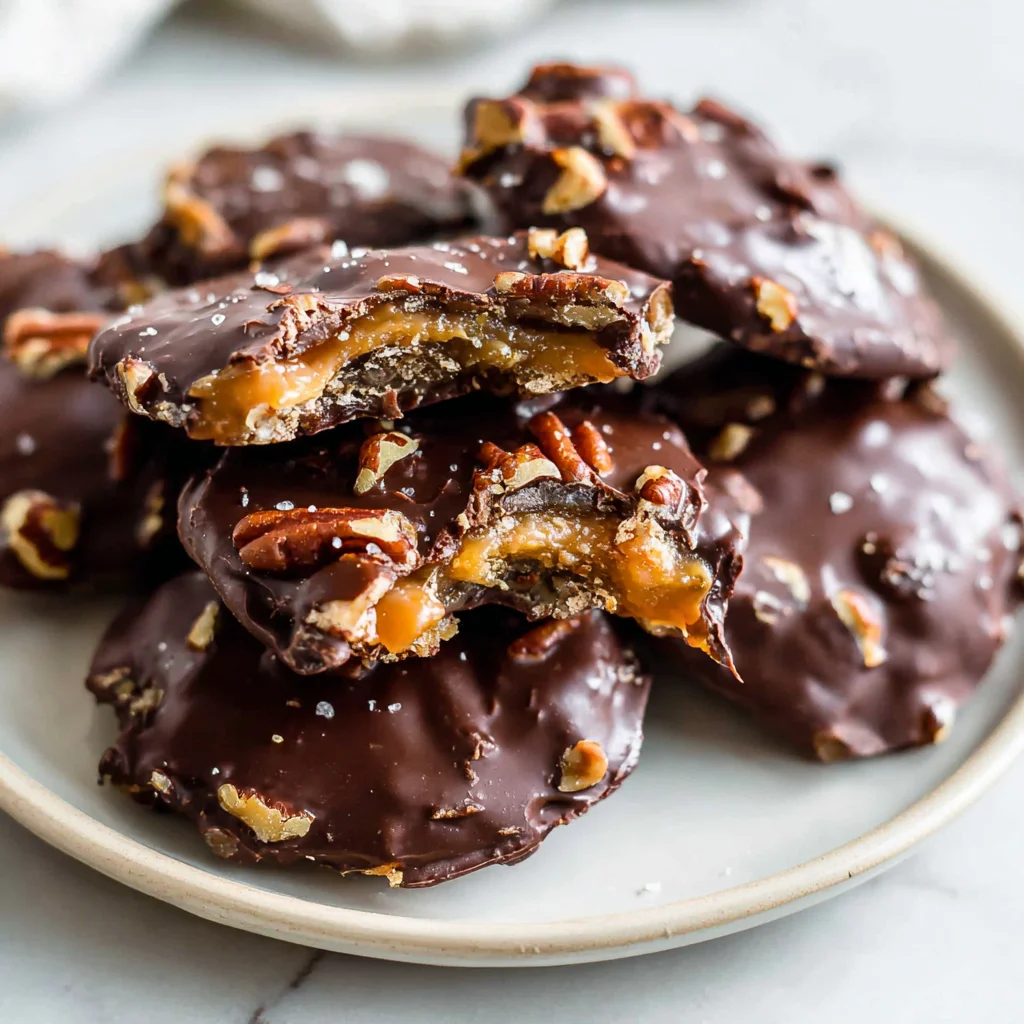
Homemade Chocolate Turtles with Gooey Caramel Center
Ingredients
Equipment
Method
- Line two large baking sheets with parchment paper or silicone mats. Preheat your oven to 350°F (175°C). Spread the pecan halves in a single layer on a baking sheet and toast them for 5 to 7 minutes until fragrant. Watch closely to prevent burning. Remove the nuts and allow them to cool completely.
- Once cooled, arrange the pecan halves onto the prepared baking sheets in clusters of three or four nuts, positioned close together to form a small base for the turtle shape. Ensure you leave adequate space between each cluster.
- In a heavy-bottomed saucepan, combine the butter, brown sugar, corn syrup, and sweetened condensed milk. Place the saucepan over medium heat, stirring constantly until the butter has fully melted and the sugar has completely dissolved.
- Attach a candy thermometer to the side of the pan (ensuring the tip does not touch the bottom of the pot). Bring the mixture to a slow, rolling boil. Continue to cook the caramel, stirring frequently, until it reaches a temperature of 245°F (118°C).
- Remove the saucepan immediately from the heat once the desired temperature is reached. Quickly stir in the vanilla extract and salt until they are fully incorporated into the hot caramel mixture.
- Working quickly while the caramel is still hot, spoon a heaping teaspoon of the caramel mixture directly over the center of each pecan cluster. The caramel should gently pool over the nuts, covering the center completely.
- Allow the assembled pecan and caramel clusters to cool and set completely (at least 30 to 45 minutes in the refrigerator) until the caramel is firm before proceeding to the chocolate dipping stage.
- Chop the melting chocolate (if not using wafers) and place it in a microwave-safe bowl. Microwave the chocolate in 30-second intervals, stirring thoroughly after each interval, until the chocolate is smooth and completely melted. If using shortening or coconut oil, stir it in now.
- Carefully lift one set caramel turtle off the parchment paper. Dip the bottom of the turtle into the melted chocolate, or place it on a fork and use a spoon to drizzle the chocolate over the entire surface, ensuring the caramel is fully encased.
- Return the coated turtle to the clean, parchment-lined baking sheet. Repeat this process for all remaining turtles. Allow the finished chocolate turtles to set completely at room temperature or in the refrigerator until the chocolate shell is firm and glossy.