Welcome to the simplest, most delicious candy recipe you will ever encounter. If you are looking for a show-stopping, no-bake treat that requires only three core ingredients and zero fuss, you have found your holy grail: Cool Whip Candy. Often referred to by various names including whipped topping fudge, refrigerator candy, or cloud candy this recipe delivers an impossibly creamy, melt-in-your-mouth confection that tastes like a marshmallow dream crossed with rich, dense fudge. Forget complicated double boilers and precision thermometer readings. This “Perfection Version” of Cool Whip Candy simplifies the process, ensuring a smooth, uniform texture and flawless setting every time. Whether you’re preparing for a holiday party, need a quick fix for a sudden sugar craving, or are looking for a fun project to do with kids, this easy, adaptable recipe is guaranteed to become a family favorite.
The beauty of this Cool Whip Candy lies in its magical transformation. By combining light, fluffy frozen whipped topping with massive amounts of powdered sugar, we create a chemical reaction that thickens the mixture into a moldable clay. After a mandatory chill period, you are left with soft, pliable candy squares ready for rolling and coating. This guide provides the precise ratios and essential tips required to avoid common pitfalls, such as sticky messes or failure to set. Get ready to experience the creamy, delightful world of homemade refrigerator fudge!
Why You’ll Love This Cool Whip Candy Recipe: Simplicity Meets Decadence
In the culinary world, recipes that offer maximal reward for minimal effort are often the most beloved. The Cool Whip Candy recipe fits this description perfectly, providing a delightful confectionary experience without requiring any special skills or costly equipment. This isn’t just an easy recipe; it’s a nostalgic throwback to simpler kitchen days, resulting in a unique texture that differentiates it from traditional fudge or bonbons.
Three Ingredients, Endless Possibilities
The core genius of this recipe rests in its minimalistic ingredient list. The base of this incredible candy uses only frozen whipped topping, confectioners’ sugar, and vanilla extract. This extremely limited list means quick preparation, easy shopping, and a forgiving process. Even a novice baker can achieve perfection on the first try. Unlike many baked goods that require precise measurements of leavening agents or specific oven temperatures, making Cool Whip Candy is a fundamentally straightforward mixing and chilling process. The primary challenge is having the patience to wait for the mixture to firm up in the refrigerator!
A Texture That Cannot Be Matched
Traditional fudges, whether they are chocolate fudge or peanut butter fudge, often rely on boiling sugar and milk, resulting in a dense, granular texture. This specific Cool Whip Candy, however, yields a unique consistency. It’s softer and chewier than traditional fudge but firmer than a truffle, achieving an almost melt-in-your-mouth quality similar to divinity or light nougat. This distinctive texture is solely achieved by the unique properties of the whipped topping base when combined with the stabilizing effect of the powdered sugar. If you prefer light, airy desserts over heavy, dense ones, this candy is tailored for your palate.
Perfect for Every Occasion and Easy Customization
From holiday cookie trays to impromptu summer gatherings, this Cool Whip Candy is remarkably versatile. Its neutral, sweet flavor profile serves as a perfect canvas for customization. You can easily adjust the color, flavor, and external coating to match any season or event. Thinking pink for Valentine’s Day? Add a drop of red food coloring. Preparing for Christmas? Roll them in crushed peppermint. Planning a fall festival? Try rolling them in crushed pumpkin spice cookies. The simplicity of the base allows the variations to truly shine, making this recipe a year-round staple for quick dessert solutions. The finished pieces store beautifully, making them excellent candidates for edible gifts.
Furthermore, because there is absolutely no baking involved, this recipe saves precious oven space, which is invaluable during busy holidays like Thanksgiving or Christmas. It’s truly a “set it and forget it” dessert that requires very little active time in the kitchen.
Why You Should Try This Recipe Now: Solving Your Dessert Dilemmas
If your current recipe repertoire is lacking in reliable, crowd-pleasing, no-fuss sweets, then adding this Cool Whip Candy recipe is a must. It addresses several common dessert dilemmas faced by home cooks, offering practical solutions alongside unparalleled taste.
The Solution to Heat-Free Dessert Needs
Summer heat or a lack of oven space can often put a damper on making homemade treats. This Cool Whip Candy is entirely refrigerator-dependent. The process generates virtually no heat, making it the perfect dessert project for scorching afternoons. The cold, creamy texture is inherently refreshing, providing a delightful contrast to traditional baked goods.
Kid-Friendly Kitchen Fun
Because there is no heat source, sharp objects (beyond the final cutting stage), or difficult techniques involved, this is an ideal recipe for getting children involved in the kitchen. They can participate in the crucial steps: pouring the sugar, mixing the thickening dough (which feels like playing with sweet clay), and, most importantly, rolling the finished cubes into powdered sugar or sprinkles. Teaching kids the joy of making their own sweets has never been easier than with this fun, tactile recipe.
Mastering the Art of No-Bake Fudge
Many no-bake fudge recipes rely on melting chocolate chips or mixing hot components, which can sometimes seize up or result in overly grainy results. Our perfection version of Cool Whip Candy uses the stability of the confectioners’ sugar and the lightness of the whipped topping to create a reliable, smooth binder. The high volume of sugar works less as a sweetener and more as a powerful structure builder, quickly absorbing the moisture from the thawed topping. This guarantees a firm, sliceable candy block after adequate chilling, eliminating the guesswork associated with other fudge methods.
In fact, the primary skill required for success here is simple observation: knowing when the mixture has absorbed enough sugar to transition from a messy, sticky goo into a manageable, stiff dough. This stage is non-negotiable for success. If the mixture remains too soft, the finished Cool Whip Candy will not hold its shape when cut. The exact amount of confectioners’ sugar can vary slightly depending on humidity and the precise volume of your thawed whipped topping, which is why we emphasize mixing until the “stiff clay” consistency is achieved, rather than blindly following the 4-cup measurement.
Ready to try another simple no-bake masterpiece? Check out my guide on making Sugar Cookie Fudge, another delightful confection that shares the ease of this recipe but offers a different flavor profile.
Ingredients and Necessary Utensils for Perfection
Achieving the perfect texture in your Cool Whip Candy depends heavily on ingredient quality and preparation, especially the state of the whipped topping. This section details what you need and why each component is crucial.
The Essential Ingredients List
Gathering your ingredients first is key to a smooth preparation process. Remember, precise measuring is less critical here than visual consistency, especially concerning the powdered sugar.
- 1 Large Container (8 ounces / 226g) Frozen Whipped Topping (such as Cool Whip): This is the foundation of the candy. The texture and water content of whipped topping are crucial. It must be thawed completely in the refrigerator not on the counter or in the microwave to maintain its structural integrity and ensure smooth incorporation.
- 4 Cups Confectioners’ Sugar (Powdered Sugar): This is the structure-builder. It contains a small amount of cornstarch, which is essential for binding the moisture and stabilizing the mixture into a solid candy. You will need approximately 4 cups for the mixture itself, plus an additional 1/2 cup for dusting and coating.
- 1 Teaspoon Pure Vanilla Extract: Vanilla is the primary flavoring agent. Use pure extract for the best depth of flavor, as it balances the intense sweetness of the sugar.
- Pinch of Salt (Optional, but Recommended): A small pinch (about 1/8 teaspoon) of fine sea salt doesn’t make the candy salty, but it performs the critical function of enhancing the vanilla flavor and cutting through the overwhelming sweetness of the sugar. Do not skip this if you want a more balanced flavor profile in your Cool Whip Candy.
- Optional: 1/2 cup Finely Crushed Coating: This adds flavor, texture, and visual appeal. Popular options include finely crushed graham crackers, brightly colored sprinkles, finely chopped nuts (pecans or walnuts), or even cocoa powder mixed with powdered sugar.
Deep Dive: Understanding Confectioners’ Sugar
The success of Cool Whip Candy hinges entirely on confectioners’ sugar. Unlike granulated sugar, which consists of large crystals, powdered sugar is finely milled and contains a small percentage of anti-caking agent (usually cornstarch). This cornstarch is the secret weapon here. When mixed with the thawed, liquid base of the whipped topping, the cornstarch immediately begins to absorb moisture and bind the mixture together. The resulting high concentration of sugar and stabilizer transforms the light, airy whipped topping into a dense, solid fudge.
Should I sift the sugar? Absolutely. While the recipe says it’s not strictly necessary, sifting is highly recommended. Powdered sugar is prone to clumping in the bag, and those lumps, if not removed, will translate into hard, dry pockets in your otherwise smooth candy. Sifting ensures a uniform, clay-like consistency and prevents any dry pockets.
Recommended Tools and Utensils for Recipe Success
You don’t need fancy equipment, but having the right tools makes the process significantly cleaner and easier:
- 8×8 Inch Baking Pan: This size provides the perfect thickness for easy cutting. A 9×9 inch pan will yield thinner candies, which may be more difficult to remove cleanly.
- Parchment Paper: This is non-negotiable. Lining the pan with parchment paper, creating a “sling” (paper overhangs the sides), is the only way to lift the set candy block out without destroying its shape.
- Large Mixing Bowl: You need ample space to incorporate the 4 cups of sugar. A bowl that is too small will result in sugar spilling over the sides as the mixture thickens.
- Sturdy Spatula or Wooden Spoon: Once you reach the 3-cup mark of powdered sugar, the mixture becomes extremely thick too thick for a standard whisk or a weak plastic spatula. A robust wooden spoon or sturdy rubber spatula is required for the final mixing phase.
- Sifter or Fine Mesh Strainer (Highly Recommended): For ensuring lump-free sugar.
- Sharp Knife or Miniature Cookie Scoop: For uniform cutting or shaping.
- Airtight Container: Essential for proper storage of the finished Cool Whip Candy.
For more easy dessert inspiration, be sure to check out my collection of recipes on Pinterest! Follow Recipes Amaya on Pinterest for Sweet Treats and More!
Detailed Recipe Steps: Creating Perfect Cool Whip Candy
Follow these steps precisely, paying close attention to the visual cues, especially the thickening process, to ensure your Cool Whip Candy sets beautifully.
Step 1: Preparation and Thawing – The Foundation of Success
- Thaw the Whipped Topping Correctly: The biggest mistake people make is trying to use partially frozen or recently thawed whipped topping. Place the 8-ounce container in the refrigerator overnight (a minimum of 8-10 hours). It must be completely soft, homogenous, and chilled. Do not rush this step.
- Prepare the Pan: Line an 8×8 inch square pan with parchment paper. Make sure the paper extends over the edges on two opposing sides; these form the crucial “sling” handles. Lightly misting the pan or the paper with non-stick cooking spray before placing the paper down can help it adhere and prevents any potential sticking, although it’s usually not strictly necessary if using good quality parchment.
- Measure and Sift Sugar: Measure 4 cups of confectioners’ sugar. Sift this amount into a large bowl or container so it is ready to be added rapidly.
Step 2: Combining the Base Ingredients – The Critical Transformation
- Gentle Start: In your large mixing bowl, gently scrape in the completely thawed whipped topping. Add the 1 teaspoon of vanilla extract and the pinch of salt. Mix slowly using a spatula until just combined. Crucial Tip: Avoid Aggressive Mixing. Overmixing at this stage can break down the structure of the whipped topping, leading to a runny base that requires excessive amounts of sugar to compensate.
- The Sugar Incorporation Phase: Begin adding the sifted confectioners’ sugar, one cup at a time. After adding the first cup, the mixture will resemble a very thick glaze. Mix thoroughly to ensure all the sugar is absorbed before adding the next cup.
- Reaching the Dough Consistency: Continue adding the sugar. By the time you incorporate the third cup, the mixture will be extremely thick, sticky, and difficult to stir. At the 4-cup mark, the mixture should no longer look wet; it should be firm enough to pull away from the sides of the bowl, resembling very stiff cookie dough or modeling clay. The mixture must be extremely firm. If it is still sticky and slightly runny, add an extra tablespoon or two of sifted powdered sugar until the desired stiff consistency is achieved. This firm texture is absolutely essential for cutting.
Step 3: Chilling and Setting the Candy – Patience is Key
- Press and Flatten: Transfer the thick, dough-like Cool Whip Candy mixture into the prepared 8×8 inch pan. Use the back of a sturdy spoon, or a slightly dampened spatula, to press the mixture down firmly and evenly into all corners of the pan. The goal is a dense, uniform block.
- Cover and Chill: Cover the pan tightly with plastic wrap, ensuring the wrap touches the surface of the candy (this prevents a dry skin from forming). Place the pan into the refrigerator.
- Mandatory Wait Time: Chill for a minimum of 4 hours, but for true perfection and the cleanest cuts, it is highly recommended to chill the mixture overnight (10 to 12 hours). The cold temperature stabilizes the sugar and fat mixture, making it solid and ready for shaping.
Step 4: Cutting and Shaping – Achieving Uniformity
- Lifting the Block: Once completely firm, gently lift the entire block of Cool Whip Candy out of the pan using the parchment paper sling. Place it on a clean, stable cutting board.
- Cutting Squares: Use a large, sharp knife to cut the block into small, bite-sized pieces. We recommend 1-inch squares or 1-inch by 1.5-inch rectangles. For the cleanest cuts, wipe the knife blade clean between slices, especially if the candy starts to warm up.
- Rolling Balls (Alternative Method): If you prefer rounded pieces, lightly dust your hands with extra confectioners’ sugar. Use a small measuring spoon (like a teaspoon) or a miniature cookie scoop to portion out the mixture. Quickly roll the portions between your palms to form smooth balls.
Step 5: Coating and Finishing – The Final Touch
- Prepare Coating Stations: Pour about 1/2 cup of extra confectioners’ sugar onto a shallow plate. If using the optional graham cracker crumbs, sprinkles, or cocoa powder, prepare separate shallow dishes for each.
- The Toss: Take each square or ball and gently toss it in the confectioners’ sugar until all sides are completely covered. This step prevents sticking and gives the candy its characteristic matte finish. Tap off any significant excess sugar.
- Alternative Coatings: If you are using a moist coating (like graham crackers or sprinkles), roll the pieces immediately after forming them, as the slightly sticky surface will help the coating adhere better before the candy dries out further.
- Set Aside: Place the finished, coated candies onto a clean plate or baking sheet lined with wax paper, ensuring they don’t touch.
Step 6: Storage – Keeping Your Candy Fresh
- Refrigerated Storage (Essential): Due to the Cool Whip base, this candy must be stored in an airtight container in the refrigerator to maintain its shape and texture. Layer the pieces with wax paper to prevent them from sticking together.
- Shelf Life: The candy maintains its quality and texture wonderfully for up to 10 days when properly refrigerated.
- Freezing: For long-term storage, place the finished, coated candies in a freezer-safe zip-top bag, removing as much air as possible. They can be frozen for up to 2 months. Thaw them slowly in the refrigerator for a few hours before serving.
Tips and Variations: Elevating Your Cool Whip Candy
While the classic vanilla version of Cool Whip Candy is sublime, the recipe is incredibly versatile. Here are ways to customize the flavor and advice for troubleshooting common issues.
Flavor and Color Variations (Customizing Your Cloud Candy)
The fun of this recipe is its adaptability. You can transform the base flavor easily using extracts and add-ins.
- Citrus Zing: Replace the vanilla extract with 1 teaspoon of lemon, lime, or orange extract. For a true citrus explosion, add 1 tablespoon of finely grated zest along with the extract.
- Nutty Delight: Incorporate 1/2 cup of very finely ground toasted pecans, walnuts, or almonds into the mixture along with the last cup of powdered sugar.
- Holiday Cheer: Add 1/2 teaspoon of peppermint extract and a few drops of red food coloring to the base mixture. Roll the finished pieces in crushed candy canes for festive Peppermint Cool Whip Candy.
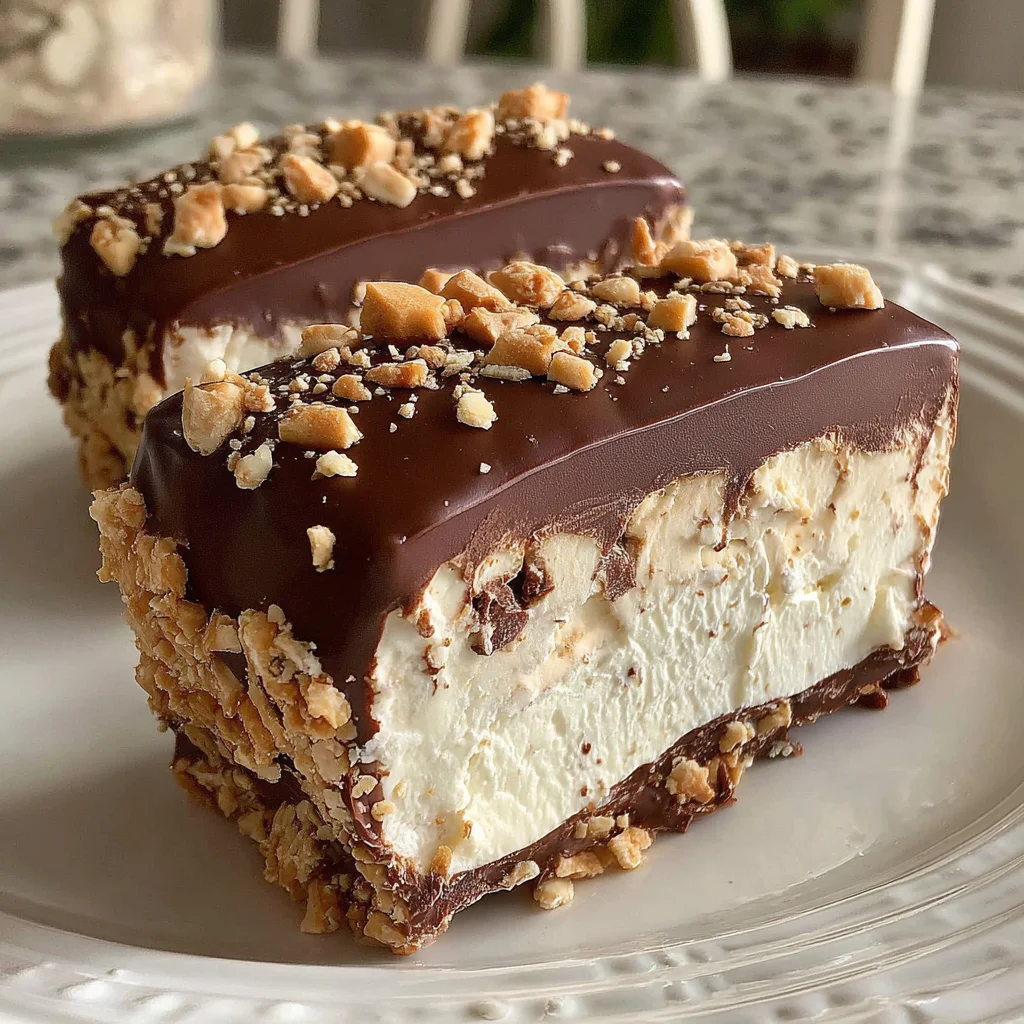
- Chocolate Drizzle: After coating the candy in powdered sugar, melt semi-sweet or milk chocolate and drizzle it over the pieces. Let the chocolate set completely in the refrigerator before serving. This creates a more decadent, rich flavor profile. You might enjoy these alongside our Christmas Oreo Balls for a full no-bake platter.
- Coconut Version: Add 1/2 cup of finely shredded, unsweetened coconut flakes to the mixture. Roll the final candy pieces in toasted coconut for a tropical twist.
Troubleshooting Common Cool Whip Candy Issues
This recipe is straightforward, but issues usually arise during the mixing or chilling phases. Here is how to prevent or fix them:
The Mixture Is Too Sticky and Won’t Form a Dough (Most Common Issue)
This means you have not added enough powdered sugar. The volume of sugar required (up to 4 cups) often seems excessive, but it is necessary to convert the liquid whipped topping into a stable solid. If your mixture feels too wet or sticky, add more sifted confectioners’ sugar, 1/4 cup at a time, until it reaches the consistency of very firm, workable clay. It should be hard to mix by hand.
The Candy Didn’t Set After Chilling
If you chilled the candy overnight and it is still soft, it usually means two things: either the whipped topping was not fully thawed and mixed (leaving pockets of ice), or, more likely, you didn’t add enough powdered sugar in Step 2. If it’s too soft, you can attempt to salvage it: place the soft mixture back into a bowl, add another 1/2 to 1 cup of powdered sugar, mix vigorously until stiff, press it back into the pan, and chill for another 6 hours.
The Finished Candy is Grainy
This is usually caused by unsifted powdered sugar that has lumped together. Always use sifted sugar for the smoothest possible texture. It can also occur if the whipped topping was overmixed initially, causing its structure to break down and release excess moisture unevenly.
Nutritional Values and Benefits of Cool Whip Candy (A Sweet Indulgence)
It is important to acknowledge that Cool Whip Candy is a rich confection primarily composed of fats and carbohydrates (sugar). It is an indulgence intended for enjoyment in moderation, particularly around holidays and special occasions. While it is not a health food, understanding its components provides useful insight.
Estimated Nutritional Breakdown (Per Serving)
Since this recipe yields approximately 30-36 small, 1-inch pieces, the nutritional data provided here is an estimate for a single 1-inch serving. These values will vary based on the specific brand of whipped topping used and whether additional coatings are added.
| Component | Estimated Value (Per 1-inch Piece) |
| :— | :— |
| Calories | 80 – 100 kcal |
| Total Fat | 3g – 5g |
| Saturated Fat | 3g – 4g |
| Total Carbohydrates | 12g – 15g |
| Dietary Fiber | 0g |
| Sugars (Added) | 10g – 13g |
| Protein | < 1g |
Analyzing Key Ingredients
Whipped Topping (Cool Whip): The primary base of this candy is a non-dairy, stabilized fat product. It is primarily made of water, corn syrup, high fructose corn syrup, and partially hydrogenated vegetable oil. Because it is largely composed of stabilized fats and sugars, it provides the necessary richness and structural binding capacity when combined with the powdered sugar.
Confectioners’ Sugar: As discussed, the role of sugar here is dual: providing immense sweetness and acting as a structural filler. The quick absorption of the sugar helps the candy set rapidly in the refrigerator, distinguishing this method from cooked fudge. The quick carbohydrate content makes this a rapid energy source, making a single piece of Cool Whip Candy a delightful post-dinner treat.
A Note on Dietary Needs: Generally, this specific recipe for Cool Whip Candy is naturally gluten-free (as Cool Whip and powdered sugar contain no wheat). However, if you opt for coatings like crushed graham crackers or certain sprinkles, you must ensure those specific products are certified gluten-free if catering to celiac or highly sensitive dietary restrictions. Because the base ingredient (Cool Whip) is non-dairy, it is also suitable for those avoiding milk, though it does contain sodium caseinate, a milk protein derivative, so strict dairy-free diets should verify the specific product label.
Indulge responsibly, savoring the unique texture and sweetness of this remarkably simple homemade candy. It’s the perfect way to satisfy that sweet tooth without spending hours in the kitchen!
Frequently Asked Questions (FAQs) About Cool Whip Candy
Answers to Your Top Questions about Making Perfect Cool Whip Candy
Can I use homemade whipped cream instead of frozen whipped topping for Cool Whip Candy?
No, homemade whipped cream is highly unstable and contains too much natural moisture and not enough stabilizers (like the starches and gums found in commercial whipped topping). Using real whipped cream will result in a soupy mess that will never set into firm, sliceable Cool Whip Candy, regardless of how much powdered sugar you add. You must use a pre-stabilized, commercial frozen whipped topping like Cool Whip or a generic equivalent.
How long does Cool Whip Candy need to chill before cutting?
The absolute minimum chilling time required for Cool Whip Candy to set is 4 hours, but for optimal results and clean, crisp cuts, it is highly recommended to chill the mixture overnight (10 to 12 hours). The longer chill time ensures the mixture is completely firm and cold, which makes handling and shaping much easier.
Can I freeze this Cool Whip Candy?
Yes, Cool Whip Candy freezes very well! Once the candies are cut and coated, place them in a single layer on a sheet pan to flash freeze, then transfer them to an airtight, freezer-safe container or zip-top bag. They can be stored in the freezer for up to 2 months. Thaw them gently in the refrigerator before serving to maintain their texture.
What happens if my Cool Whip Candy mixture is too sticky after adding 4 cups of sugar?
If the mixture is still too sticky, it means the whipped topping base was slightly wetter than average or your measurements were slightly off. You need to continue adding powdered sugar, one tablespoon at a time, until the mixture transforms into a very stiff, non-sticky dough. This is the most crucial step; the texture must resemble stiff clay to guarantee the Cool Whip Candy will hold its shape when cut.
Why is my Cool Whip Candy falling apart when I try to cut it?
If your candy is crumbling or falling apart, it likely wasn’t pressed firmly enough into the pan before chilling, resulting in a loose density. Ensure that in Step 3, you use the back of a spoon or spatula to firmly compact the mixture into a solid block. A completely firm, uniform block is essential for clean cutting.
Conclusion: The Sweet Satisfaction of Homemade Cool Whip Candy
The journey to creating the perfect batch of Cool Whip Candy is one of simplicity, patience, and a little bit of kitchen magic. We started with a basic, store-bought whipped topping and transformed it, through the sheer power of confectioners’ sugar, into a delightful, homemade confection. This “Perfection Version” guarantees a stable, sliceable, and utterly delicious candy that requires no baking, no stovetop, and minimal expertise.
Remember the critical steps for success: Always use completely thawed whipped topping, mix until the consistency is stiff like clay, and chill the mixture overnight for best results. Once you master this base recipe, the possibilities for flavor variations are truly endless, allowing you to create custom-made treats for any season or celebration.
If you’re searching for quick, reliable dessert recipes that deliver maximum payoff, this Cool Whip Candy is the answer. It’s an inexpensive, kid-friendly activity that results in an incredibly satisfying treat perfect for filling out dessert trays or simply enjoying with a cup of coffee. We encourage you to try this recipe today and share the sweet, nostalgic joy of this unique candy with your friends and family. Let us know in the comments which flavor variation you tried first!
Happy mixing, and enjoy your delightful cloud of sweetness!
COOL WHIP CANDY (PERFECTION VERSION)
Ingredients
Equipment
Method
- Ensure the whipped topping (Cool Whip) has been completely thawed. This should be done overnight in the refrigerator until it is soft and homogenous.
- Line an 8x8 inch baking pan with parchment paper, creating a 'sling' by allowing the paper to hang over the sides. Lightly grease the parchment paper if desired.
- Measure the 4 cups of confectioners' sugar. Sifting the sugar is highly recommended to eliminate lumps and ensure a smooth final texture.
- In a large mixing bowl, gently combine the thawed whipped topping, vanilla extract, and the small pinch of salt. Mix slowly using a spatula until just combined. Do not overmix.
- Begin adding the confectioners' sugar, one cup at a time, to the whipped topping mixture. Use a wooden spoon or sturdy spatula to incorporate the sugar thoroughly. The mixture will initially be very wet and sticky.
- Continue adding the sugar until the mixture becomes extremely thick and difficult to stir. The consistency must resemble very stiff cookie dough or thick clay (you will use close to all 4 cups).
- Transfer the thickened candy mixture into the prepared 8x8 inch pan. Use the back of a spoon or a slightly dampened spatula to press the mixture firmly and evenly into the pan, ensuring the surface is flat and uniform.
- Cover the pan tightly and place it into the refrigerator. Chill for a minimum of 4 hours, but ideally overnight (10 to 12 hours) for the easiest cutting.
- Once the mixture is completely firm, lift the candy out of the pan using the parchment paper sling and place the block onto a clean cutting board.
- Cut the block into small, bite-sized squares (1 inch by 1 inch) using a sharp knife. Alternatively, scoop and roll portions into smooth balls, dusting your hands lightly with confectioners' sugar to prevent sticking.
- Pour about half a cup of extra confectioners' sugar onto a shallow plate. If using alternative coatings (crushed graham crackers or sprinkles), place them in a separate bowl.
- Take each cut square or rolled ball and gently toss it in the confectioners' sugar until all sides are evenly coated. Tap off any excess sugar. If using an alternative coating, roll the pieces immediately after shaping.