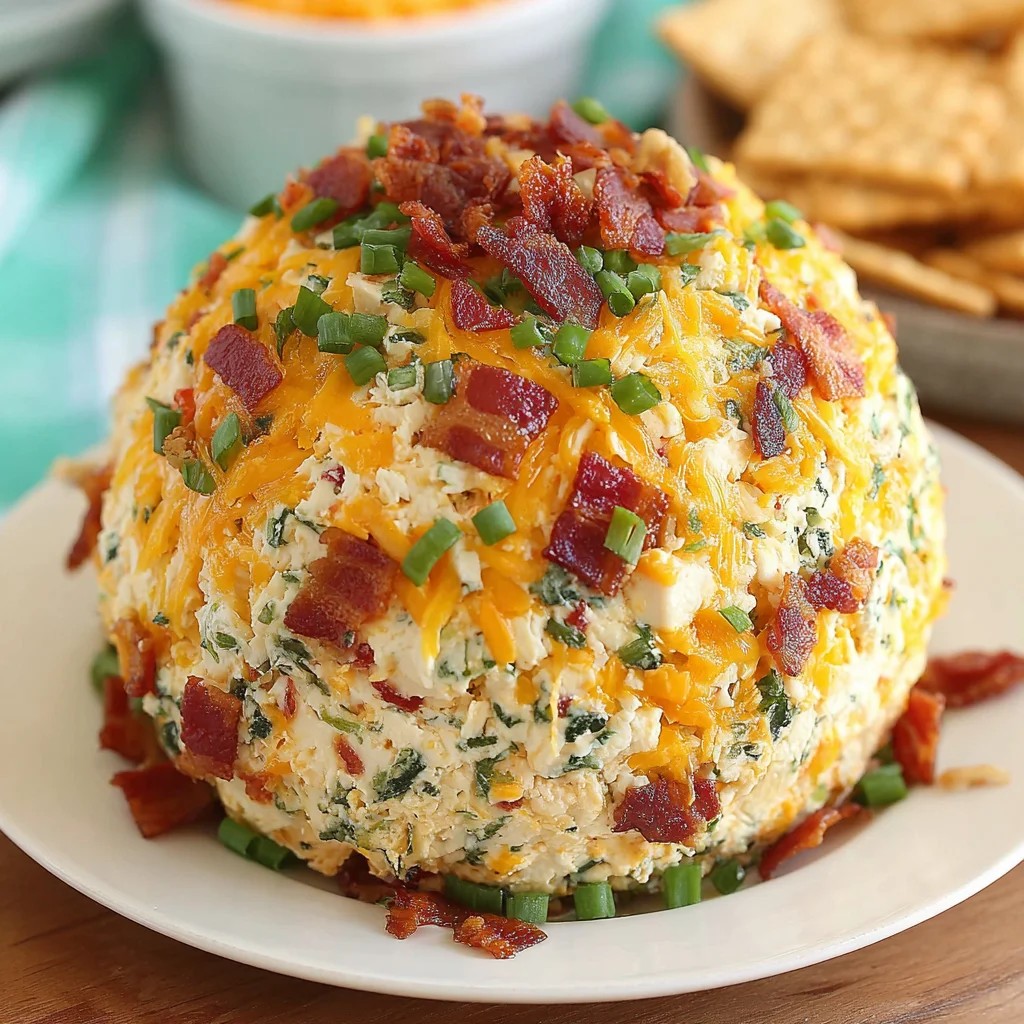
If there’s one appetizer that consistently disappears fastest at any gathering be it a holiday party, a casual backyard BBQ, or a major game day it’s anything inspired by the beloved jalapeño popper. We’ve taken that iconic flavor profile the heat of the jalapeño, the richness of cream cheese, and the smoky crunch of bacon and transformed it into the easiest, most crowd-pleasing party centerpiece: the magnificent Jalapeno Popper Cheese Ball. Forget fussing with deep fryers or stuffing tiny peppers; this recipe delivers maximum flavor with minimal effort.
This recipe for the Jalapeno Popper Cheese Ball is designed for success. It’s long because we provide all the crucial details and tips needed to perfect the texture and flavor, but the actual hands-on preparation is incredibly easy just 20 minutes! The secret lies in starting with perfectly softened ingredients, allowing sufficient chill time, and creating a truly spectacular crunchy coating made with toasted panko and fresh chives. When you serve this savory sphere, surrounded by sturdy crackers and crunchy vegetables, be prepared for rave reviews. This isn’t just a snack; it’s a statement appetizer that showcases the best of creamy, smoky, and spicy indulgence.
YIELD: 1 Large Cheese Ball
PREP TIME: 20 Minutes
CHILL TIME: 2 Hours Minimum
Why This Jalapeno Popper Cheese Ball is Your Next Party Star
The standard cheese ball, while classic, can sometimes be a little lackluster. But injecting it with the explosive flavors of a jalapeño popper elevates it from simple snack to gourmet appetizer status. If you are looking for an easy party dip alternative that requires zero cooking time (aside from optional bacon prep and panko toasting), you have found your champion. This particular rendition of the Jalapeno Popper Cheese Ball stands out for several compelling reasons that solidify its spot as a permanent fixture on your entertaining menu.
Unbeatable Flavor Fusion
This recipe successfully captures the holy trinity of flavor required for a perfect popper experience: creamy, spicy, and smoky. We start with a base of two types of cheese tangy cream cheese and sharp cheddar (or Pepper Jack, for an extra kick) which provides a luxurious, rich backdrop. The flavor depth is enhanced by grated Parmesan, which adds a nutty, salty complexity not found in simpler cheese ball recipes. This combination ensures that every bite of the Jalapeno Popper Cheese Ball is profoundly savory.
The Perfect Texture Contrast
Texture is everything when it comes to successful appetizers. The interior of this cheese ball is unbelievably smooth and fluffy, thanks to the addition of mayonnaise or sour cream and proper mixing. This smooth interior contrasts beautifully with the textural elements folded inside bits of chewy bacon and soft, diced jalapeños. However, the true textural masterpiece is the coating. We recommend toasting the panko breadcrumbs until they achieve a deep, golden-brown color. When mixed with fresh chives and reserved bacon crumbles, this coating provides an irresistible, loud crunch that makes the overall experience far superior to any unadorned cheese ball.
Make-Ahead Marvel
One of the greatest benefits of the Jalapeno Popper Cheese Ball is its phenomenal make-ahead capability. Preparing party food often means juggling many tasks just before guests arrive, leading to unnecessary stress. This appetizer needs a minimum of two hours to chill and firm up, but it can be prepared entirely (up to the point of coating) 1–2 days in advance. This means you can handle the messy mixing well ahead of time, leaving only the simple task of rolling and serving on the day of your event. This characteristic makes it the ideal choice for busy hosts.
Furthermore, because the recipe yields one large cheese ball, it serves a crowd easily, usually providing enough dip for 12 to 15 people, depending on the sturdiness of the serving vessels. For those looking for more easy party dip ideas, consider pairing this spicy number with something cool and tangy, like a creamy dreamy pimento cheese, to create a balanced appetizer spread.
Why You Should Try This Homemade Cheese Ball Recipe
While many recipes for appetizers promise ease, few deliver the stunning visual impact and sophisticated flavor profile that this homemade Jalapeno Popper Cheese Ball achieves. Moving beyond the standard store-bought fare or even simpler homemade dips offers a rewarding culinary experience, proving that simple ingredients can create spectacular results.
Superior Freshness and Control
When you make your own cheese ball, you gain complete control over the quality and freshness of the ingredients. You select the sharpest cheddar, the highest quality cream cheese, and ensure your bacon is perfectly crispy not chewy or undercooked. Store-bought cheese balls often rely on stabilizers and less intense flavors, but here, the robust notes of garlic powder, onion powder, and real, crisp bacon shine through. By finely dicing and thoroughly drying the jarred jalapeños, you ensure they integrate smoothly without adding excess liquid, which is a common pitfall in lower-quality recipes.
Versatility for Any Occasion
The spicy kick and decadent richness of the Jalapeno Popper Cheese Ball make it suitable for a wide range of events. It’s spicy enough for a football watch party, sophisticated enough for a cocktail hour, and comforting enough for a holiday gathering. During the winter holidays, when people often crave hearty, savory snacks, this cheese ball can be an excellent counterpoint to sweet treats, alongside dishes like The Best Mashed Potatoes (if served buffet style) or perhaps a holiday punch.
An Engaging Culinary Project
Shaping a cheese ball is a surprisingly satisfying process, especially when you achieve that perfectly smooth, round sphere ready for coating. This is a fantastic recipe to involve children in the kitchen (the mixing and rolling steps are easy!), or simply as a relaxing pre-party activity. Unlike baking, where precision is paramount, the mixing and folding steps here are forgiving. The main requirement is patience during the chilling phase, which is truly the secret sauce to a structural success.
Furthermore, the coating stage allows for creativity. The vibrant green chives and the rich golden panko create a beautiful mosaic, making the finished Spicy Appetizer visually appealing. It requires just a few minutes of focused effort to roll and press the ingredients firmly onto the chilled surface, turning a simple mix of cheese into a stunning appetizer ready to impress your guests.
The Magic Behind the Crunch: Ingredients and Essential Tools for the Perfect Cream Cheese Ball
Success with any cheese ball recipe begins long before the mixing bowl it starts with selecting and preparing your ingredients correctly. This section provides a detailed breakdown of the components required for this specific Jalapeno Popper Cheese Ball, emphasizing quality, quantity, and preparation tips necessary for achieving the best flavor and texture.
Ingredients Breakdown: Precision is Key
Every ingredient in this recipe serves a distinct purpose, from structure and creaminess to heat and crunch. Pay close attention to the preparation notes, especially regarding temperature and moisture.
FOR THE CHEESE BALL BASE:
- 2 (8-ounce) blocks cream cheese: Crucially, this must be completely softened to room temperature. If the cream cheese is even slightly cool, it will result in a lumpy, dense cheese ball. Room temperature cream cheese mixes into a smooth, fluffy base, which is essential for that luxurious texture.
- 2 cups shredded sharp cheddar cheese (or Pepper Jack), divided: Sharp cheddar provides the necessary salty bite. If you want maximum spice, opt for Pepper Jack. Dividing this cheese is key: 1 1/2 cups go into the initial fluffy base, and the remaining 1/2 cup is folded in later. This folded-in cheddar provides textural pockets of cheese that melt slightly in your mouth.
- 1/2 cup grated Parmesan cheese: Use real grated Parmesan, not the powdered kind. It adds an essential salty, umami depth that elevates this recipe far beyond a simple cream cheese dip.
- 1/2 cup mayonnaise or sour cream: This is the secret to the incredibly smooth, spreadable texture. It adds moisture and fat, making the ball easier to mix and ensuring it remains soft enough to spread even after chilling. Mayo offers a slightly richer flavor, while sour cream provides a tangier note.
- 1/2 cup crispy cooked bacon, crumbled (reserve 2 tablespoons for coating): The smoky element! Ensure the bacon is cooked until very crisp. If it’s soft, it will become chewy and wet inside the cheese ball. Crumble it into small, uniform pieces.
- 1/4 cup finely diced jarred or canned jalapeños: This step requires meticulous preparation. You must drain the jalapeños very well and pat them dry using paper towels. Excess liquid will ruin the structure of the cheese ball, making it impossible to form or firm up properly. Dicing them finely ensures the heat is evenly distributed.
- 1 teaspoon garlic powder & 1/2 teaspoon onion powder: These pantry staples provide the deep, aromatic savoriness typical of a great dip.
- 1/2 teaspoon black pepper & 1/4 teaspoon salt: Adjust the salt carefully based on how salty your bacon is. It’s always easier to add salt than to take it away.
FOR THE CRUNCHY COATING:
The coating is what makes this a true Jalapeno Popper Cheese Ball, providing that delightful crunch and visual appeal.
- 1 cup panko breadcrumbs: Panko is non-negotiable here. Unlike traditional breadcrumbs, panko is lighter, larger, and holds its crunch much better. Toasting the panko, as detailed in the instructions, is highly recommended for maximum texture and color.
- 2 tablespoons butter, melted (optional, for toasting panko): Used specifically to toast the panko, giving it a rich, buttery flavor.
- 1/4 cup fresh chives, finely chopped: Fresh herbs are essential. Chives provide a delicate, oniony bite and a beautiful pop of bright green color against the golden coating.
- Remaining 2 tablespoons crispy bacon crumbles: Reserved from the main mixture, these are added to the coating for visual appeal and an extra hit of smoky flavor right on the surface.
Essential Tools and Equipment
While the recipe is simple, having the right tools on hand will guarantee a smooth process, especially during the mixing and shaping phases.
- Electric Mixer (Hand Mixer or Stand Mixer): Absolutely essential for achieving that light, fluffy, lump-free cream cheese base. Attempting to mix the cold ingredients by hand will be frustrating and yield a dense result.
- Large Mixing Bowl: Necessary for accommodating all the ingredients and allowing the mixer to work effectively without splashing.
- Rubber Spatula: Used for scraping down the sides of the bowl during mixing and, most importantly, for gently folding in the chunky inclusions (bacon and jalapeños) without overworking the mixture.
- Measuring Cups and Spoons: For precise ingredient quantities.
- Sharp Knife and Cutting Board: For finely dicing the jalapeños and chopping the fresh chives.
- Paper Towels: Crucial for drying the diced jalapeños.
- Plastic Wrap: The primary tool for shaping the cheese ball and ensuring it holds its form while chilling.
- Shallow Dish or Pie Plate: Ideal for holding the coating mixture and easily rolling the chilled ball.
- Small Skillet (Optional): Required if you opt to toast the panko breadcrumbs for that superior crunch.
Step-by-Step Guide to Crafting Your Jalapeno Popper Cheese Ball
Follow these detailed instructions precisely, paying special attention to the chilling and coating steps, to create a flawless and delicious Homemade Cheese Ball Recipe.
STEP 1: Prepare the Cheese Base
This initial mixing stage dictates the final texture of the cheese ball. Do not rush this step, and ensure your cream cheese is adequately soft.
- Combine Base Ingredients: Place the completely softened cream cheese (remember, softness is key!), the Parmesan cheese, and 1 1/2 cups of the shredded cheddar cheese into a large mixing bowl. Reserve the remaining 1/2 cup shredded cheddar for Step 2.
- Add Wet and Dry Seasonings: Add the mayonnaise (or sour cream), garlic powder, onion powder, salt, and pepper to the bowl.
- Whip Until Fluffy: Using an electric hand mixer or a stand mixer fitted with the paddle attachment, begin beating the mixture on low speed to incorporate the dry ingredients, then increase to medium speed. Beat until all ingredients are completely smooth, light, and noticeably fluffy. Stop and scrape down the sides of the bowl as needed to ensure no lumps of cream cheese remain. This whipping process usually takes a minimum of 2 to 3 minutes. The resulting mixture should look almost like a very thick frosting.
STEP 2: Fold in the Fillings
Once the base is fluffy, we introduce the flavor inclusions. This step requires a gentle touch to avoid deflating the airy mixture.
- Prep Inclusions: Ensure your finely diced jalapeños are fully drained and patted dry. This prevents watery spots in your finished product.
- Gently Fold: Using a rubber spatula (not the electric mixer), gently fold the drained jalapeños, the 1/2 cup of crumbled bacon, and the remaining 1/2 cup of reserved shredded cheddar cheese into the cream cheese mixture.
- Mix Just Enough: Mix just until the inclusions are evenly distributed throughout the cheese mixture. Crucially, avoid overmixing. Overmixing can cause the mixture to become too soft and sticky, making the shaping process difficult. The spatula should cut and fold the ingredients together cleanly.
STEP 3: Shape and Chill the Ball
The chilling time is non-negotiable. This is what transforms the soft mixture into a firm, elegant sphere that is easy to handle and roll in the coating.
- Prepare Surface: Lay a large sheet of plastic wrap (about 18-24 inches) flat on your counter surface.
- Spoon and Gather: Spoon the entire cheese mixture onto the center of the plastic wrap.
- Shape the Sphere: Use the plastic wrap to help you gather the mixture and compress it into a uniform, tight sphere. Work quickly, twisting the plastic wrap on top to tighten the ball and ensure a smooth surface. Use the counter to help flatten the bottom slightly if necessary, but aim for a rounded shape.
- The Critical Chill: Once shaped, wrap the Jalapeno Popper Cheese Ball tightly in the plastic wrap, eliminating all air pockets. Place the wrapped cheese ball in the refrigerator to chill and firm up for at least 2 hours, or preferably up to 4 hours. The colder and firmer the ball is, the easier it will be to coat evenly without it sticking to your hands.
STEP 4: Prepare the Crunchy Coating
The coating is what gives this cheese ball its signature popper crunch. Toasting the panko adds tremendous flavor depth.
- Optional Step for Extra Crunch (Highly Recommended): In a small skillet, melt 2 tablespoons of butter over medium heat. Add the panko breadcrumbs and toast, stirring constantly, until they achieve a deep golden-brown color and become fragrant (this takes approximately 3–5 minutes). Remove from heat immediately and transfer to a separate plate to cool completely. If skipping this step, use plain raw panko.
- Mix Coating Ingredients: In a shallow dish or pie plate (wide enough to accommodate the cheese ball), combine the cooled, toasted panko breadcrumbs, the chopped fresh chives, and the remaining 2 tablespoons of reserved crispy bacon crumbles. Mix the coating ingredients well until they are evenly distributed.
STEP 5: Coat and Serve
The final step brings the entire appetizer together, transforming the chilled cheese ball into a stunning party centerpiece.
- Unwrap: Remove the chilled Jalapeno Popper Cheese Ball from the refrigerator and carefully unwrap the plastic wrap. The ball should feel very firm to the touch.
- Coat Thoroughly: Place the firm cheese ball into the shallow dish containing the coating mixture. Gently roll the cheese ball, using your hands to press the coating firmly onto the surface until the entire ball is evenly and thoroughly covered. Focus on pressing the ingredients firmly to ensure they adhere well.
- Final Chill (Optional): The Jalapeno Popper Cheese Ball can be served immediately. However, if you have time, refrigerating it for another 15–30 minutes after coating allows the coating to fully set.
- Serving Suggestions: Serve with sturdy crackers (like pita chips or woven wheat crackers), toasted baguette slices, pretzel thins, or fresh vegetable sticks (carrots, celery, bell peppers). For even more recipe inspiration, find more inspiring appetizer recipes on our Pinterest board!
Tips, Tricks, and Flavor Variations for Your Spicy Appetizer
While the classic Jalapeno Popper Cheese Ball recipe is phenomenal as written, part of the joy of cooking is customization. Here are several tips to perfect your technique and variations to adapt the flavor profile to your specific tastes or dietary needs.
Troubleshooting Common Mistakes
- The Cheese Ball is Too Soft: This is the most common issue, usually caused by two things: using cold cream cheese (which requires over-mixing, warming the fat), or not chilling it long enough. If your mixture feels too soft after Step 2, place it back in the fridge for 30 minutes before shaping. If it’s too soft after the required 2-hour chill, try chilling it for another 1-2 hours. A minimum of 4 hours is often necessary in warmer kitchens.
- The Coating Won’t Stick: Ensure the cheese ball is very cold and firm when you attempt to roll it. If it’s sticky, pat the surface gently with a paper towel before rolling. Roll gently but press the coating ingredients firmly onto the surface with your hands to help them adhere.
- It Tastes Bland: If the flavor seems weak, you likely need more salt or acid. Add a dash of Worcestershire sauce or a teaspoon of fresh lemon juice into the cream cheese base before chilling. Always taste the mixture before adding the jalapeños (if you plan to use a spoon you can safely lick).
Spice Level Adjustments
This recipe uses jarred jalapeños, which are milder than fresh. Here’s how to adjust the heat level:
- Increase the Heat: Use fresh jalapeños instead of jarred ones. Remove the seeds and membranes, then dice finely. For extreme heat, add a teaspoon of finely diced Serrano pepper or a pinch of cayenne pepper to the dry seasonings. Alternatively, swap out the sharp cheddar for extra spicy Pepper Jack cheese.
- Decrease the Heat: Use fewer jalapeños (start with 1/8 cup) or substitute half the jalapeños with finely diced green bell pepper for flavor without the heat.
Creative Flavor and Texture Variations
The beauty of this Cream Cheese Ball base is its adaptability. Feel free to swap out ingredients to create unique versions:
- Herb Garden Cheese Ball: Swap chives for a mixture of finely chopped parsley, dill, and dried oregano in the coating.
- Nutty Crunch: Replace the panko coating with finely chopped pecans or walnuts, combined with the chives and bacon. Toasting the nuts before chopping enhances their flavor dramatically.
- Sweet and Spicy: For a holiday twist, replace half the panko with chopped dried cranberries. This adds a beautiful festive color and a tart-sweet counterpoint to the spice, similar to a Cranberry Pecan Cheese Ball.
- Smoked Cheese Ball: Use smoked cheddar or smoked Gouda in place of the sharp cheddar for a deeper, smokier flavor profile that complements the bacon beautifully.
Dietary Adaptations (Vegan and Gluten-Free)
While this recipe is inherently rich and dairy-heavy, modern substitutes make adaptations possible:
- Gluten-Free: The primary source of gluten is the panko breadcrumbs. Easily substitute the panko with gluten-free breadcrumbs or certified gluten-free crackers (like rice crackers), pulverized into coarse crumbs. Alternatively, use a coating of finely chopped nuts and seeds.
- Vegan/Dairy-Free: Achieving the exact texture requires high-quality substitutes. Use two blocks of vegan cream cheese (Tofutti or Miyoko’s brand works well) and a vegan shredded cheddar/Pepper Jack blend. Replace the mayonnaise/sour cream with a vegan substitute or 1/4 cup of coconut cream (refrigerated part only). Replace bacon with finely chopped, smoked shiitake mushrooms or store-bought vegan bacon bits.
Nutritional Overview and Ingredient Benefits for the Jalapeno Popper Cheese Ball
The Jalapeno Popper Cheese Ball is undeniably a rich, celebratory appetizer designed for indulgence. While it’s not a low-calorie health food, understanding the main components provides context for its nutritional profile and highlights the benefits of incorporating certain ingredients into your diet (in moderation, of course!).
Please Note: Nutritional data for appetizers like cheese balls can vary drastically based on the serving size, the brand of ingredients used, and the thickness of the coating. The values below are generalized estimates for a typical 1 oz serving (about 1/15th of the total ball).
Estimated Nutritional Value (Per 1 oz Serving)
- Calories: 120–150 kcal
- Total Fat: 10–13 g (mostly saturated fat from dairy)
- Cholesterol: 30–40 mg
- Sodium: 200–280 mg (highly variable based on salt content of bacon and cheese)
- Total Carbohydrates: 2–4 g (mainly from panko and dairy)
- Dietary Fiber: < 1 g
- Protein: 5–7 g
Ingredient Benefits Spotlight
While the Jalapeno Popper Cheese Ball is primarily fat and protein, key ingredients offer essential vitamins and minerals:
Dairy (Cream Cheese, Cheddar, Parmesan):
The cheese component is the foundation of this appetizer. Cheese, particularly cheddar and Parmesan, is an excellent source of calcium, which is vital for bone health, nerve function, and blood clotting. It also provides high-quality protein necessary for muscle repair and satiety. The B vitamins found in dairy support energy metabolism. When making a Cream Cheese Ball, the quality of your dairy also dictates the richness of the final product.
Bacon (Protein and Flavor):
Though often considered strictly decadent, bacon provides a good source of protein, essential for structure and function throughout the body. Furthermore, its smoky flavor is derived from curing processes, which contribute heavily to the savory umami quality of the appetizer. While high in fat, the small amounts used here are primarily for flavor impact and texture.
Jalapeños (Spice and Vitamins):
The heat in the jalapeño comes from capsaicin, a compound known for its anti-inflammatory and pain-relieving properties. Capsaicin has also been linked to boosting metabolism, though the amount consumed in a cheese ball serving is small. Jalapeños also contain Vitamin C and Vitamin A, acting as mild antioxidants. By using jarred jalapeños, we get the flavor and some benefits without overwhelming heat.
Chives (Micronutrients):
The fresh chives in the coating are more than just decoration; they add freshness and beneficial nutrients. Chives are part of the Allium family (like garlic and onion) and are rich in Vitamin K, crucial for bone health and blood clotting. They also contribute mild amounts of Vitamin C and carotenoids.
Enjoying Appetizers Responsibly: The Jalapeno Popper Cheese Ball is an optimal choice for entertaining because a small serving provides a huge burst of flavor. It satisfies those savory cravings quickly. Serving this rich dip with crunchy, low-calorie vegetable sticks alongside sturdy crackers allows guests to enjoy the flavor while balancing the richness.
Frequently Asked Questions (FAQ) About the Jalapeno Popper Cheese Ball
We’ve gathered the most common questions about making, serving, and storing this popular Spicy Appetizer.
How far in advance can I make this Jalapeno Popper Cheese Ball?
You can prepare the cheese ball mixture (Steps 1, 2, and 3) and wrap it tightly in plastic wrap up to 3 days in advance. Store it in the refrigerator. Wait to apply the crunchy panko coating until just 1–2 hours before serving. This prevents the coating from becoming soggy and guarantees maximum crunch.
Can I freeze the Jalapeno Popper Cheese Ball?
Yes, the prepared cheese ball (uncoated) freezes well. Wrap it tightly in several layers of plastic wrap and aluminum foil and freeze for up to one month. To thaw, move it to the refrigerator overnight. Once thawed, roll it in the coating and serve. The freezing process may slightly affect the fluffiness, but it remains a delicious, convenient option.
Why do I need to dry the jalapeños so thoroughly?
Moisture is the enemy of a firm cheese ball structure. Jarred or canned jalapeños retain a lot of brine. If this liquid is incorporated, it will thin the cream cheese mixture, making it difficult to shape and preventing the Cream Cheese Ball from firming up properly in the refrigerator. Always pat them down with paper towels after dicing.
What is the best way to serve the Homemade Cheese Ball Recipe?
For the best spreadability, remove the Jalapeno Popper Cheese Ball from the refrigerator about 15–20 minutes before guests arrive. This slight temperature increase makes the center easier to scoop without losing its shape. Serve with a designated cheese knife and plenty of sturdy dippers that can handle the thick texture, such as pita chips, bagel chips, or thick slices of toasted bread.
Can I use regular breadcrumbs instead of panko for the coating?
While you can use regular breadcrumbs, panko is highly recommended for this Jalapeno Popper Cheese Ball. Panko offers a larger, airier structure, resulting in a much superior and louder crunch. If using regular breadcrumbs, be sure to toast them thoroughly to maximize their flavor and texture before mixing with the chives and bacon.
Conclusion: Your New Favorite Jalapeno Popper Appetizer
The Jalapeno Popper Cheese Ball is more than just a dip; it is an effortless centerpiece that combines the best elements of creamy comfort food with an exciting, spicy twist. We’ve walked through the key steps from ensuring your cream cheese is perfectly softened for that fluffy base, to meticulously drying the jalapeños, and finally, toasting the panko for a truly next-level crunchy coating. This recipe eliminates the deep-frying mess of traditional poppers while still delivering that iconic smoky, cheesy heat.
Whether you are hosting a casual football game day or planning an elaborate holiday spread, this appetizer’s make-ahead capabilities make it a true winner. It frees up your time, allowing you to focus on other details, such as perfecting your Sweet and Spicy Cranberry Salsa or crafting a delicious dessert. Remember the critical lesson: patience during the chilling phase is paramount to creating a beautifully firm and rollable sphere.
If you’re ready to elevate your appetizer game and impress every guest with minimal stress, this is the recipe you need. Give this Jalapeno Popper Cheese Ball a try, and watch it become the most requested item at your next gathering. Don’t forget to let us know how your cheese ball turned out in the comments below, and share your favorite serving suggestions!
Jalapeño Popper Cheese Ball (Long and Easy Recipe)
Ingredients
Equipment
Method
- Place the completely softened cream cheese, Parmesan cheese, and 1 1/2 cups of the shredded cheddar cheese into a large mixing bowl. Reserve the remaining 1/2 cup shredded cheddar for later.
- Add the mayonnaise (or sour cream), garlic powder, onion powder, salt, and pepper to the bowl.
- Using an electric hand mixer or a stand mixer fitted with the paddle attachment, beat the mixture on medium speed until all ingredients are completely smooth, light, and fluffy, scraping down the sides of the bowl as needed. This usually takes 2 to 3 minutes.
- Using a rubber spatula, gently fold the drained jalapeños, the 1/2 cup of crumbled bacon, and the remaining 1/2 cup of reserved shredded cheddar cheese into the cream cheese mixture.
- Mix just until the inclusions are evenly distributed throughout the cheese mixture. Avoid overmixing, as this can make the mixture too soft.
- Lay a large sheet of plastic wrap on your counter surface. Spoon the entire cheese mixture onto the center of the plastic wrap.
- Use the plastic wrap to help you gather and shape the mixture into a uniform, tight sphere (a ball). Wrap the cheese ball tightly, ensuring there are no air pockets.
- Place the wrapped cheese ball in the refrigerator to chill and firm up for at least 2 hours, or preferably up to 4 hours. The chilling step is crucial for achieving a firm, rollable texture.
- Optional Step for Extra Crunch: In a small skillet, melt 2 tablespoons of butter over medium heat. Add the panko breadcrumbs and toast, stirring frequently, until they are golden brown and fragrant (about 3–5 minutes). Remove from heat and allow to cool completely. (If skipping this step, use plain raw panko.)
- In a shallow dish or pie plate, combine the cooled panko breadcrumbs, the chopped fresh chives, and the remaining 2 tablespoons of reserved crispy bacon crumbles. Mix the coating ingredients well.
- Remove the chilled cheese ball from the refrigerator and unwrap the plastic wrap.
- Place the firm cheese ball into the shallow dish containing the coating mixture. Gently roll the cheese ball, pressing the coating onto the surface firmly with your hands until the entire ball is evenly and thoroughly covered.
- Serve immediately with sturdy crackers, toasted baguette slices, pretzel thins, or fresh vegetable sticks. This cheese ball holds well refrigerated for up to 2 days before serving.