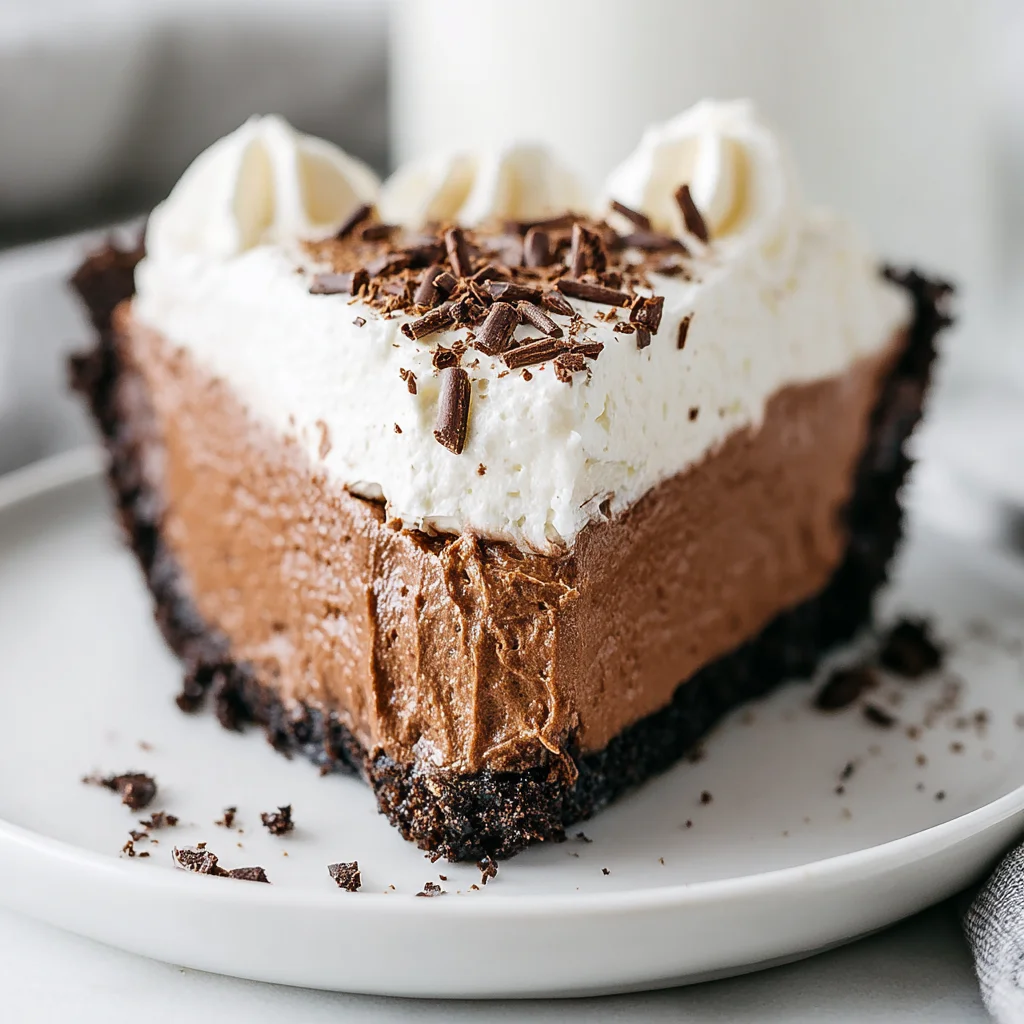
Welcome to the dessert that defines decadence: the Chocolate Silk Pie Recipe. This isn’t just a chocolate pie; it’s an experience. Imagine a buttery, slightly crisp chocolate crust giving way to a filling so impossibly light, smooth, and rich that it feels like biting into a cloud of the purest cocoa. Unlike many dense, fudgy chocolate pies, this classic recipe earns its “silk” moniker through a careful technique beating butter, sugar, and high-quality chocolate until it reaches peak velvety perfection. Best of all? The magnificent filling is completely no-bake, requiring only patience for chilling.
If you’ve been searching for that show-stopping dessert that requires minimal oven time but delivers maximum flavor, your quest ends here. Whether you’re planning a holiday dinner, celebrating a birthday, or simply need an extraordinary comfort dessert, this Chocolate Silk Pie Recipe promises absolute satisfaction. We will guide you through every critical step, from achieving the perfectly moist crust to mastering the crucial 5-minute whipping technique that transforms simple ingredients into culinary magic.
Why You’ll Fall Head Over Heels for This Chocolate Silk Pie Recipe
The world is full of chocolate desserts, but few manage to hit the perfect trifecta of texture, richness, and simplicity quite like this classic Chocolate Silk Pie Recipe. This isn’t a refrigerated mousse pie, nor is it a heavy, baked custard. It stands entirely in its own category, which is why it has endured as a beloved favorite for generations. There are several key reasons this particular recipe will quickly become a fixture in your dessert rotation.
The Unforgettable Velvety Texture
The texture is truly the star. The name “silk” is not an exaggeration. The filling is smooth, light, and almost airy, melting on your tongue instantly. This texture is achieved through incorporating a large volume of air during the extended creaming and mixing phases. This long beating process emulsifies the butter, sugar, and raw eggs perfectly, resulting in a filling that is stable, yet surprisingly delicate. If you’ve ever found chocolate pies too dense or cloyingly sweet, the ethereal lightness of this filling will be a delightful revelation. This delicate balance of rich flavor and light texture is what elevates it far above standard triple chocolate pies.
Decadence Without the Oven Drama
While the crust requires a quick 8 to 10 minutes in the oven, the glorious filling is entirely no-bake. This is a massive advantage, especially during the holidays when oven space is precious, or in the summer when you want to avoid heating up the kitchen. The structure of the pie relies purely on the chemical reaction of the ingredients and the chilling time. This simplifies the process immensely no checking for doneness, no worrying about cracks, just mix, pour, and refrigerate. This makes the Chocolate Silk Pie Recipe remarkably low-stress for such a high-impact dessert.
Pure, Intense Chocolate Flavor
Because this recipe utilizes unsweetened high-quality baking chocolate, the flavor profile is deep, complex, and intensely chocolatey, perfectly balanced by the sweetness of the powdered sugar. The result is a sophisticated flavor that appeals equally to adults and children. We are not using cocoa powder here; the richness comes from pure cocoa butter and solids, ensuring every bite is a deeply satisfying experience. We pair this rich filling with a homemade chocolate cookie crust, amplifying the flavor profile even further, ensuring that the chocolate element is dominant and luxurious.
Why You Should Try This Chocolate Silk Pie Recipe Today
Beyond the flavor and texture, there are practical reasons why this Chocolate Silk Pie Recipe deserves a place on your counter (and in your fridge) right now. It is a recipe that showcases effort and finesse, yet remains accessible to the average home baker. The process is straightforward, but the results are world-class, making you look like a pastry genius.
Perfect Make-Ahead Dessert
The Chocolate Silk Pie Recipe is not just good chilled it requires it. This pie must chill for a minimum of six hours, but ideally overnight, to fully set into its silky texture. This makes it the ultimate make-ahead dessert. You can prepare the entire pie one or even two days before your event. Just hold off on adding the whipped topping until about an hour before serving to ensure the cream is fresh and peaks are sharp. This convenience takes a huge burden off day-of entertaining.
A Note on Egg Safety and Quality
As this is a classic silk pie, the recipe calls for raw eggs, which are crucial for the structure and lightness of the filling. For safety, it is absolutely essential to use pasteurized eggs. Pasteurized eggs have been gently heated to eliminate potential bacteria (like Salmonella) while maintaining their raw structure, making them safe for consumption in no-bake preparations like this filling. If pasteurized eggs are unavailable, you can gently temper regular eggs using the double-boiler method, or look into egg substitutes, although substituting may slightly alter the final texture of your silk pie. The quality of your ingredients, especially the eggs and chocolate, directly affects the outcome of this premium dessert.
Ideal for Gifting and Potlucks
A slice of this velvety pie is always a welcome gift. Its rich appearance and unmistakable taste make it far superior to store-bought options. Since it travels well (as long as it stays chilled), it’s a phenomenal choice for any potluck or gathering where you want to bring something truly memorable. If you enjoy creating stunning, flavor-packed desserts, you might also be interested in our guide on baking a truly moist chocolate cake or checking out this easy chocolate cake recipe for other chocolate indulgences.
Essential Ingredients and Tools for the Perfect Chocolate Silk Pie Recipe
Success with this Chocolate Silk Pie Recipe hinges on two things: ingredient quality and proper technique (specifically, mixing). Here is a detailed look at what you need and why each component is important.
I. Ingredients Breakdown
For the Crust: Building a Solid Foundation
- 1 1/2 cups finely crushed chocolate cookie crumbs: While graham crackers work, chocolate sandwich cookies (like Oreos, filling removed) create a richer, darker base that complements the silk filling perfectly. Ensure they are finely crushed for firm packing.
- 1/4 cup granulated sugar: Adds a touch of sweetness and helps the crust caramelize slightly during baking.
- 6 tablespoons unsalted butter, melted: This binds the crumbs together. Ensure it’s fully melted so it distributes evenly without creating wet clumps.
For the Chocolate Silk Filling: The Heart of the Pie
The filling requires very specific preparation to achieve its signature texture:
- 1 cup (2 sticks) unsalted butter, softened to room temperature: Room temperature is crucial. If the butter is too cold, it won’t cream properly with the sugar; if it’s too soft (borderline melted), the filling will be greasy and won’t whip into a light structure.
- 1 1/2 cups powdered sugar, sifted: Sifting prevents lumps and helps it incorporate smoothly into the softened butter, which is vital for that smooth, non-gritty texture.
- 1 teaspoon pure vanilla extract: A flavor enhancer that brings depth to the chocolate.
- 4 ounces high-quality unsweetened baking chocolate: This is the time to splurge. Use 100% cacao or premium unsweetened chocolate. Melt the chocolate gently (microwave or double boiler) and let it cool slightly. If you add hot chocolate, it will melt the creamed butter mixture, ruining the texture.
- 4 large eggs (Pasteurized recommended): As discussed, pasteurized eggs are mandatory for food safety since they are consumed raw. They provide the necessary structure and aeration when beaten vigorously.
For the Topping: The Finishing Touch
A pie this rich needs a counterpoint of fresh, lightly sweetened cream.
- 1 1/2 cups cold heavy whipping cream: Must be very cold to whip successfully into stiff peaks.
- 1/4 cup powdered sugar: For sweetness.
- 1/2 teaspoon pure vanilla extract: For flavor.
- Chocolate shavings: Optional, but highly recommended for a beautiful, professional finish.
II. Recommended Tools and Utensils
While you can theoretically make the filling with a hand mixer, a stand mixer is strongly recommended, as the recipe calls for a significant amount of vigorous beating over an extended period. The power and stability of a stand mixer are essential for achieving the truly “silky” consistency of this filling.
- Stand Mixer (with paddle and whisk attachments): The paddle is used for creaming the butter and sugar, and the whisk is used for the topping.
- 9-inch Deep-Dish Pie Plate: Needed to accommodate the generous volume of the silk filling.
- Rubber Spatula: Essential for scraping down the sides of the mixing bowl (especially important when creaming butter and sugar).
- Wire Rack: For cooling the crust completely.
- Melting Apparatus: A small bowl for microwaving the chocolate, or a double boiler setup.
- Measuring Cups/Spoons: Standard kitchen essentials.
- Sifter/Fine Mesh Strainer: For the powdered sugar. Skipping this step risks a grainy filling.
Detailed Recipe Steps: Crafting the Classic Chocolate Silk Pie Recipe
Follow these steps precisely especially the mixing times to ensure your pie achieves its legendary silky smooth texture.
Step 1: Prepare the Crust
- Preheat your oven to 350°F (175°C).
- In a medium mixing bowl, combine the cookie crumbs (or graham cracker crumbs) and the 1/4 cup of granulated sugar.
- Pour the 6 tablespoons of melted butter over the crumb mixture. Stir thoroughly until everything is evenly moistened and the texture resembles wet sand. If the mixture is too dry, add a tiny bit more melted butter until it holds together when pressed.
- Press the mixture firmly and evenly into the bottom and up the sides of your 9-inch deep-dish pie plate. Use the bottom of a flat measuring cup or glass to help compact the crust tightly. A tightly packed crust prevents crumbling when sliced.
- Bake the crust for 8 to 10 minutes until set. Remove from the oven and allow the crust to cool completely on a wire rack before filling. A warm crust will melt the butter in the silk filling.
Step 2: Prepare the Chocolate Silk Filling
This stage is where the magic happens. Pay close attention to temperature and timing.
- In the bowl of a stand mixer fitted with the paddle attachment, cream the softened 1 cup of butter on medium speed until it is smooth and lump-free, about 1 minute.
- Gradually add the 1 1/2 cups of sifted powdered sugar to the butter. Beat on medium-high speed until the mixture is light, fluffy, and very pale in color. This process requires patience scraping down the sides of the bowl often is essential to ensure the butter and sugar are fully incorporated and aerated. This creaming process should take approximately 4 to 5 minutes.
- Add the melted and slightly cooled chocolate (it should be liquid but not hot) and the vanilla extract to the creamed mixture. Beat on low speed until just combined, then increase to medium speed and beat for 1 minute.
- Stop the mixer and scrape down the sides and bottom again. Ensure the chocolate mixture is fully incorporated and uniform.
- Add the 4 pasteurized eggs one at a time, beating well after each addition to fully incorporate them into the mixture.
- Once all four eggs have been added, increase the mixer speed to high and beat the filling vigorously for a full 5 minutes. This long, high-speed beating time is the most crucial step for achieving the light, airy, and truly “silky” texture. The mixture will lighten significantly in both color and volume, transforming from a dense paste into a cloud-like mousse.
For more baking inspiration and delicious dessert ideas, don’t forget to check out my boards on Pinterest: Recipes Amaya Blog on Pinterest.
Step 3: Assemble and Chill the Pie
The waiting game begins!
- Carefully spoon the prepared chocolate silk filling into the cooled pie crust.
- Use a rubber spatula or the back of a spoon to smooth the top of the filling, making a level surface.
- Cover the pie loosely with plastic wrap or foil. Ensure the covering does not touch the filling to prevent sticking and ruining the surface.
- Refrigerate the pie for a minimum of 6 hours, or preferably overnight, until the filling is firm and fully set. The longer it chills, the better the structure of the Chocolate Silk Pie Recipe will be.
Step 4: Prepare the Whipped Topping and Serve
- Just before serving, place the cold heavy whipping cream, 1/4 cup powdered sugar, and 1/2 teaspoon vanilla extract in the bowl of a stand mixer fitted with the whisk attachment.
- Beat on medium-high speed until stiff peaks form. The cream should hold its shape firmly. Be careful not to over-beat, which will turn the cream into butter.
- Spread or pipe the freshly whipped cream generously over the chilled Chocolate Silk Pie Recipe.
- Garnish the entire surface or individual slices with delicate chocolate shavings, if desired.
- Slice with a sharp knife and serve immediately. Store any leftovers securely covered in the refrigerator.
Tips, Variations, and Troubleshooting for Your Chocolate Silk Pie Recipe
Even though this Chocolate Silk Pie Recipe is relatively simple, there are common pitfalls. Here are some pro tips and variations to ensure absolute success every time.
Troubleshooting Common Issues
- Soupy Filling: If your filling hasn’t set after chilling, the primary cause is usually that the butter was too soft initially, or the chocolate was added too hot and melted the butter. Ensure your butter is cool room temperature (softened but not greasy) and that the melted chocolate is only slightly warm to the touch. The extended 5-minute beat time is also crucial for emulsification and stability.
- Gritty Texture: A gritty filling means the powdered sugar wasn’t fully dissolved or incorporated. Always sift the sugar, and ensure you cream the butter and sugar mixture for the full 4-5 minutes, scraping down the bowl several times, before adding the chocolate.
- Crust Crumbling: This happens if the crumbs weren’t packed tightly enough or didn’t receive enough melted butter. When pressing the crust, you should feel resistance.
Flavor and Ingredient Variations
- Espresso Enhancement: Add 1 teaspoon of espresso powder (or instant coffee granules dissolved in the vanilla) to the filling mixture along with the melted chocolate. Coffee enhances the depth of the chocolate flavor without making the pie taste like coffee.
- Alcoholic Twist: Replace 1 teaspoon of the vanilla extract with a high-quality liquor like bourbon, dark rum, or Grand Marnier for a sophisticated adult flavor profile.
- Nut Crust: Replace half of the chocolate cookie crumbs with finely ground pecans or walnuts for a nutty base, which provides a lovely textural contrast to the silky filling.
Dietary Adaptations
- Gluten-Free Chocolate Silk Pie Recipe: Easily made gluten-free by using gluten-free chocolate sandwich cookies or a simple nut-based crust (ground almond flour mixed with butter and sugar).
- Dairy-Free/Vegan Silk Pie: Achieving the “silk” texture without butter and pasteurized eggs is challenging but possible. You would need to use high-quality vegan butter sticks and a silken tofu or avocado-based mousse blended with dark chocolate, stabilized with coconut oil or cornstarch. However, be aware this will yield a mousse pie, not the exact texture of the classic butter/egg silk pie.
Remember, the success of this Chocolate Silk Pie Recipe is in the detail. Using pasteurized eggs and adhering to the mixing times are non-negotiable steps for a perfect finish.
Nutritional Value and Decadent Benefits of the Chocolate Silk Pie Recipe
Let’s be upfront: this is a rich, indulgent dessert. The Chocolate Silk Pie Recipe is inherently high in saturated fats and sugar due to the large quantities of butter and powdered sugar required for the silky texture.
General Nutritional Breakdown (Estimate per serving, based on 8 slices):
- Calories: Approximately 500-650 calories per slice, depending on topping thickness.
- Fats: High (40-55g), predominantly from butter and heavy cream.
- Carbohydrates: High (40-60g), mainly from sugars in the filling and crust.
- Protein: Moderate (5-8g), contributed primarily by the eggs and dairy.
While this pie is certainly a treat best reserved for special occasions, there are some benefits derived from the quality ingredients used:
Benefits of High-Quality Unsweetened Chocolate
The use of 4 ounces of unsweetened baking chocolate means you are incorporating pure cacao solids. Cacao is packed with beneficial compounds:
- Antioxidants: Cacao is rich in polyphenols, particularly flavonoids, which are powerful antioxidants that help combat free radicals in the body.
- Mood Enhancement: Chocolate contains compounds that can trigger the release of endorphins and serotonin, contributing to feelings of well-being and happiness.
- Mineral Content: Cacao provides essential minerals like iron, magnesium, and copper.
The Role of Butter and Eggs
In this context, butter is essential not just for flavor, but for structure. It provides the smooth mouthfeel that is the hallmark of the silk pie. The pasteurized eggs are a critical source of protein and healthy fats, which, when incorporated through aeration, create the unique, light structure of the finished dessert. Enjoying a slice of this magnificent Chocolate Silk Pie Recipe is a delightful way to treat yourself, prioritizing quality and enjoyment over restrictive dieting.
FAQs about the Chocolate Silk Pie Recipe
Is the Chocolate Silk Pie Recipe really no-bake?
Yes, the rich and creamy filling for the Chocolate Silk Pie Recipe is completely no-bake. Only the chocolate cookie crust requires a quick 8 to 10 minutes in the oven to set. The filling sets beautifully in the refrigerator through the emulsification of the butter, sugar, and pasteurized eggs.
Why do I need to beat the filling for 5 full minutes?
The extended, high-speed beating time is absolutely critical for the Chocolate Silk Pie Recipe. This process vigorously incorporates air and thoroughly emulsifies the raw pasteurized eggs, butter, and sugar. This aeration is what transforms the mixture from a dense chocolate paste into the light, fluffy, and truly “silky” texture the pie is famous for.
Can I use regular eggs instead of pasteurized eggs in this Chocolate Silk Pie Recipe?
Since the filling in this Chocolate Silk Pie Recipe is not cooked, consuming raw eggs carries a risk of foodborne illness. For maximum safety, you should always use pasteurized eggs, which have been treated to eliminate bacteria. If pasteurized eggs are unavailable, you must consider gently tempering the eggs before use, though this can slightly change the final texture.
How long does homemade Chocolate Silk Pie last in the fridge?
The Chocolate Silk Pie Recipe, when stored properly in an airtight container in the refrigerator, will stay fresh and delicious for 3 to 4 days. Because the pie contains raw pasteurized eggs and dairy, it should never be left out at room temperature for longer than two hours.
Can I freeze this Chocolate Silk Pie?
Yes, you can freeze the Chocolate Silk Pie Recipe successfully. Do not add the whipped cream topping before freezing. Wrap the pie tightly in plastic wrap, followed by a layer of foil, and freeze for up to one month. Thaw it overnight in the refrigerator before adding the fresh whipped cream and serving.
Conclusion: The Masterpiece of the Chocolate Silk Pie Recipe
The Classic Chocolate Silk Pie Recipe is the epitome of comfort food elevated to gourmet status. It is a deceptively simple dessert that delivers on its promise of rich flavor and unparalleled silky texture. By focusing on quality ingredients especially the high-quality unsweetened chocolate and safe, pasteurized eggs and adhering strictly to the powerful mixing times, you guarantee a result that is far superior to any store-bought pie.
This recipe is built for success: a simple, sturdy crust; a filling that requires no fussy baking; and a generous crown of freshly whipped cream. It is the perfect make-ahead centerpiece for any gathering, allowing you to focus on your guests while the refrigerator does the hard work. Remember, the key to the silk is patience in the mixing bowl and patience during the chilling phase. Once you try this velvety, decadent dessert, you will understand why the Chocolate Silk Pie Recipe remains a timeless classic.
We encourage you to try this ultimate chocolate indulgence! Don’t forget to share your experience and pictures in the comments below, or tell us how you customized your pie. Happy baking (and chilling)!
Classic Decadent Chocolate Silk Pie (No-Bake Filling)
Ingredients
Equipment
Method
- Preheat oven to 350°F (175°C).
- In a medium mixing bowl, combine the cookie crumbs and the 1/4 cup of granulated sugar. Pour the melted butter over the crumb mixture and stir until everything is evenly moistened and resembles wet sand.
- Press the mixture firmly and evenly into the bottom and up the sides of a 9-inch deep-dish pie plate. Use the bottom of a measuring cup to help compact the crust.
- Bake the crust for 8 to 10 minutes until set. Remove from the oven and allow the crust to cool completely on a wire rack before filling.
- In the bowl of a stand mixer fitted with the paddle attachment, cream the softened 1 cup of butter on medium speed until smooth, about 1 minute.
- Gradually add the 1 1/2 cups of sifted powdered sugar to the butter and beat on medium-high speed until the mixture is light, fluffy, and very pale in color, scraping down the sides of the bowl often. This process should take approximately 4 to 5 minutes.
- Add the melted and cooled chocolate and the vanilla extract to the creamed mixture. Beat on low speed until just combined, then increase to medium speed and beat for 1 minute.
- Ensure the mixture is fully incorporated, then stop the mixer and scrape down the sides. Add the eggs one at a time, beating well after each addition.
- Once all four eggs have been added, increase the mixer speed to high and beat the filling vigorously for a full 5 minutes. This long beating time is crucial for achieving the light, airy, and 'silky' texture. The mixture will lighten in color and volume significantly.
- Carefully spoon the prepared chocolate silk filling into the cooled pie crust.
- Use a rubber spatula or the back of a spoon to smooth the top of the filling.
- Cover the pie loosely with plastic wrap or foil (be careful not to touch the filling). Refrigerate the pie for a minimum of 6 hours, or preferably overnight, until the filling is firm and fully set.
- Just before serving, place the cold heavy whipping cream, 1/4 cup powdered sugar, and 1/2 teaspoon vanilla extract in the bowl of a stand mixer fitted with the whisk attachment.
- Beat on medium-high speed until stiff peaks form. Be careful not to over-beat, which can turn the cream into butter.
- Spread or pipe the freshly whipped cream over the chilled chocolate silk pie. Garnish with chocolate shavings, if desired.
- Slice and serve immediately. Store leftovers in the refrigerator.