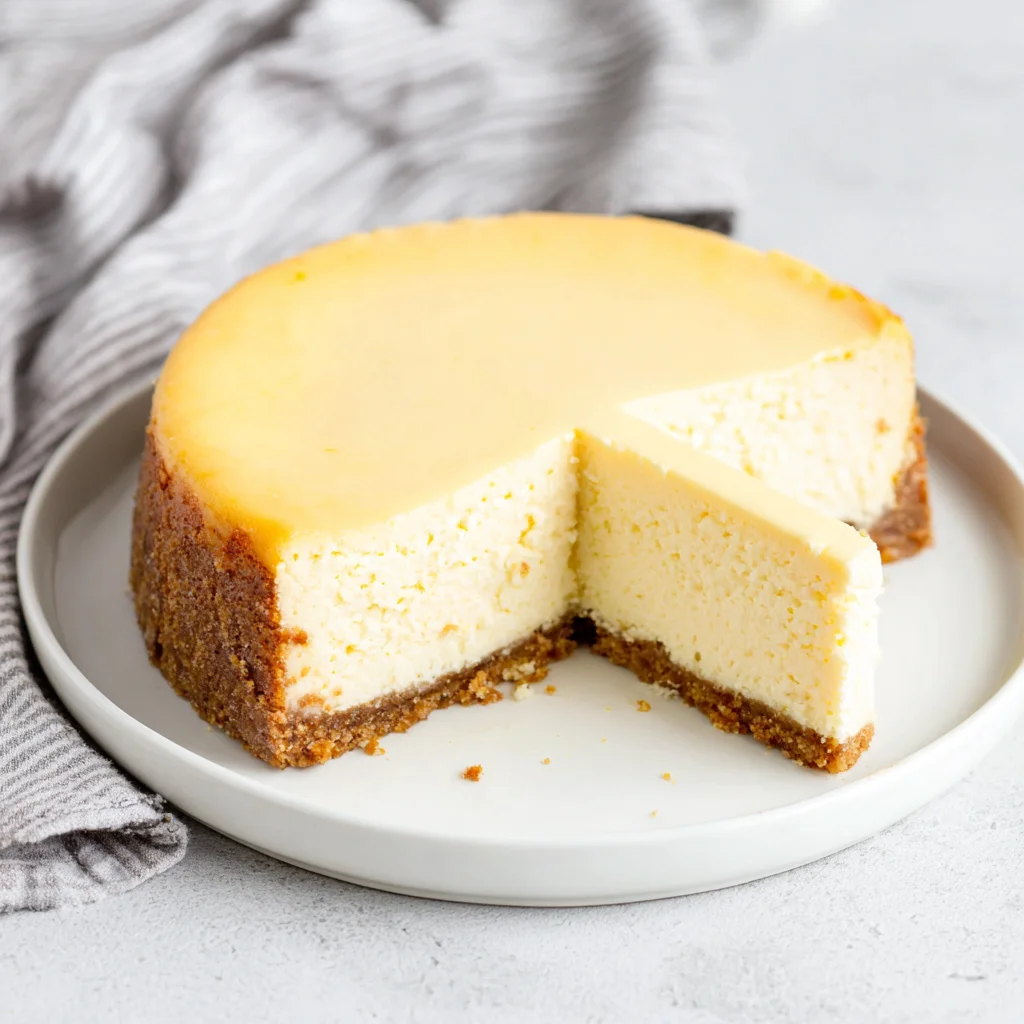
Indulge in the timeless allure of a Creamy Classic Cheesecake, a dessert that transcends generations. This recipe isn’t just about following instructions; it’s about crafting a culinary experience, a symphony of textures and flavors that will leave your taste buds singing. From the delicate crunch of the graham cracker crust to the velvety smooth, rich cream cheese filling, every bite is a testament to simplicity elevated to perfection. This isn’t just a cheesecake; it’s a celebration. A celebration of creamy perfection, a testament to the art of baking, and a guaranteed crowd-pleaser at any gathering. Prepare yourself for a journey into the heart of dessert nirvana, where each spoonful is an exquisite moment of pure bliss. This Creamy Classic Cheesecake is more than just a recipe; it’s an invitation to create unforgettable memories.
Why You’ll Love This Creamy Classic Cheesecake Recipe
There’s a reason why cheesecake reigns supreme in the dessert world, and this recipe captures its essence perfectly. This Creamy Classic Cheesecake recipe isn’t your average slice of heaven; it’s a divine experience. What makes it so special? Let’s delve into the reasons why you’ll absolutely adore this recipe:
- Unbelievably Creamy Texture: The secret lies in using room-temperature cream cheese and a gentle hand when mixing the filling. This ensures an incredibly smooth, luxurious texture that melts in your mouth.
- Perfectly Balanced Sweetness: The sweetness is perfectly balanced, avoiding that overly sugary taste some cheesecakes can have. It’s just the right amount of sweetness to complement the tanginess of the cream cheese and the subtle notes of vanilla.
- Classic, Irresistible Flavor: This recipe focuses on the quintessential cheesecake flavor profile, allowing the high-quality ingredients to shine. It’s a timeless classic for a reason.
- Easy-to-Follow Instructions: Even novice bakers can master this recipe. The step-by-step instructions are clear, concise, and easy to follow, ensuring a successful baking experience every time.
- Impressive Presentation: This Creamy Classic Cheesecake is a showstopper. Its elegant appearance makes it perfect for special occasions or simply to impress your loved ones. The golden crust and creamy filling create a visually stunning dessert.
- Versatile Dessert: Perfect for birthdays, holidays, or any special occasion, this Creamy Classic Cheesecake is a guaranteed crowd-pleaser. It can also be dressed up or down depending on the occasion.
Beyond the exceptional taste and texture, this recipe is about more than just a delicious dessert; it’s about the joy of creating something special. The process of baking this Creamy Classic Cheesecake is therapeutic, and the result is a reward that’s both delicious and visually stunning. It’s a recipe you’ll want to make again and again, perfecting your technique and sharing the joy with family and friends. Think of the compliments you’ll receive, the smiles on the faces of your loved ones, and the satisfaction of creating a truly unforgettable dessert. This Creamy Classic Cheesecake is an investment in happiness and delicious memories.
Why You Should Try This Creamy Classic Cheesecake Recipe
In a world of trendy desserts and complicated recipes, sometimes the classics offer the most satisfying experiences. This Creamy Classic Cheesecake is a testament to the power of simplicity and high-quality ingredients. Here’s why you shouldn’t miss out:
- Elevated Comfort Food: It offers the ultimate comfort food experience, taken to a sophisticated level. It’s familiar yet refined, a perfect balance of indulgence and elegance.
- Perfect for Any Occasion: From intimate gatherings to large parties, this cheesecake is a versatile dessert that fits any occasion. Its impressive appearance and delicious flavor will make it the star of the show.
- Impress Your Guests: This Creamy Classic Cheesecake is a guaranteed conversation starter. Its rich, creamy texture and delightful taste will leave a lasting impression on your guests.
- Recipe Refinement: This isn’t just a recipe; it’s a refined process that teaches you essential baking techniques applicable to other desserts. You’ll learn how to create a perfect crust, a smooth filling, and achieve that beautiful, even bake.
- Homemade Quality: Nothing beats the taste and satisfaction of a homemade dessert. This recipe allows you to control the quality of ingredients, ensuring a superior taste and texture compared to store-bought versions.
- Make Ahead Dessert: Prepare it ahead of time and enjoy it chilled. It’s a perfect make-ahead dessert, allowing you to relax and enjoy the party without last-minute dessert stress.
This Creamy Classic Cheesecake is a culinary adventure waiting to happen. It’s a chance to reconnect with the joy of baking and create a truly special dessert that will impress your friends and family. Don’t just take our word for it; try it for yourself and experience the magic of this timeless classic. The memories you create while making and sharing this dessert will be as delightful as the cheesecake itself. It’s more than just a recipe; it’s an experience.
Ingredients and Necessary Utensils for Creamy Classic Cheesecake
Gathering the right ingredients and tools is crucial for a successful baking experience. This section will provide a detailed list of ingredients, precise quantities, and recommendations for the utensils that will help you create the perfect Creamy Classic Cheesecake.
Ingredients:
For the Crust:
- 1 ½ cups (150g) graham cracker crumbs – *Use good quality graham crackers for the best flavor.*
- ¼ cup (50g) granulated sugar – *For a touch of sweetness in the crust.*
- 6 tablespoons (85g) unsalted butter, melted – *Provides binding and richness to the crust.*
For the Filling:
- 3 (8 ounce) packages cream cheese, softened to room temperature – *Essential for a smooth, creamy filling. Don’t skip this step!*
- 1 ¾ cups (350g) granulated sugar – *Adjust to your preferred sweetness level.*
- ¼ cup (60ml) sour cream – *Adds tang and creaminess to the filling.*
- 2 teaspoons vanilla extract – *Enhances the overall flavor of the cheesecake.*
- ¼ teaspoon salt – *Balances the sweetness and enhances the other flavors.*
- 4 large eggs – *Bind the filling and create a light and airy texture.*
Necessary Utensils:
- 9-inch springform pan – *Essential for easy removal of the cheesecake.*
- Large mixing bowl – *For mixing the filling.*
- Medium mixing bowl – *For making the crust.*
- Measuring cups and spoons – *For accurate ingredient measurements.*
- Rubber spatula or wooden spoon – *For combining ingredients thoroughly.*
- Electric mixer (handheld or stand mixer) – *Makes mixing the cream cheese and sugar much easier.*
- 9×13 inch roasting pan – *Creates a water bath for even baking.*
- Parchment paper (optional) – *Lines the bottom of the springform pan to prevent sticking.*
- Wire rack – *For cooling the cheesecake.*
- Thin knife – *For releasing the cheesecake from the pan.*
Detailed Recipe Steps for Creamy Classic Cheesecake
Let’s embark on the journey of creating this delectable Creamy Classic Cheesecake. Follow these steps carefully, and you’ll be rewarded with a truly memorable dessert.
- Prepare the Crust: Preheat your oven to 350°F (175°C). In a medium bowl, combine the graham cracker crumbs, sugar, and melted butter. Mix until the crumbs are evenly moistened. **Ensure the butter is completely melted for even distribution.** Press the mixture firmly into the bottom of your 9-inch springform pan. You can use the bottom of a measuring cup or a glass to evenly compress the crust. Bake for 8-10 minutes, or until the crust is lightly golden. Let it cool completely before proceeding. **Cooling the crust completely prevents the filling from melting too quickly.**
- Make the Filling: In a large bowl, beat the softened cream cheese and sugar together using an electric mixer until the mixture is smooth and creamy. **Softening the cream cheese is crucial for achieving a smooth filling. Don’t skip this step!** Beat in the sour cream, vanilla extract, and salt. Add the eggs one at a time, beating well after each addition. Be careful not to overmix. **Overmixing can incorporate too much air, leading to cracks in the cheesecake.**
- Create the Water Bath: Pour the filling over the cooled crust. Place the springform pan inside a larger roasting pan. Pour enough hot water into the roasting pan to come halfway up the sides of the springform pan. **The water bath creates a humid environment, preventing the cheesecake from cracking and ensuring even baking.**
- Bake the Cheesecake: Bake for 50-60 minutes, or until the cheesecake is set around the edges but still slightly jiggly in the center. **A slightly jiggly center is normal; it will firm up as it cools.** Turn off the oven and leave the cheesecake inside the oven with the door slightly ajar for 1 hour. **This slow cooling process prevents cracking.**
- Cool and Chill: Remove the cheesecake from the water bath and let it cool completely on a wire rack. Once cooled, cover and refrigerate for at least 4 hours, or preferably overnight, before serving. **Chilling is crucial for the cheesecake to set properly and develop its full flavor.**
- Serve: Carefully run a thin knife around the edges of the cheesecake to loosen it from the pan before releasing the springform. Serve and enjoy! You can garnish with fresh berries, whipped cream, or a drizzle of chocolate sauce, if desired.
Tips and Variations for Creamy Classic Cheesecake
While this recipe is a classic, there’s always room for personal touches and adjustments. Here are some tips and variations to enhance your Creamy Classic Cheesecake experience:
- Crust Alternatives: Experiment with different crusts! Try a chocolate cookie crust, a pecan sandie crust, or even a digestive biscuit crust for a unique twist.
- Flavor Variations: Add a teaspoon of lemon zest or orange zest to the filling for a citrusy kick. A swirl of caramel or chocolate sauce in the filling creates a visually stunning and delicious effect. Try incorporating some berries into the filling for a fruity cheesecake. Check out our Chocolate Chip Cheesecake Balls for a no-bake alternative.
- Preventing Cracks: The water bath is your best friend in preventing cracks. Ensure the water comes halfway up the springform pan’s sides. Don’t open the oven door during baking. Let it cool slowly in the oven with the door ajar.
- Room Temperature Ingredients: Make sure your cream cheese is at room temperature; otherwise, your filling will be lumpy.
- Don’t Overmix: Overmixing the filling incorporates too much air, which can lead to cracks. Mix until just combined.
- Gluten-Free Option: Use gluten-free graham cracker crumbs to make this cheesecake gluten-free. You could also experiment with almond flour or other gluten-free crust options.
- Vegan Option: While achieving the exact same texture and taste as a classic cheesecake is challenging, you can find excellent vegan cream cheese alternatives and experiment with vegan crust options for a dairy-free version.
Nutritional Values and Benefits of Creamy Classic Cheesecake
While cheesecake is undeniably indulgent, it’s important to understand its nutritional profile. This Creamy Classic Cheesecake recipe uses wholesome ingredients, offering some nutritional benefits.
Note: Nutritional information is an approximation and may vary depending on the specific ingredients used.
A typical serving (1/12th of the cheesecake) will contain approximately:
- Calories: Around 350-400
- Fat: Around 25-30g
- Protein: Around 5-7g
- Carbohydrates: Around 30-35g
Benefits of Key Ingredients:
- Cream Cheese: A good source of calcium and protein.
- Graham Crackers: Provide fiber and whole grains (depending on the brand).
- Sour Cream: Contains probiotics, beneficial for gut health.
- Eggs: Excellent source of protein and essential nutrients.
This Creamy Classic Cheesecake should be enjoyed in moderation as part of a balanced diet. It’s a special treat, not a daily meal. The nutritional information is provided for awareness. Always consult with a registered dietitian or healthcare professional for personalized dietary advice.
FAQs
How long does Creamy Classic Cheesecake need to chill?
Can I freeze Creamy Classic Cheesecake?
Why did my Creamy Classic Cheesecake crack?
What kind of cream cheese should I use for Creamy Classic Cheesecake?
Can I make this Creamy Classic Cheesecake ahead of time?
Conclusion
This Creamy Classic Cheesecake recipe is a testament to the beauty of simplicity. By carefully following the steps and paying attention to detail, you’ll create a dessert that’s as impressive as it is delicious. Remember the importance of using room-temperature cream cheese, creating a water bath for even baking, and letting the cheesecake cool slowly to prevent cracking. This recipe isn’t just about making a cheesecake; it’s about crafting a memorable experience. Don’t be afraid to experiment with different crusts and flavor variations to personalize your Creamy Classic Cheesecake. Share your creations with us in the comments below, and don’t forget to share this recipe with your friends and family! Happy baking!
For more delicious dessert recipes, check out our Eggnog Cream Pie or our Cream Cheese Mints. And don’t forget to pin this recipe to your Pinterest board for later!
Pin this recipe to your Pinterest board!
Creamy Classic Cheesecake
Ingredients
Equipment
Method
- Preheat oven to 350°F (175°C). Combine graham cracker crumbs, sugar, and melted butter in a medium bowl. Mix until moistened.
- Press mixture into the bottom of a 9-inch springform pan. Bake for 8-10 minutes, or until lightly golden. Cool completely.
- Beat cream cheese and sugar in a large bowl until smooth and creamy. Beat in sour cream, vanilla, and salt.
- Add eggs one at a time, beating well after each addition. Do not overmix.
- Pour filling over the cooled crust. Place the springform pan in a larger roasting pan. Pour hot water halfway up the sides of the springform pan (water bath).
- Bake for 50-60 minutes, or until set around the edges but slightly jiggly in the center. Turn off the oven; leave cheesecake in with the door slightly ajar for 1 hour.
- Remove from water bath and cool completely on a wire rack. Refrigerate for at least 4 hours, or preferably overnight.
- Run a knife around the edges before releasing the springform pan. Serve and enjoy!