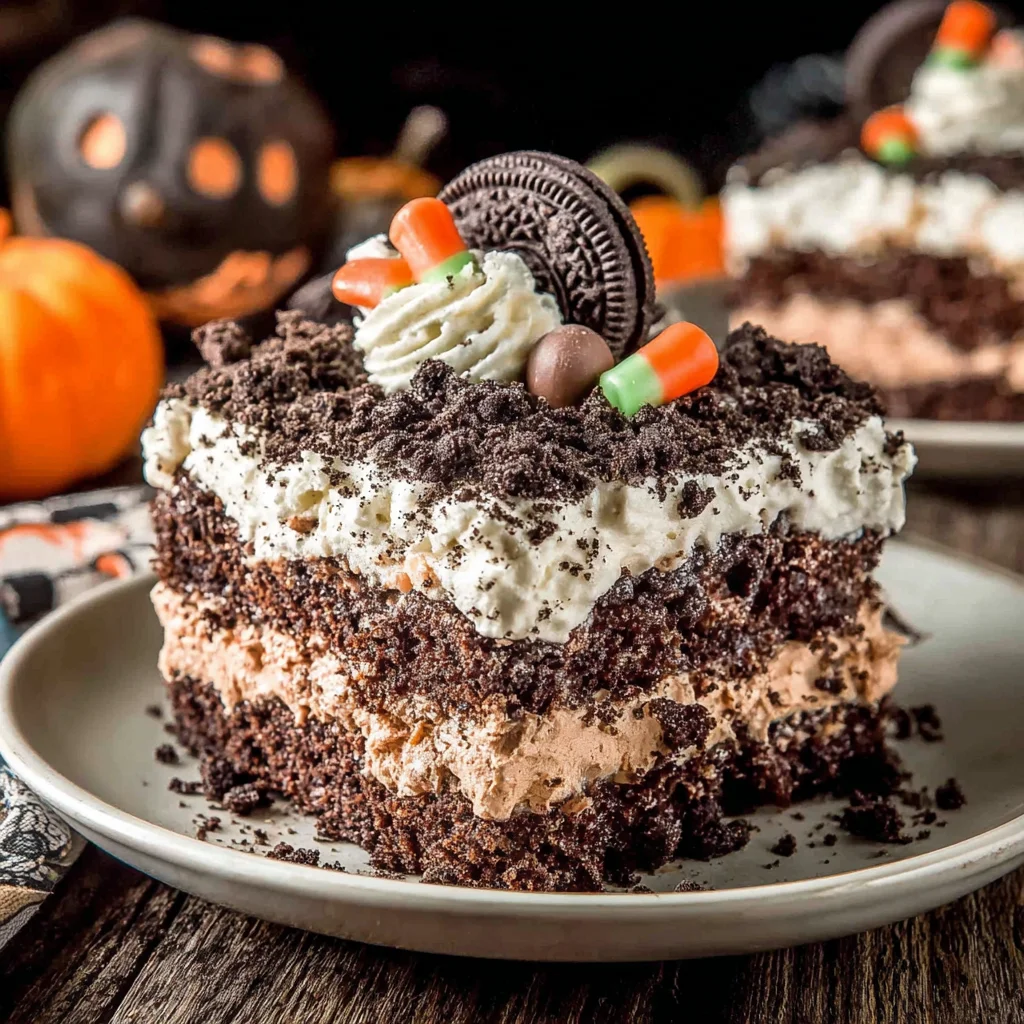
Get ready to dig into a delightfully spooky dessert that’s as fun to make as it is to eat! This Halloween Dirt Cake is the perfect combination of creamy chocolate pudding, crunchy chocolate cookie “dirt,” and wiggly gummy worms. It’s a no-bake recipe, making it incredibly easy to whip up, even for busy Halloween party planners. Forget complicated baking; this recipe delivers big on flavor and fun with minimal effort. Whether you’re hosting a Halloween party, looking for a classroom treat, or simply craving a deliciously creepy dessert, this Halloween Dirt Cake is guaranteed to be a hit with both kids and adults. Its simple elegance allows for easy customization, so feel free to get creative and personalize your creepy creation! Let’s delve into the details of this frightfully fun recipe.
Why You’ll Love This Halloween Dirt Cake Recipe
This Halloween Dirt Cake recipe isn’t just delicious; it’s a complete experience. First, there’s the undeniable appeal of its unique presentation. Who can resist a dessert that looks like a graveyard, complete with gummy worms wriggling in the “dirt”? It’s inherently fun and visually captivating, guaranteeing it will be the star of any Halloween gathering. Secondly, the no-bake aspect is a game-changer. Forget the oven and the complicated baking procedures; this dessert requires no baking skills whatsoever, making it perfect for even the most novice of bakers. You can focus on the fun elements, like decorating, rather than wrestling with oven temperatures and baking times.
Thirdly, it’s incredibly customizable. Want to add a spooky spiderweb? Go for it! Fancy some crushed Oreos for a “grassy” edge? Absolutely! The beauty of this recipe lies in its adaptability. You can tailor it to your preferences and the theme of your Halloween party, making it a truly personalized treat. Finally, the combination of creamy chocolate pudding and crunchy chocolate cookie “dirt” is simply irresistible. The textures contrast beautifully, and the rich chocolate flavor is a crowd-pleaser. This Halloween Dirt Cake is a recipe that provides instant satisfaction without compromising on taste or fun.
Why You Should Try This Halloween Dirt Cake Recipe
This recipe isn’t just a dessert; it’s an experience. Imagine the delighted gasps as your guests uncover the gummy worms lurking beneath the chocolate “dirt.” It’s the perfect conversation starter, instantly adding a touch of spooky fun to your Halloween celebrations. Beyond the visual appeal, the ease of preparation is a significant advantage. With its no-bake nature, this Halloween Dirt Cake is an excellent choice for those short on time or who prefer simpler recipes. This eliminates the stress often associated with baking complex desserts, allowing you to focus on enjoying the Halloween festivities.
Furthermore, its versatility is a key selling point. You can easily adjust the recipe to cater to dietary requirements or personal preferences. Need a gluten-free version? Swap the chocolate sandwich cookies for gluten-free equivalents. Looking for a richer chocolate flavor? Add more cocoa powder to the “dirt” mixture. The adaptable nature of this recipe ensures that everyone can enjoy a slice of this spooky delight. Finally, its delicious combination of textures and rich chocolate taste guarantees a satisfying and memorable treat. It’s the perfect balance of simple preparation and delicious results, a win-win for any Halloween party host.
Ingredients and Utensils for Your Spooktacular Halloween Dirt Cake
Gathering the ingredients for this Halloween Dirt Cake is a straightforward process. The recipe is designed to be accessible, using readily available ingredients found in most supermarkets. Let’s delve into the precise quantities and explore some recommended tools for a smoother recipe preparation.
Ingredients:
- For the “Dirt”:
- 1 package (18 ounces) chocolate sandwich cookies, finely crushed (approximately 4 cups): Choose your favorite brand! Oreos are a popular and readily available option.
- ½ cup unsweetened cocoa powder: This enhances the chocolate flavor of the “dirt” mixture. Consider using Dutch-processed cocoa powder for a richer, less acidic taste.
- ½ cup milk: Any type of milk works; whole milk will create a slightly richer “dirt”.
- ¼ cup vegetable oil: This helps bind the “dirt” mixture together.
- For the “Worms”:
- 1 package (3 ounces) gummy worms: These are the star of the show! Select brightly colored gummy worms for a more vibrant effect.
- For the Pudding:
- 1 (3.4 ounce) package instant chocolate pudding mix: Choose your preferred brand of instant chocolate pudding mix.
- 2 cups cold milk: Use cold milk as per the pudding instructions for optimal thickness.
- For the “Grass” (Optional):
- 1 cup crushed green cookies (e.g., green-colored Oreos or similar): Adds a fun, festive touch.
Utensils:
- Large bowl: For mixing the “dirt” ingredients.
- Separate bowl: For preparing the pudding.
- Whisk: For smoothly combining the pudding mix and milk.
- Measuring cups and spoons: For accurate ingredient measurements.
- Ziploc bag or food processor: For easily crushing the chocolate cookies.
- Serving glasses or trifle bowl: To layer and present your Halloween Dirt Cake. Individual glasses are perfect for portion control and make for adorable spooky treats. A large trifle bowl is ideal for sharing at a Halloween party.
- Spoon or spatula: For carefully layering the ingredients.
- Optional: Sprinkles, chocolate shavings, or other Halloween-themed candies for extra decoration.
Detailed Steps to Create Your Spooktacular Halloween Dirt Cake
Follow these step-by-step instructions to create your very own Halloween Dirt Cake, complete with creepy crawlies! This guide includes tips and tricks to enhance your dessert-making experience.
Step 1: Preparing the “Dirt”
- Place the chocolate sandwich cookies in a zip-top bag and crush them into fine crumbs using a rolling pin. Alternatively, use a food processor for faster and more even crushing.
- In a large bowl, combine the crushed cookies, cocoa powder, milk, and vegetable oil. Mix thoroughly until a moist, crumbly mixture is formed. Ensure the mixture isn’t too wet or too dry; adjust the amount of milk as needed. A slightly crumbly texture is ideal for the “dirt”.
- Set the “dirt” mixture aside while you prepare the pudding.
Step 2: Making the Creamy Chocolate Pudding
- In a separate bowl, whisk together the instant chocolate pudding mix and cold milk for approximately 2 minutes, or until the mixture is smooth and creamy. Whisk vigorously to prevent lumps.
- Let the pudding stand for 5 minutes to allow it to slightly thicken. This will prevent it from being too runny when layered.
Step 3: Assembling the Halloween Dirt Cake
- In individual serving glasses or a large trifle bowl, begin layering the ingredients. Start with a layer of chocolate pudding at the bottom.
- Add a layer of the prepared “dirt” mixture on top of the pudding.
- Repeat the layers, alternating between pudding and “dirt”, ending with a layer of “dirt”. Don’t press down too hard on the layers; let the layers maintain their texture.
Step 4: Adding the Gummy Worms
- Gently press the gummy worms into the top layer of “dirt”, creating a creepy, crawly effect. Arrange the worms strategically for optimal visual impact.
Step 5: Optional “Grass” Decoration
- If using, sprinkle the crushed green cookies around the edges of the glasses or bowl to resemble grass. This is a fun way to add a whimsical, graveyard touch to your dessert.
Step 6: Chilling and Serving
- Refrigerate your Halloween Dirt Cake for at least 30 minutes to allow the pudding to fully set and the flavors to meld together. This will improve the overall texture and taste.
- Serve chilled and enjoy this spooktacular treat!
Tips, Variations, and Troubleshooting for a Perfect Halloween Dirt Cake
Here are some extra tips and alternative versions to elevate your Halloween Dirt Cake.
Tips for Success:
- For a more intense chocolate flavor, use dark chocolate sandwich cookies.
- If your “dirt” is too dry, add a tablespoon of milk at a time until you achieve the desired consistency.
- If your “dirt” is too wet, add more crushed cookies.
- For a richer pudding, use full-fat milk instead of low-fat or skim.
- Get creative with decorations! Use chocolate chips, sprinkles, or even plastic spiders for an extra spooky touch.
- You can make this recipe ahead of time and store it in the refrigerator for up to 2 days.
Variations:
- Vegan Version: Use vegan chocolate sandwich cookies, vegan chocolate pudding mix, and plant-based milk. Ensure all your ingredients are certified vegan.
- Gluten-Free Version: Use gluten-free chocolate sandwich cookies. Many brands now offer gluten-free alternatives to Oreos and similar cookies. Double-check the ingredients list to confirm.
- Peanut Butter Version: Use peanut butter sandwich cookies for a nutty twist and substitute peanut butter pudding mix for the chocolate pudding.
- Other Worm Alternatives: Try using gummy worms with different textures or colors, or even try chocolate-covered pretzels shaped like worms.
Nutritional Values and Health Benefits of Your Halloween Dirt Cake
While this Halloween Dirt Cake is primarily a dessert, let’s explore its nutritional aspects. It’s important to note that the nutritional values will vary slightly depending on the specific brands of cookies and pudding mix used.
Approximate Nutritional Information (per serving, based on a 12-serving recipe): These values are estimates and can vary.
- Calories: Approximately 250-300
- Protein: Around 3-4 grams
- Fat: Approximately 12-15 grams
- Carbohydrates: Approximately 35-40 grams
Ingredient Benefits:
- Chocolate: Contains antioxidants, which are beneficial to health in moderation. It can also provide a mood boost, due to its effects on dopamine levels.
- Milk: A good source of calcium, which is essential for strong bones and teeth.
- Cookies: Provide energy due to their carbohydrate content (again, moderation is key).
Important Note: This Halloween Dirt Cake is a treat and should be consumed in moderation as part of a balanced diet. It’s high in sugar and fat, so it’s not a daily food item.
FAQs about Halloween Dirt Cake
FAQs
Can I make this Halloween Dirt Cake ahead of time?
Yes, you can prepare this recipe up to 2 days in advance. Store it in the refrigerator to maintain its freshness.
What can I use instead of gummy worms?
You can experiment with other candies like gummy spiders, chocolate-covered pretzels, or even small pieces of candy corn.
Is it possible to make this Halloween Dirt Cake gluten-free?
Absolutely! Just use gluten-free chocolate sandwich cookies and ensure your pudding mix is also gluten-free.
Conclusion: Embrace the Spooky Fun of Your Halloween Dirt Cake!
This Halloween Dirt Cake recipe is more than just a dessert; it’s a fun and easy way to add a spooky twist to your Halloween celebrations. Its simple preparation, delicious flavors, and customizable nature make it a perfect treat for parties, classrooms, or even a cozy night in. Remember, the key to success is using fresh ingredients, layering carefully, and letting your creativity run wild with the decorations. So gather your ingredients, put on some spooky music, and prepare to create a Halloween Dirt Cake that’s as deliciously creepy as it is fun.
Don’t forget to share your creations with us! Leave a comment below and let us know how your Halloween Dirt Cake turned out. And don’t hesitate to share this recipe with your friends and family – spread the spooky deliciousness! For more fun and easy Halloween treats, check out our other recipes on Recipes Amaya. You might also love our Peanut Butter Oat Balls for another easy no-bake option! Happy Halloween!
Spooky Halloween Dirt Cake
Ingredients
Equipment
Method
- Crush chocolate sandwich cookies into fine crumbs. You can do this in a food processor or by placing them in a ziplock bag and crushing with a rolling pin.
- In a large bowl, combine crushed cookies, cocoa powder, milk, and vegetable oil. Mix until a moist, crumbly mixture forms. This is your 'dirt'.
- In a separate bowl, whisk together the chocolate pudding mix and cold milk until smooth and creamy. Let it stand for 5 minutes to slightly thicken.
- Layer the pudding and 'dirt' mixture in individual serving glasses or a trifle bowl. Start with a layer of pudding, then a layer of 'dirt', repeating until you finish with a layer of 'dirt'.
- Gently press gummy worms into the top layer of 'dirt'.
- If using, sprinkle crushed green cookies around the edges of the glasses or bowl to resemble grass.
- Refrigerate for at least 30 minutes to allow the pudding to set completely before serving.