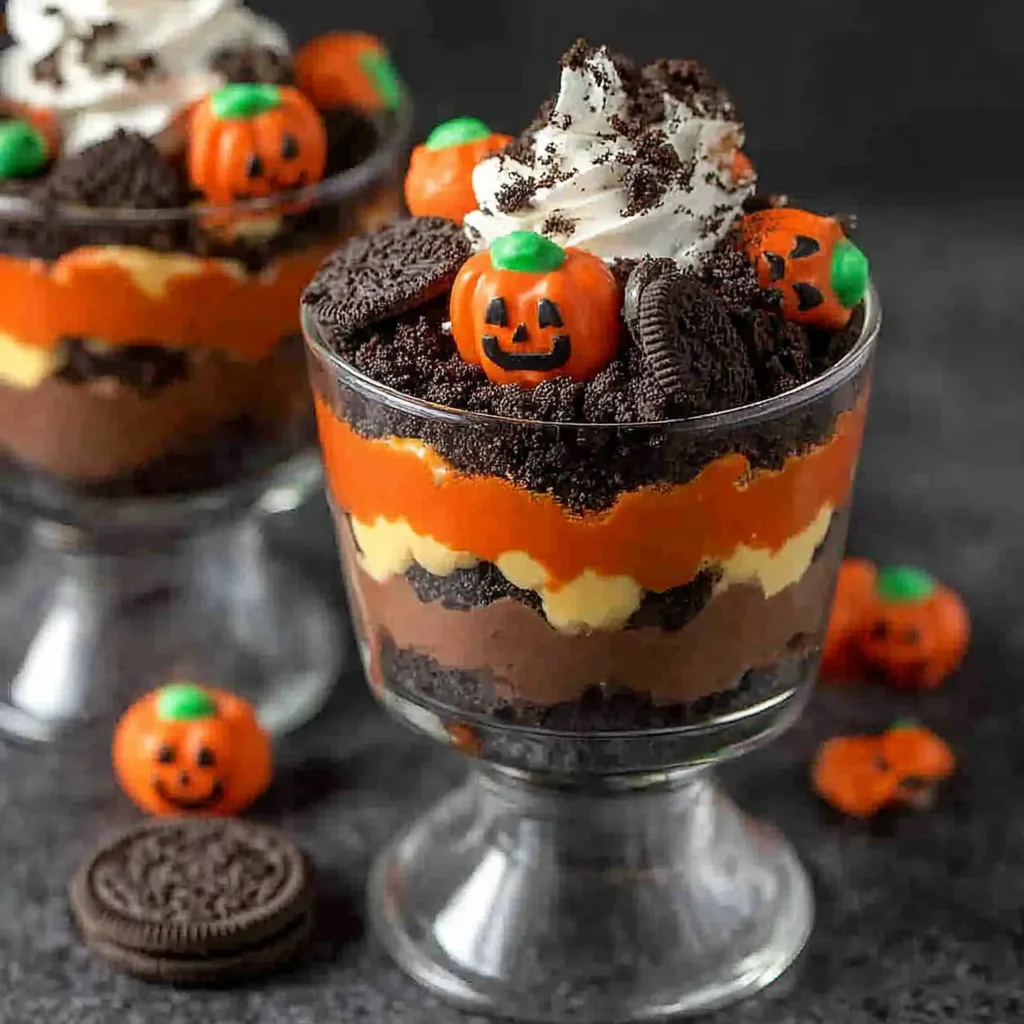
Get ready to dig into some deliciousness this Halloween with these easy-to-make Halloween Dirt Cups! These spooky treats are perfect for parties, family gatherings, or a fun after-school snack. Forget complicated baking projects; these no-bake Halloween Dirt Cups are surprisingly simple to assemble, requiring minimal cooking skills and time. The combination of crunchy chocolate cookie crumbles, creamy cream cheese frosting, and rich chocolate pudding creates a delightful textural experience that’s sure to please both kids and adults. Topped with gummy worms and plastic spiders, these Halloween Dirt Cups are the ultimate spooky-themed dessert that delivers on both taste and presentation. Whether you’re a seasoned baker or a complete beginner, this recipe is guaranteed to impress your guests and become a new Halloween tradition.
These Halloween Dirt Cups are more than just a dessert; they are a fun and engaging activity that can be enjoyed by the whole family. Get everyone involved in the assembly process, making it a memorable and collaborative experience. The customizable nature of this recipe allows you to get creative with toppings and decorations, making each cup unique and reflective of individual preferences. It’s a perfect opportunity to unleash your inner artist and create a truly memorable Halloween dessert spread. Let’s dive in and discover the magic of these delightfully creepy Halloween Dirt Cups!
Why You’ll Love This Halloween Dirt Cups Recipe
This Halloween Dirt Cups recipe is a winner for several reasons. First and foremost, it’s incredibly easy to make. No oven is required, which means less heat in the kitchen, less cleanup, and more time to enjoy the festivities. The simplicity of the recipe makes it an ideal choice for busy individuals or families with limited time. Even novice bakers can easily master this recipe, guaranteeing a delicious outcome every time. Secondly, the ingredients are readily available at most grocery stores. You likely already have many of them in your pantry, minimizing the need for extra shopping trips.
Furthermore, the customizability of Halloween Dirt Cups is a significant advantage. Feel free to experiment with different types of cookies, pudding flavors, and toppings to create your own unique variations. Add sprinkles, crushed candy canes, mini marshmallows, or even different colored gummy candies to personalize each cup. The possibilities are endless, allowing you to create a dessert that truly reflects your style and preferences. This adaptable nature makes it perfect for catering to various dietary needs or preferences as well. You can easily make adjustments to accommodate allergies or dietary restrictions.
Beyond its ease and customizability, the delicious taste is undeniably a major draw. The perfect blend of crunchy, creamy, and chocolatey flavors offers a delightful contrast that will tantalize your taste buds. The combination of textures, from the crunchy cookie base to the smooth pudding and cream cheese filling, adds another layer of enjoyment to these spooky treats. And let’s not forget the fun factor! The adorable gummy worms and plastic spiders transform these simple cups into a whimsical Halloween delight that’s guaranteed to bring smiles to everyone’s faces.
Why You Should Try This Halloween Dirt Cups Recipe
This recipe is more than just a delicious dessert; it’s an experience. It’s a chance to create something fun and festive with your family, a way to add a little extra magic to your Halloween celebrations. Imagine the delight on your children’s faces as they help assemble these spooky treats, each tiny gummy worm and spider carefully placed to perfection. This shared activity strengthens family bonds and creates lasting memories, transforming a simple dessert into a heartwarming experience. Plus, this is the perfect way to showcase your creativity and personalize your Halloween dessert spread.
Beyond the family fun, these Halloween Dirt Cups are incredibly versatile. They can be prepared in advance, making them perfect for parties and gatherings. Simply assemble the cups a day or two before and store them in the refrigerator until ready to serve. This allows you to focus on other aspects of your party preparations, reducing stress and ensuring a smooth and enjoyable event. Furthermore, the portion control is easy to manage. Individual cups make serving simple, avoiding the need for messy slicing and sharing. This is particularly useful for children’s parties or when serving a large group of guests.
Finally, the affordability of this recipe is a significant factor. The ingredients are inexpensive and readily available, making it a budget-friendly option for Halloween celebrations. Compared to other elaborate desserts, these Halloween Dirt Cups offer exceptional value for the effort and cost involved. This recipe represents a delicious and satisfying dessert without breaking the bank, allowing you to enjoy a festive treat without compromising your budget.
Ingredients and Utensils for Spooky Halloween Dirt Cups
Here’s what you need to create these delightful Halloween Dirt Cups. We’ve provided detailed information to ensure your baking success!
- Chocolate Sandwich Cookies (16 ounces): These form the base of your “dirt.” Oreos are classic, but feel free to experiment with other chocolate sandwich cookies. Look for options that are easily crushable. Secondary Keywords: Oreo cookies, chocolate cookies, sandwich cookies
- Unsalted Butter (1/2 cup or 1 stick): Melted butter acts as a binder for the cookie crumbs, creating a cohesive base. Make sure the butter is completely melted before mixing it with the cookies. Secondary Keywords: Melted butter, unsalted butter
- Cream Cheese (8 ounces): Soft, full-fat cream cheese creates the perfect creamy frosting layer. Ensure it is softened to room temperature for easier mixing. Secondary Keywords: Cream cheese frosting, softened cream cheese
- Powdered Sugar (1/2 cup): This sweetens the cream cheese frosting and gives it a light and airy texture. Gradually add the powdered sugar to achieve your desired sweetness. Secondary Keywords: Powdered sugar, icing sugar
- Vanilla Extract (1 teaspoon): A touch of vanilla enhances the flavor of the cream cheese frosting, adding warmth and depth. Pure vanilla extract is recommended for the best flavor. Secondary Keywords: Vanilla extract, pure vanilla extract
- Chocolate Pudding (1 cup): Instant chocolate pudding is convenient, but you can also use prepared chocolate pudding. Choose a brand you enjoy. Secondary Keywords: Chocolate pudding, instant pudding, prepared pudding
- Gummy Worms: These are the essential “worms” in your dirt cups, adding a fun and spooky touch. Choose your favorite brand or flavor. Secondary Keywords: Gummy worms, candy worms
- Plastic Spiders (Optional): These add an extra layer of spooky fun to your Halloween Dirt Cups. Secondary Keywords: Plastic spiders, Halloween decorations
- Chocolate Shavings (Optional): For an extra touch of elegance and chocolatey goodness. Secondary Keywords: Chocolate shavings, chocolate sprinkles
Utensils:
- Food processor or zip-top bag and rolling pin (for crushing cookies)
- Medium mixing bowl
- Rubber spatula or wooden spoon
- Measuring cups and spoons
- Small serving cups or glasses
- Spoon for layering
Detailed Steps for Making Spooky Halloween Dirt Cups
Follow these easy-to-follow steps for creating the perfect Halloween Dirt Cups:
- Crush the Cookies: Place the chocolate sandwich cookies in a food processor and pulse until finely crushed, resembling dirt. Alternatively, place the cookies in a zip-top bag and crush them using a rolling pin. Ensure the cookies are finely crushed for the best texture.
- Combine Cookie Crumbs and Butter: Add the melted butter to the crushed cookies and mix thoroughly until all crumbs are evenly moistened. This mixture should be slightly damp but not overly wet. If it seems too dry, add a teaspoon of melted butter at a time until it’s the right consistency.
- Prepare the Cream Cheese Frosting: In a medium mixing bowl, beat the softened cream cheese with the powdered sugar and vanilla extract until smooth and creamy. Ensure the cream cheese is completely softened for a smoother consistency.
- Assemble the Dirt Cups: Divide the cookie crumb mixture evenly among your serving cups or glasses. Press the crumbs down firmly to create a solid base. This will prevent the layers from mixing.
- Add the Cream Cheese Frosting: Spoon the cream cheese frosting over the cookie crumb base. Spread it evenly to create a smooth layer.
- Layer the Chocolate Pudding: Top the cream cheese frosting with a layer of chocolate pudding. You can spread it or leave it in dollops for a rustic look.
- Decorate and Serve: Add gummy worms and plastic spiders (if using) to each cup to create a spooky effect. You can also sprinkle chocolate shavings on top for an extra touch of elegance. Refrigerate for at least 30 minutes before serving to allow the layers to set.
Tips and Variations for Your Halloween Dirt Cups
Here are some helpful tips and exciting variations to personalize your Halloween Dirt Cups:
- Dietary Modifications: For a gluten-free version, use gluten-free chocolate sandwich cookies. For a vegan option, use vegan cream cheese and chocolate pudding alternatives. Be sure to check ingredient labels to ensure they are suitable for your dietary needs. Secondary Keywords: Gluten-free Halloween Dirt Cups, Vegan Halloween Dirt Cups
- Flavor Variations: Experiment with different pudding flavors like vanilla or caramel. You could even use a pumpkin spice pudding for a fall twist. Try adding different types of cookies for added flavor dimensions. Consider using different types of candies like sprinkles, chocolate chips, or crushed Oreos for extra texture and flavor.
- Presentation: Get creative with your presentation! Use different-sized cups or glasses to create visual interest. You could even add a layer of crushed graham crackers for a different texture.
- Avoiding Common Mistakes: Don’t over-crush the cookies; aim for a slightly coarse texture. Make sure the butter is completely melted and incorporated into the crumbs. Ensure the cream cheese is properly softened for easy mixing. Avoid overfilling the cups to prevent messy spills.
Nutritional Information and Health Benefits of Halloween Dirt Cups
While Halloween Dirt Cups are undeniably a treat, it’s good to be mindful of their nutritional content. A single serving (approximately 1 cup) will vary depending on the specific ingredients used, but a general estimate would include roughly 300-400 calories, 10-15 grams of fat, 40-50 grams of carbohydrates, and 4-6 grams of protein. These are just estimates, and nutritional values can change based on the brands and types of ingredients you use. For a more precise analysis, use a nutritional calculator with the exact brands of your ingredients.
Despite the treat status, some ingredients offer potential health benefits. Dairy products like cream cheese provide calcium, essential for bone health. Chocolate, in moderation, contains antioxidants that offer potential health benefits. Cookies (depending on the brand and ingredients) might contribute some fiber. However, it’s crucial to remember that these benefits are offset by the high sugar and fat content of this dessert. Therefore, enjoy Halloween Dirt Cups in moderation as part of a balanced diet.
FAQs
Can I make Halloween Dirt Cups ahead of time?
What can I substitute for Oreo cookies in Halloween Dirt Cups?
Are Halloween Dirt Cups gluten-free?
How many Halloween Dirt Cups does this recipe make?
Can I freeze Halloween Dirt Cups?
Conclusion: Embrace the Spooky Fun of Halloween Dirt Cups
These Halloween Dirt Cups are the perfect blend of ease, deliciousness, and festive fun. With minimal effort, you can create a spooky treat that will delight both children and adults. Their customizable nature allows for endless creative possibilities, making them a perfect choice for any Halloween gathering. Remember to share your creations with us! Tag us on social media with your photos, and let us know your favorite variations. Don’t forget to check out our other amazing dessert recipes on Recipesamaya.com, like our Peanut Butter Oat Balls for another no-bake delight! Happy Halloween baking!
We hope you enjoyed this recipe and found it helpful. We encourage you to leave a comment below and share your experience making these Halloween Dirt Cups. Don’t hesitate to ask any questions you may have. Happy Halloween, and happy baking! And don’t forget to share this recipe with your friends and family! You can find more delicious recipes and Halloween inspiration on our Pinterest board.
Spooky Halloween Dirt Cups
Ingredients
Equipment
Method
- Crush chocolate sandwich cookies into fine crumbs. You can do this in a food processor or by placing them in a zip-top bag and crushing with a rolling pin.
- In a mixing bowl, combine the cookie crumbs and melted butter. Mix until well combined.
- In a separate bowl, beat together the softened cream cheese, powdered sugar, and vanilla extract until smooth and creamy.
- Layer the cookie crumb mixture into small cups or glasses, pressing down firmly to create a base.
- Spoon the chocolate pudding over the cookie crumb layer.
- Top with the cream cheese mixture.
- Decorate with gummy worms, plastic spiders, and chocolate shavings (if using).
- Refrigerate for at least 30 minutes before serving to allow the flavors to meld and the pudding to set.